HP Photosmart 7520 User Guide - Page 61
SETUP cartridges, If you installed a set of regular cartridges - installation
 |
View all HP Photosmart 7520 manuals
Add to My Manuals
Save this manual to your list of manuals |
Page 61 highlights
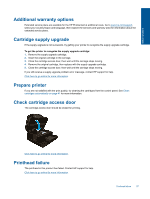
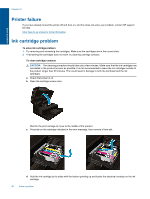
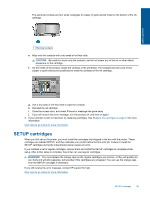
Solve a problem The electrical contacts are four small rectangles of copper or gold-colored metal on the bottom of the ink cartridge. 1 Electrical contacts e. Wipe only the contacts with a dry swab or lint-free cloth. CAUTION: Be careful to touch only the contacts, and do not smear any of the ink or other debris elsewhere on the cartridge. f. On the inside of the product, locate the contacts in the printhead. The contacts look like a set of four copper or gold-colored pins positioned to meet the contacts on the ink cartridge. g. Use a dry swab or lint-free cloth to wipe the contacts. h. Reinstall the ink cartridge. i. Close the access door, and check if the error message has gone away. j. If you still receive the error message, turn the product off, and then on again. 3. If your problem is still not resolved, try replacing cartridges. See Replace the cartridges on page 42 for more information. Click here to go online for more information. SETUP cartridges When you first set up the printer, you must install the cartridges that shipped in the box with the printer. These cartridges are labeled SETUP, and they calibrate your printer before the first print job. Failure to install the SETUP cartridges during the initial product setup causes an error. If you installed a set of regular cartridges, remove them and install the SETUP cartridges to complete printer setup. After printer setup is complete, the printer can use regular cartridges. WARNING! You must replace the orange caps on the regular cartridges you remove, or they will quickly dry out. Some ink will still evaporate, but less than if the cartridges are uncapped. You can use the orange caps from the SETUP cartridges if necessary. If you still receive the error message, contact HP support for help. Click here to go online for more information. SETUP cartridges 59
-
 1
1 -
2
-
3
-
4
-
5
-
6
-
7
-
8
-
9
-
10
-
11
-
12
-
13
-
14
-
15
-
16
-
17
-
18
-
19
-
20
-
21
-
22
-
23
-
24
-
25
-
26
-
27
-
28
-
29
-
30
-
31
-
32
-
33
-
34
-
35
-
36
-
37
-
38
-
39
-
40
-
41
-
42
-
43
-
44
-
45
-
46
-
47
-
48
-
49
-
50
-
51
-
52
-
53
-
54
-
55
-
 56
56 -
 57
57 -
 58
58 -
 59
59 -
 60
60 -
 61
61 -
 62
62 -
 63
63 -
 64
64 -
 65
65 -
 66
66 -
67
-
68
-
69
-
70
-
71
-
72
-
73
-
74
-
75
-
76
-
77
-
78
-
79
-
80
-
81
-
82
-
83
-
84
-
85
-
86
-
87
-
88
-
89
-
90
-
91
-
92
-
93
-
94
-
95
-
96
-
97
-
98
-
99
-
100
-
101
-
102
 |
 |
