HP Photosmart 7520 User Guide - Page 90
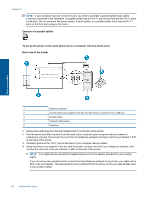
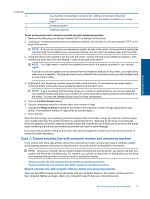
Example of a parallel splitter
 |
View all HP Photosmart 7520 manuals
Add to My Manuals
Save this manual to your list of manuals |
Page 90 highlights
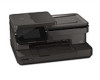
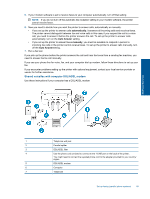
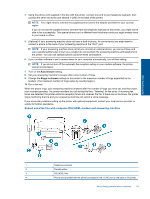
Chapter 12 NOTE: If your computer has only one phone port, you need to purchase a parallel splitter (also called a coupler), as shown in the illustration. (A parallel splitter has one RJ-11 port on the front and two RJ-11 ports on the back. Do not use a two-line phone splitter, a serial splitter, or a parallel splitter which has two RJ-11 ports on the front and a plug on the back.) Example of a parallel splitter To set up the printer on the same phone line as a computer with two phone ports Back view of the printer Additional fax setup 1 Telephone wall jack 2 Use the phone cord supplied in the box with the printer to connect to the 1-LINE port. 3 Parallel splitter 4 Computer with modem 5 Telephone 1. Remove the white plug from the port labeled 2-EXT on the back of the printer. 2. Find the phone cord that connects from the back of your computer (your computer dial-up modem) to a telephone wall jack. Disconnect the cord from the telephone wall jack and plug it into the port labeled 2-EXT on the back of the printer. 3. Connect a phone to the "OUT" port on the back of your computer dial-up modem. 4. Using the phone cord supplied in the box with the printer, connect one end to your telephone wall jack, then connect the other end to the port labeled 1-LINE on the back of the printer. NOTE: You might need to connect the supplied phone cord to the adapter provided for your country/ region. If you do not use the supplied cord to connect from the telephone wall jack to the printer, you might not be able to fax successfully. This special phone cord is different from the phone cords you might already have in your home or office. 88 Additional fax setup
-
 1
1 -
2
-
3
-
4
-
5
-
6
-
7
-
8
-
9
-
10
-
11
-
12
-
13
-
14
-
15
-
16
-
17
-
18
-
19
-
20
-
21
-
22
-
23
-
24
-
25
-
26
-
27
-
28
-
29
-
30
-
31
-
32
-
33
-
34
-
35
-
36
-
37
-
38
-
39
-
40
-
41
-
42
-
43
-
44
-
45
-
46
-
47
-
48
-
49
-
50
-
51
-
52
-
53
-
54
-
55
-
56
-
57
-
58
-
59
-
60
-
61
-
62
-
63
-
64
-
65
-
66
-
67
-
68
-
69
-
70
-
71
-
72
-
73
-
74
-
75
-
76
-
77
-
78
-
79
-
80
-
81
-
82
-
83
-
84
-
 85
85 -
 86
86 -
 87
87 -
 88
88 -
 89
89 -
 90
90 -
 91
91 -
 92
92 -
 93
93 -
 94
94 -
 95
95 -
96
-
97
-
98
-
99
-
100
-
101
-
102
 |
 |