HP Pro 3500 Maintenance & Service Guide HP Pro 3400, 3405 and 3410 Microto - Page 184
Solving Internet Access Problems
 |
View all HP Pro 3500 manuals
Add to My Manuals
Save this manual to your list of manuals |
Page 184 highlights
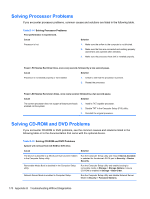
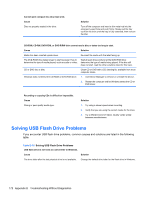
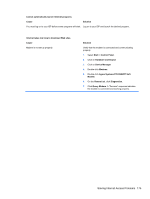
Table D-17 Solving Front Panel Component Problems (continued) A USB device, headphone, or microphone is not recognized by the computer. Cause Solution The device is not working. 1. Replace the device. 2. Restart the computer. USB ports on the computer are disabled in Computer Setup. Run the Computer Setup utility and ensure that Device available is selected for appropriate USB ports under Security > USB Security. Solving Internet Access Problems If you encounter Internet access problems, consult your Internet Service Provider (ISP) or refer to the common causes and solutions listed in the following table. Table D-18 Solving Internet Access Problems Unable to connect to the Internet. Cause Solution Internet Service Provider (ISP) account is not set up properly. Verify Internet settings or contact your ISP for assistance. Modem is not set up properly. Reconnect the modem. Verify the connections are correct using the quick setup documentation. Web browser is not set up properly. Verify that the Web browser is installed and set up to work with your ISP. Cable/DSL modem is not plugged in. Plug in cable/DSL modem. You should see a "power" LED light on the front of the cable/DSL modem. Cable/DSL service is not available or has been interrupted due to bad weather. Try connecting to the Internet at a later time or contact your ISP. (If the cable/DSL service is connected, the "cable" LED light on the front of the cable/DSL modem will be on.) The CAT5 UTP cable is disconnected. Connect the CAT5 UTP cable between the cable modem and the computers's RJ-45 connector. (If the connection is good, the "PC" LED light on the front of the cable/DSL modem will be on.) IP address is not configured properly. Contact your ISP for the correct IP address. Cookies are corrupted. (A "cookie" is a small piece of 1. information that a Web server can store temporarily with the Web browser. This is useful for having the browser 2. remember some specific information that the Web server can later retrieve.) 3. 4. Select Start > Control Panel. Click Network and Internet. Click Internet Options. In the Browsing history section on the General tab, click the Delete button. 5. Select the Cookies check box and click the Delete button. 174 Appendix D Troubleshooting Without Diagnostics
-
 1
1 -
2
-
3
-
4
-
5
-
6
-
7
-
8
-
9
-
10
-
11
-
12
-
13
-
14
-
15
-
16
-
17
-
18
-
19
-
20
-
21
-
22
-
23
-
24
-
25
-
26
-
27
-
28
-
29
-
30
-
31
-
32
-
33
-
34
-
35
-
36
-
37
-
38
-
39
-
40
-
41
-
42
-
43
-
44
-
45
-
46
-
47
-
48
-
49
-
50
-
51
-
52
-
53
-
54
-
55
-
56
-
57
-
58
-
59
-
60
-
61
-
62
-
63
-
64
-
65
-
66
-
67
-
68
-
69
-
70
-
71
-
72
-
73
-
74
-
75
-
76
-
77
-
78
-
79
-
80
-
81
-
82
-
83
-
84
-
85
-
86
-
87
-
88
-
89
-
90
-
91
-
92
-
93
-
94
-
95
-
96
-
97
-
98
-
99
-
100
-
101
-
102
-
103
-
104
-
105
-
106
-
107
-
108
-
109
-
110
-
111
-
112
-
113
-
114
-
115
-
116
-
117
-
118
-
119
-
120
-
121
-
122
-
123
-
124
-
125
-
126
-
127
-
128
-
129
-
130
-
131
-
132
-
133
-
134
-
135
-
136
-
137
-
138
-
139
-
140
-
141
-
142
-
143
-
144
-
145
-
146
-
147
-
148
-
149
-
150
-
151
-
152
-
153
-
154
-
155
-
156
-
157
-
158
-
159
-
160
-
161
-
162
-
163
-
164
-
165
-
166
-
167
-
168
-
169
-
170
-
171
-
172
-
173
-
174
-
175
-
176
-
177
-
178
-
 179
179 -
 180
180 -
 181
181 -
 182
182 -
 183
183 -
 184
184 -
 185
185 -
 186
186 -
 187
187 -
 188
188 -
 189
189 -
190
-
191
-
192
-
193
-
194
-
195
-
196
-
197
-
198
-
199
-
200
-
201
 |
 |