HP ProBook 4525s HP ProBook Notebook PC User Guide - Windows Vista - Page 74
The computer does not detect the optical drive, Start, Control Panel, System and Maintenance
 |
View all HP ProBook 4525s manuals
Add to My Manuals
Save this manual to your list of manuals |
Page 74 highlights
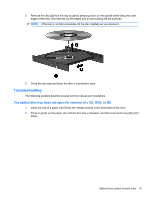
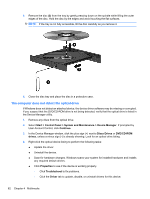
3. Remove the disc (3) from the tray by gently pressing down on the spindle while lifting the outer edges of the disc. Hold the disc by the edges and avoid touching the flat surfaces. NOTE: If the tray is not fully accessible, tilt the disc carefully as you remove it. 4. Close the disc tray and place the disc in a protective case. The computer does not detect the optical drive If Windows does not detect an attached device, the device driver software may be missing or corrupted. If you suspect that the DVD/CD-ROM drive is not being detected, verify that the optical drive is listed in the Device Manager utility. 1. Remove any discs from the optical drive. 2. Select Start > Control Panel > System and Maintenance > Device Manager. If prompted by User Account Control, click Continue. 3. In the Device Manager window, click the plus sign (+) next to Discs Drives or DVD/CD-ROM drives, unless a minus sign (-) is already showing. Look for an optical drive listing. 4. Right-click the optical device listing to perform the following tasks: ● Update the driver. ● Uninstall the device. ● Scan for hardware changes. Windows scans your system for installed hardware and installs any required default drivers. ● Click Properties to see if the device is working properly. ◦ Click Troubleshoot to fix problems. ◦ Click the Driver tab to update, disable, or uninstall drivers for this device. 62 Chapter 4 Multimedia
-
 1
1 -
2
-
3
-
4
-
5
-
6
-
7
-
8
-
9
-
10
-
11
-
12
-
13
-
14
-
15
-
16
-
17
-
18
-
19
-
20
-
21
-
22
-
23
-
24
-
25
-
26
-
27
-
28
-
29
-
30
-
31
-
32
-
33
-
34
-
35
-
36
-
37
-
38
-
39
-
40
-
41
-
42
-
43
-
44
-
45
-
46
-
47
-
48
-
49
-
50
-
51
-
52
-
53
-
54
-
55
-
56
-
57
-
58
-
59
-
60
-
61
-
62
-
63
-
64
-
65
-
66
-
67
-
68
-
 69
69 -
 70
70 -
 71
71 -
 72
72 -
 73
73 -
 74
74 -
 75
75 -
 76
76 -
 77
77 -
 78
78 -
 79
79 -
80
-
81
-
82
-
83
-
84
-
85
-
86
-
87
-
88
-
89
-
90
-
91
-
92
-
93
-
94
-
95
-
96
-
97
-
98
-
99
-
100
-
101
-
102
-
103
-
104
-
105
-
106
-
107
-
108
-
109
-
110
-
111
-
112
-
113
-
114
-
115
-
116
-
117
-
118
-
119
-
120
-
121
-
122
-
123
-
124
-
125
-
126
-
127
-
128
-
129
-
130
-
131
-
132
-
133
-
134
-
135
-
136
-
137
-
138
-
139
-
140
-
141
-
142
-
143
-
144
-
145
-
146
-
147
-
148
-
149
-
150
-
151
-
152
-
153
-
154
-
155
-
156
-
157
-
158
-
159
-
160
-
161
-
162
-
163
-
164
-
165
-
166
-
167
-
168
-
169
-
170
-
171
-
172
-
173
-
174
-
175
-
176
-
177
-
178
-
179
-
180
-
181
-
182
-
183
-
184
-
185
-
186
-
187
-
188
-
189
-
190
-
191
-
192
 |
 |
