HP ProBook 4525s HP ProBook Notebook PC User Guide - Windows Vista - Page 79
Webcam, Webcam tips, Adjusting webcam properties, Start, All Programs, ArcSoft TotalMedia Suite - reader not detected
 |
View all HP ProBook 4525s manuals
Add to My Manuals
Save this manual to your list of manuals |
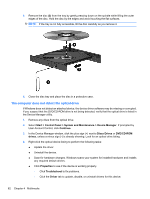
Page 79 highlights
Webcam NOTE: This section describes features that are common to most models. Some features may not be available on your computer. Your computer includes an integrated webcam, located at the top of the display. With the preinstalled software, you can use the webcam to take a photo, record a video, or make an audio recording. You can preview the photo, video recording, or audio recording, and save it on your computer hard drive. To access the webcam and software, select Start > All Programs > ArcSoft TotalMedia Suite > WebCam Companion. The webcam software enables you to experiment with the following features: ● Video-Record and play back webcam video. ● Audio-Record and play back audio. ● Streaming video-Use with instant message software solutions that support UVC (Universal Video Class) cameras. ● Snapshots-Take still photos. ● HP Business Card Reader (select models only)-Use to transform business cards into a usable database of contact information. Webcam tips For optimum performance, observe the following guidelines while using the webcam: ● Be sure that you have the latest version of an instant message program before starting a video conversation. ● The webcam may not work properly across some network firewalls. NOTE: If you are having trouble viewing or sending multimedia files to someone on another LAN or outside your network firewall, temporarily disable the firewall, perform the task you want to perform, and then reenable the firewall. To permanently resolve the problem, reconfigure the firewall as necessary, and adjust the policies and settings of other intrusion detection systems. For additional information, contact your network administrator or IT department. ● Whenever possible, place bright light sources behind the webcam and out of the picture area. NOTE: For details about using your webcam, click the Help menu in the webcam software Help. Adjusting webcam properties You can adjust webcam properties using the Properties dialog box, which is accessible from various programs that use the integrated webcam, usually from a configuration, settings, or properties menu: ● Brightness-Controls the amount of light that is incorporated into the image. A higher brightness setting creates a brighter image; a lower brightness setting creates a darker image. ● Contrast-Controls the difference between lighter and darker areas on the image. A higher contrast setting intensifies the image; a lower contrast setting maintains more of the original information's dynamic range, but leads to a flatter image. Webcam 67
-
 1
1 -
2
-
3
-
4
-
5
-
6
-
7
-
8
-
9
-
10
-
11
-
12
-
13
-
14
-
15
-
16
-
17
-
18
-
19
-
20
-
21
-
22
-
23
-
24
-
25
-
26
-
27
-
28
-
29
-
30
-
31
-
32
-
33
-
34
-
35
-
36
-
37
-
38
-
39
-
40
-
41
-
42
-
43
-
44
-
45
-
46
-
47
-
48
-
49
-
50
-
51
-
52
-
53
-
54
-
55
-
56
-
57
-
58
-
59
-
60
-
61
-
62
-
63
-
64
-
65
-
66
-
67
-
68
-
69
-
70
-
71
-
72
-
73
-
 74
74 -
 75
75 -
 76
76 -
 77
77 -
 78
78 -
 79
79 -
 80
80 -
 81
81 -
 82
82 -
 83
83 -
 84
84 -
85
-
86
-
87
-
88
-
89
-
90
-
91
-
92
-
93
-
94
-
95
-
96
-
97
-
98
-
99
-
100
-
101
-
102
-
103
-
104
-
105
-
106
-
107
-
108
-
109
-
110
-
111
-
112
-
113
-
114
-
115
-
116
-
117
-
118
-
119
-
120
-
121
-
122
-
123
-
124
-
125
-
126
-
127
-
128
-
129
-
130
-
131
-
132
-
133
-
134
-
135
-
136
-
137
-
138
-
139
-
140
-
141
-
142
-
143
-
144
-
145
-
146
-
147
-
148
-
149
-
150
-
151
-
152
-
153
-
154
-
155
-
156
-
157
-
158
-
159
-
160
-
161
-
162
-
163
-
164
-
165
-
166
-
167
-
168
-
169
-
170
-
171
-
172
-
173
-
174
-
175
-
176
-
177
-
178
-
179
-
180
-
181
-
182
-
183
-
184
-
185
-
186
-
187
-
188
-
189
-
190
-
191
-
192
 |
 |