HP StorageWorks 2/16V HP StorageWorks SAN Switch 2/8V, 2/16V, 2/16N and 4/32 I - Page 48
Installing the switch into a rack (HP 10, 000 series rack)
 |
View all HP StorageWorks 2/16V manuals
Add to My Manuals
Save this manual to your list of manuals |
Page 48 highlights
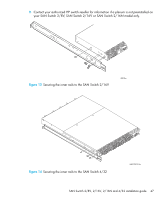
10.Insert the switch with the attached inner rails into the outer rails. Please note this step (#10), applies to both the HP 10,000 series and System/e racks. NOTE: Note that the SAN Switch mounts in the rack with its front, the port side, facing the back of the rack. The rear of the switch, the AC side, faces the front of the rack. Figure 15 Installing the switch into a rack (HP 10,000 series rack) 48 Installing and configuring
-
 1
1 -
2
-
3
-
4
-
5
-
6
-
7
-
8
-
9
-
10
-
11
-
12
-
13
-
14
-
15
-
16
-
17
-
18
-
19
-
20
-
21
-
22
-
23
-
24
-
25
-
26
-
27
-
28
-
29
-
30
-
31
-
32
-
33
-
34
-
35
-
36
-
37
-
38
-
39
-
40
-
41
-
42
-
 43
43 -
 44
44 -
 45
45 -
 46
46 -
 47
47 -
 48
48 -
 49
49 -
 50
50 -
 51
51 -
 52
52 -
 53
53 -
54
-
55
-
56
-
57
-
58
-
59
-
60
-
61
-
62
-
63
-
64
-
65
-
66
-
67
-
68
-
69
-
70
-
71
-
72
-
73
-
74
-
75
-
76
-
77
-
78
-
79
-
80
-
81
-
82
-
83
-
84
-
85
-
86
-
87
-
88
-
89
-
90
-
91
-
92
-
93
-
94
-
95
-
96
-
97
-
98
-
99
-
100
-
101
-
102
-
103
-
104
-
105
-
106
-
107
-
108
-
109
-
110
-
111
-
112
-
113
-
114
-
115
-
116
-
117
-
118
-
119
-
120
-
121
-
122
-
123
-
124
-
125
-
126
 |
 |

Installing and configuring
48
10.
Insert the switch with the attached inner rails into the outer rails. Please note this step (#10),
applies to both the HP 10,000 series and System/e racks.
NOTE:
Note that the SAN Switch mounts in the rack with its front, the port side, facing the
back of the rack. The rear of the switch, the AC side, faces the front of the rack.
Figure 15
Installing the switch into a rack (HP 10,000 series rack)