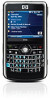
HP iPAQ 912c HP iPAQ 900 Business Messenger Series - Product Guide (Version 2)
HP iPAQ 912c - Business Messenger Manual
 |
View all HP iPAQ 912c manuals
Add to My Manuals
Save this manual to your list of manuals |
HP iPAQ 912c manual content summary:
- HP iPAQ 912c | HP iPAQ 900 Business Messenger Series - Product Guide (Version 2) - Page 1
HP iPAQ 900 Series Product Guide - HP iPAQ 912c | HP iPAQ 900 Business Messenger Series - Product Guide (Version 2) - Page 2
© Copyright 2008 Hewlett-Packard Development Company, L.P. HP iPAQ products are powered by Microsoft® Windows Mobile® 6.1 Professional with Messaging and Security Feature Pack. Microsoft Windows, the Windows logo, Outlook, Windows Mobile Device Center, and ActiveSync are trademarks of Microsoft - HP iPAQ 912c | HP iPAQ 900 Business Messenger Series - Product Guide (Version 2) - Page 3
side components ...5 Back panel components ...6 4 Set up your HP iPAQ Step 1: Remove the battery cover and insert the SIM card 7 Step 2: Install the battery and replace the battery cover 8 Step 3: Charge the battery ...9 Step 4: Turn on your HP iPAQ ...9 Find the serial and model number 10 Status - HP iPAQ 912c | HP iPAQ 900 Business Messenger Series - Product Guide (Version 2) - Page 4
Protect your HP iPAQ with a password 18 Using device lock ...19 Battery saving tips ...19 6 Use your Business Messenger Use the Keyboard ...21 Answer/Send key Change the SIM PIN ...28 Change service settings ...29 Change phone service settings 29 Forward calls 29 Call waiting 29 Configure caller ID - HP iPAQ 912c | HP iPAQ 900 Business Messenger Series - Product Guide (Version 2) - Page 5
HAC support 36 Voice notes ...36 Create voice notes ...36 Delete voice notes ...37 Listen to voice notes ...37 Rename voice notes ...37 Configure channels ...37 Notes ...38 Write a note ...38 Create a copy of a note 38 Reset your HP iPAQ ...38 Perform a Hard Reset 39 Perform a Factory Reset 39 - HP iPAQ 912c | HP iPAQ 900 Business Messenger Series - Product Guide (Version 2) - Page 6
software ...50 Copy files ...50 Migrate data from Palm Desktop to Microsoft Windows Mobile 6.1 51 Wireless synchronization cost saving tips 52 Troubleshoot e-mail ...59 Create a new POP3 or IMAP4 account 59 Change e-mail download options 60 Delete an account 61 Text messaging ...61 MMS ...61 MMS - HP iPAQ 912c | HP iPAQ 900 Business Messenger Series - Product Guide (Version 2) - Page 7
Compose and send messages 64 Reply or forward a message 65 Add an attachment to a message 65 Download messages ...65 Download messages from a server 65 Install an online address book ...66 12 Calendar Access calendar ...67 Change the display of the work week 67 Set a default - HP iPAQ 912c | HP iPAQ 900 Business Messenger Series - Product Guide (Version 2) - Page 8
91 Download the HP iPAQ GPS QK Position Data File 91 Verify Compatibility With Your HP iPAQ 91 Configure and Manage My GPS Software to Connect to My HP iPAQ's GPS Receiver Automatically ...92 Identify the COM Port for My GPS Receiver 92 Improve a Slow GPS Connection 92 Troubleshoot Frequent GPS - HP iPAQ 912c | HP iPAQ 900 Business Messenger Series - Product Guide (Version 2) - Page 9
HP Help and Support ...94 HP VoiceReply ...94 HP iPAQ Setup Assistant 95 HP iPAQ DataConnect 96 HP Photosmart Mobile 96 View pictures stored on your HP iPAQ or a storage card 97 Attach a voice note to a picture 97 Print using Storage Card 97 View a slideshow 98 E-mail pictures 98 Associate a - HP iPAQ 912c | HP iPAQ 900 Business Messenger Series - Product Guide (Version 2) - Page 10
a laptop using a USB data connection 111 To connect to a laptop using Bluetooth data connection 112 Pocket Internet Explorer ...113 Windows Live ...113 SMS 122 France ...122 Italy ...122 Battery Warning ...122 Battery Recycling ...122 Battery Disposal ...122 Chemical substances ...122 Disposal - HP iPAQ 912c | HP iPAQ 900 Business Messenger Series - Product Guide (Version 2) - Page 11
phone call 137 How can I improve the standby time and talk time on my HP iPAQ 137 Why does the HP iPAQ operate slowly sometimes 138 I have trouble charging my battery. What should I do 138 I am unable to synchronize my HP iPAQ with my computer. What should I do 138 Which factors degrade the GPS - HP iPAQ 912c | HP iPAQ 900 Business Messenger Series - Product Guide (Version 2) - Page 12
Cleaning your HP iPAQ ...143 Carrying or storing your HP iPAQ 143 Use accessories ...143 23 Quick reference Acronyms ...144 Icons used ...145 Index ...148 xii - HP iPAQ 912c | HP iPAQ 900 Business Messenger Series - Product Guide (Version 2) - Page 13
register your HP iPAQ with Hewlett-Packard to be able to perform the following tasks: ● Access support and services, and get the most out of your HP products. ● Manage your profile. ● Sign up for free support alerts, software updates, and personalized newsletters. Visit http://www.register.hp.com to - HP iPAQ 912c | HP iPAQ 900 Business Messenger Series - Product Guide (Version 2) - Page 14
iPAQ 900 Series Business Messenger (2) Stylus NOTE: The stylus is located on the back panel at the bottom-left corner of your HP iPAQ. (3) 1940 mAh Li-polymer removable/rechargeable battery (4) Getting Started CD with additional software (5) Getting Started Guide (6) Wired stereo headset - HP iPAQ 912c | HP iPAQ 900 Business Messenger Series - Product Guide (Version 2) - Page 15
Know the different components of your HP iPAQ. NOTE: Not all models or features are Windows Key Function Use to view the on-screen contents. Use the stylus to select items, navigate menus, change feature settings, and play games. Press to launch Contacts from the Today screen. Press to end a phone - HP iPAQ 912c | HP iPAQ 900 Business Messenger Series - Product Guide (Version 2) - Page 16
to listen to phone calls, sounds, and notifications. (1) (3) (2) Component (1) (2) (3) Description External GPS Antenna Connector Reset Power Key Function Use to attach an external GPS antenna. Use to soft reset your HP iPAQ. Press and hold to turn your HP iPAQ on or off. NOTE: Press once to - HP iPAQ 912c | HP iPAQ 900 Business Messenger Series - Product Guide (Version 2) - Page 17
and confirm your selection. Press to confirm your selection. Use to launch the camera and capture photos. Use to connect the mini-USB charging/synchronization cable. NOTE: You need to open the protective flap to access the slot. Insert a Micro Secure Digital (MicroSD) storage card with the label - HP iPAQ 912c | HP iPAQ 900 Business Messenger Series - Product Guide (Version 2) - Page 18
view it on your HP iPAQ screen before capturing the photo. Detects Wi-Fi signals. NOTE: This component will not be visible externally. Use the speaker to listen to music or as a speakerphone to converse when driving or otherwise occupied. Remove to insert or remove the battery and/or the SIM card - HP iPAQ 912c | HP iPAQ 900 Business Messenger Series - Product Guide (Version 2) - Page 19
4 Set up your HP iPAQ Step 1: Remove the battery cover and insert the SIM card 1. Slide the cover down and away from the HP iPAQ. 2. Align the SIM card over the SIM card slot. Step 1: Remove the battery cover and insert the SIM card 7 - HP iPAQ 912c | HP iPAQ 900 Business Messenger Series - Product Guide (Version 2) - Page 20
the battery is already installed, remove it before inserting the SIM card. The SIM card is provided by a mobile phone service provider. Also, make sure that the metal contacts are facing down and the notched corner is in the correct position. If the SIM card is not properly inserted in the HP iPAQ - HP iPAQ 912c | HP iPAQ 900 Business Messenger Series - Product Guide (Version 2) - Page 21
battery by connecting your HP iPAQ to a USB port on your computer using the mini-USB synchronization cable. To enable USB charging on your HP iPAQ, tap Start > Settings > System > Power > USB Charging. On the Power screen, select the Use USB Charging check box. NOTE: Whenever a replacement battery - HP iPAQ 912c | HP iPAQ 900 Business Messenger Series - Product Guide (Version 2) - Page 22
by tapping Start > HP Help and Support > Serial and Model Numbers. Alternatively, to locate the serial and model number: 1. Remove the battery cover. 2. Remove the battery from your HP iPAQ. 3. Locate the label containing the product ID and serial number on the HP iPAQ. NOTE: Tap Start > Settings - HP iPAQ 912c | HP iPAQ 900 Business Messenger Series - Product Guide (Version 2) - Page 23
Status Bluetooth stereo headset detected General Packet Radio Service (GPRS) available GPRS connecting Enhanced Data Rates for GSM Evolution (EDGE) available EDGE connecting GSM service only Radio off 3G connecting High Speed Download Packet Access (HSDPA) service available HSDPA in use TTY - HP iPAQ 912c | HP iPAQ 900 Business Messenger Series - Product Guide (Version 2) - Page 24
with your HP iPAQ by learning top of the Today screen, connectivity icons, volume indicator, battery indicator, and clock are displayed. To customize the Today screen item to select it, and then tap Move Up or Move Down. NOTE: There are two default softkeys at the bottom of the Today screen: - HP iPAQ 912c | HP iPAQ 900 Business Messenger Series - Product Guide (Version 2) - Page 25
convert your writing into typed text. NOTE: This feature might not be ABC 123 Description Press a text-entry key on the keyboard to enter the desired character. Enter numbers and symbols using this mode. Customize your HP iPAQ HP iPAQ can be returned to you if it is lost. Customize your HP iPAQ 13 - HP iPAQ 912c | HP iPAQ 900 Business Messenger Series - Product Guide (Version 2) - Page 26
the system volume slider on the screen using the stylus or the scroll wheel of your HP iPAQ to the required volume level. 3. To mute system sounds, tap Off. You can also a flashing light. NOTE: Turning off sounds and the LED notification helps conserve battery power. 14 Chapter 5 Learn the basics - HP iPAQ 912c | HP iPAQ 900 Business Messenger Series - Product Guide (Version 2) - Page 27
HP iPAQ stays on when using battery power or AC power. Customize screen settings You can customize your HP iPAQ screen settings. You can correct screen tap and alignment problems Move the slider on the screen to set the required text size. NOTE: The default text size is set to large. 3. Tap ok. Dim - HP iPAQ 912c | HP iPAQ 900 Business Messenger Series - Product Guide (Version 2) - Page 28
: 1. Use the WMDC or ActiveSync (WMDC for Windows Vista and ActiveSync for Windows XP) to connect your HP iPAQ to your computer. 2. Follow the instructions in the installation wizard provided with the program you want to install. 3. Check the screen of your HP iPAQ to see if any further steps are - HP iPAQ 912c | HP iPAQ 900 Business Messenger Series - Product Guide (Version 2) - Page 29
Menu > Edit > Categories. NOTE: To assign a category to a contact, the contact needs to be saved in the phone memory. ● For a new item Business, Holiday, Personal, or Seasonal) and then tap ok to assign the category. 4. Tap ok to return to the appointment, task, or contact. Customize your HP iPAQ - HP iPAQ 912c | HP iPAQ 900 Business Messenger Series - Product Guide (Version 2) - Page 30
NOTE: To create . 5. Tap ok and when prompted, tap Yes. The next time your HP iPAQ is unused for the specified amount of time, you are prompted to enter your password. TIP: Use the same steps as above to change or reset your - HP iPAQ 912c | HP iPAQ 900 Business Messenger Series - Product Guide (Version 2) - Page 31
conserve battery life: ● Connect to AC power - Leave your HP iPAQ connected to AC power at all possible times when not using it. HP also offers a variety of accessories to keep your HP iPAQ charged when you are out of the office for extended time periods. These include the mini-USB synchronization - HP iPAQ 912c | HP iPAQ 900 Business Messenger Series - Product Guide (Version 2) - Page 32
WARNING! Removing the battery from your HP iPAQ before turning it off might corrupt data on your HP iPAQ. 20 Chapter 5 Learn the basics - HP iPAQ 912c | HP iPAQ 900 Business Messenger Series - Product Guide (Version 2) - Page 33
6 Use your Business Messenger Use the Keyboard Answer/Send key Press the (Answer/Send) key to access the Dialer screen as well as make and receive calls. End key Press the (End) key to end a call and quit the Dialer screen. You can press this key to wake up your HP iPAQ from the suspend - HP iPAQ 912c | HP iPAQ 900 Business Messenger Series - Product Guide (Version 2) - Page 34
connection and signal strength When you slide your SIM card into your HP iPAQ, your unit automatically connects to your mobile phone service provider's network. The (Signal strength) icon indicates that you are keyboard, and then pressing the (Enter) key. 22 Chapter 6 Use your Business Messenger - HP iPAQ 912c | HP iPAQ 900 Business Messenger Series - Product Guide (Version 2) - Page 35
phone stops ringing, the caller might be sent to Voice mail, depending on the settings provided by your mobile phone service . As you enter a contact's name, the HP iPAQ searches the Contacts, Call History, Speed Dial lists to enter the contact name. 2. In case there is more than one contact with the - HP iPAQ 912c | HP iPAQ 900 Business Messenger Series - Product Guide (Version 2) - Page 36
and/or the HP iPAQ. Your service provider programs one or more emergency phone numbers, such as 911 or 112, which you can call under any circumstances, even when your HP iPAQ is locked or the SIM card is not inserted. To dial an emergency number: 1. Press the (Answer/Send) key. NOTE: You need to - HP iPAQ 912c | HP iPAQ 900 Business Messenger Series - Product Guide (Version 2) - Page 37
time includes busy signals and ringing. The amount of network connection time you track on your reset timer might not equal the amount of time for which you are billed by your service provider. For billing information, please contact your service provider. NOTE: Your HP iPAQ is preconfigured for - HP iPAQ 912c | HP iPAQ 900 Business Messenger Series - Product Guide (Version 2) - Page 38
the phone number: 1. Press the (Answer/Send) key. 2. On the Dialer screen, tap and hold 0 until the plus (+) sign displays. 3. Enter the country code and phone number. NOTE: You can also insert a plus (+) sign into a contact's phone number for quick dialing. 26 Chapter 6 Use your Business Messenger - HP iPAQ 912c | HP iPAQ 900 Business Messenger Series - Product Guide (Version 2) - Page 39
Call History. 3. Tap the phone number of the contact to view NOTE: You can also launch the Voice Commander by pressing the hook switch on your HP iPAQ headset. To Call a contact saved in the contact list Call the last number dialed Say Call followed by the name of the contact and home/work/ mobile - HP iPAQ 912c | HP iPAQ 900 Business Messenger Series - Product Guide (Version 2) - Page 40
. To enter a PIN before you make calls, check Require PIN when phone is used. NOTE: Emergency calls can be placed at any time, without entering a PIN. To remove the SIM PIN: 1. Enter the PIN to access your HP iPAQ. 2. Press (Answer/Send) key on the keyboard. 28 Chapter 6 Use your Business Messenger - HP iPAQ 912c | HP iPAQ 900 Business Messenger Series - Product Guide (Version 2) - Page 41
phone is used check box and tap ok. Change service settings Change phone service settings Once your phone service is set up through your mobile phone service provider, you can change service settings on your HP iPAQ - phone cannot be answered. ● Unavailable - phone is off. ● Busy - line is busy. 6. - HP iPAQ 912c | HP iPAQ 900 Business Messenger Series - Product Guide (Version 2) - Page 42
certain numbers, you can block the numbers on your HP iPAQ. To block calls: 1. Press the (Answer/Send) key. 2. Tap Menu > Options... > Services. 3. Tap Call Barring > Get Settings... 4. or text message phone numbers, contact your mobile phone service provider. 30 Chapter 6 Use your Business Messenger - HP iPAQ 912c | HP iPAQ 900 Business Messenger Series - Product Guide (Version 2) - Page 43
> Network. 2. Select the network setting options you want to change. NOTE: Some of these services might not be available, please contact your service provider for more details. The current phone network your HP iPAQ is using is listed at the top of the screen and remains active until you change - HP iPAQ 912c | HP iPAQ 900 Business Messenger Series - Product Guide (Version 2) - Page 44
name or the phone number you were connected to when writing the note. Select a frequency band automatically Your HP iPAQ has an integrated GSM/GPRS/EDGE feature that supports four different frequency bands (850/900/1800/1900) for international roaming. Your HP iPAQ also supports WCDMA/HSDPA in three - HP iPAQ 912c | HP iPAQ 900 Business Messenger Series - Product Guide (Version 2) - Page 45
NOTE: Your HP iPAQ might take several minutes, depending on the environment, to connect to the network for the first time when roaming in another country. To avoid problems once you are out of the country, follow these tips before you leave: ● Visit your mobile phone service provider's Web site to - HP iPAQ 912c | HP iPAQ 900 Business Messenger Series - Product Guide (Version 2) - Page 46
developing products, services, and information that are accessible to everyone, including people with disabilities or age-related limitations. For more information, visit http://www.hp.com/accessibility. Enable TTY support NOTE: Before enabling TTY support on the HP iPAQ, connect a headset into the - HP iPAQ 912c | HP iPAQ 900 Business Messenger Series - Product Guide (Version 2) - Page 47
can also disable TTY by tapping Start > Settings > Personal > Phone > TTY. 3. Select the Disable HAC & TTY option. 4. Tap ok. NOTE: If you plan to use the HP iPAQ in both normal and (TTY) audio mode, HP recommends disabling TTY support when the HP iPAQ is not being used for TTY to allow the special - HP iPAQ 912c | HP iPAQ 900 Business Messenger Series - Product Guide (Version 2) - Page 48
Create or open a note, and then tap the (Record) icon. NOTE: If the Recording toolbar does not appear, tap Menu > View Recording Toolbar. 3. Speak into the microphone. 4. When you have finished recording the note, tap the (Stop) icon on the Recording toolbar. 36 Chapter 6 Use your Business Messenger - HP iPAQ 912c | HP iPAQ 900 Business Messenger Series - Product Guide (Version 2) - Page 49
2. Tap and hold the note to rename. 3. Tap Rename/Move. 4. Enter the new name in the Name box. 5. Tap ok. Configure channels Enable this feature to receive real-time news and information such as traffic news and weather reports. Check with your mobile phone service provider for availability in your - HP iPAQ 912c | HP iPAQ 900 Business Messenger Series - Product Guide (Version 2) - Page 50
the contents in a new note, a copy of the note displays in the note list. Reset your HP iPAQ You might need to reset your HP iPAQ if it does not respond to your pressing a button or tapping on the screen. The three types of resets are soft, hard, and clean. 38 Chapter 6 Use your Business Messenger - HP iPAQ 912c | HP iPAQ 900 Business Messenger Series - Product Guide (Version 2) - Page 51
before performing a hard reset. NOTE: You can also use these steps to perform a soft reset. To perform a hard reset: 1. Locate the recessed Reset button at the top of your HP iPAQ. 2. Use the stylus to lightly press the Reset button. 3. Release the Reset button. The HP iPAQ resets and powers on - HP iPAQ 912c | HP iPAQ 900 Business Messenger Series - Product Guide (Version 2) - Page 52
The HP iPAQ restarts and powers on. CAUTION: If you perform a factory reset, you will lose all the data stored on your HP iPAQ, except the data in iPAQ File Store. 40 Chapter 6 Use your Business Messenger - HP iPAQ 912c | HP iPAQ 900 Business Messenger Series - Product Guide (Version 2) - Page 53
all models. Use the camera Use the built-in camera on your HP iPAQ to capture and view photos. Capture photos You can capture photos and store them in your HP iPAQ or storage card. NOTE: You cannot use the camera if the battery power is less than 20%. To capture photos: 1. Press the Camera key - HP iPAQ 912c | HP iPAQ 900 Business Messenger Series - Product Guide (Version 2) - Page 54
rectangle with your object and press the Camera key located on the right-hand side of your HP iPAQ. When the focus rectangle turns green, press the Camera key again to capture the photo. NOTE: This is the default mode for capturing photos. ◦ Timer - Use this mode to capture self portraits. After - HP iPAQ 912c | HP iPAQ 900 Business Messenger Series - Product Guide (Version 2) - Page 55
device. The storage devices available are phone memory and external storage card. Flash Mobile - Tap to launch HP Photosmart Mobile to view the captured photos. Video - Tap to switch to the camera mode. Settings - Tap to change the settings. Zoom - Move the slider to zoom out or zoom in. NOTE - HP iPAQ 912c | HP iPAQ 900 Business Messenger Series - Product Guide (Version 2) - Page 56
radio is turned on for the first time, the HP iPAQ DataConnect application detects the mobile phone service provider and automatically populates the MMS settings on the HP iPAQ. NOTE: You need a data-enabled SIM installed in your HP iPAQ. To transfer pictures using MMS: 1. Press the (Messaging - HP iPAQ 912c | HP iPAQ 900 Business Messenger Series - Product Guide (Version 2) - Page 57
5. Tap Next. 6. Select the device and tap Tap to send. NOTE: Your Bluetooth connection should be switched on to transfer images. Transfer images 45 - HP iPAQ 912c | HP iPAQ 900 Business Messenger Series - Product Guide (Version 2) - Page 58
for: ● Expanding the memory of your HP iPAQ ● Storing pictures, video clips, music, and applications NOTE: Storage cards are not included with your HP iPAQ, and must be purchased separately. For more information about storage cards, visit http://www.hp.com/go/ipaqaccessories. Insert a storage card - HP iPAQ 912c | HP iPAQ 900 Business Messenger Series - Product Guide (Version 2) - Page 59
protecting the storage card slot. If you have trouble inserting a storage card, try the following: ● Make sure you are not inserting the card at an angle. ● Make sure you are inserting the metal area first and it should face the rear of the HP iPAQ. Remove a storage card To remove a MicroSD storage - HP iPAQ 912c | HP iPAQ 900 Business Messenger Series - Product Guide (Version 2) - Page 60
4. Push the card in the slot to unlock the card. 5. Remove the storage card from the storage card slot. 6. Close the cover protecting the storage card slot. View contents of a storage card Use File Explorer to view the files that are located on your optional storage card. To view contents of a - HP iPAQ 912c | HP iPAQ 900 Business Messenger Series - Product Guide (Version 2) - Page 61
If the HP iPAQ does not recognize your storage card, try the following: ● Install any drivers that came with the storage card. ● Reset the HP iPAQ by using the stylus to lightly press the Reset button. NOTE: Make sure that you save your data before you reset. View contents of a storage card 49 - HP iPAQ 912c | HP iPAQ 900 Business Messenger Series - Product Guide (Version 2) - Page 62
are managed through Windows Mobile Device Center (WMDC). WMDC 6.1 is available on the Getting Started CD. You can also visit http://www.microsoft.com/windowsmobile to download WMDC. NOTE: You must install Microsoft ActiveSync or WMDC on your computer before connecting your HP iPAQ to the computer - HP iPAQ 912c | HP iPAQ 900 Business Messenger Series - Product Guide (Version 2) - Page 63
on-screen instructions. 5. Insert the Getting Started CD into your computer's CD-ROM drive and follow the on-screen instructions to install ActiveSync on your computer and create a partnership between your HP iPAQ and your computer. Migrate data from Palm Desktop to Microsoft Windows Mobile 6.1 51 - HP iPAQ 912c | HP iPAQ 900 Business Messenger Series - Product Guide (Version 2) - Page 64
arrive. NOTE: The HP iPAQ power-down timer is reset each time you synchronize. If you schedule a synchronization interval that is smaller than the time interval set for the HP iPAQ to automatically power down, the HP iPAQ never turns off to save battery power. Troubleshoot synchronization issues - HP iPAQ 912c | HP iPAQ 900 Business Messenger Series - Product Guide (Version 2) - Page 65
www.microsoft.com/windowsmobile to download Windows Mobile Device Center. NOTE: HP does not guarantee the accurate functionality of any third party applications with Windows Vista. ● If you are running ActiveSync 4.5 or later and personal firewall software on your computer, please add ActiveSync to - HP iPAQ 912c | HP iPAQ 900 Business Messenger Series - Product Guide (Version 2) - Page 66
reinstall. Customized links in WMDC After connecting your HP iPAQ to a Windows Vista system using WMDC 6.1, an image of HP iPAQ 900 Series Business Messenger pops up on the left of the Windows Mobile Device Center screen. You can set up your HP iPAQ to synchronize the Outlook contacts, e-mail, and - HP iPAQ 912c | HP iPAQ 900 Business Messenger Series - Product Guide (Version 2) - Page 67
remind you about upcoming appointments. Create a new task To create a new task: 1. Tap Start > Programs > Tasks. 2. Tap Menu > New Task. NOTE: You can also tap Tap here to add a new task and enter a description for the task to quickly create a new task. 3. Enter the required fields for the task, and - HP iPAQ 912c | HP iPAQ 900 Business Messenger Series - Product Guide (Version 2) - Page 68
next to the task you want to mark as completed. To mark an open task as completed: 1. Tap Edit. 2. In the Status box, tap Completed. NOTE: You can also select a task and tap Complete to mark the task as completed. To activate a completed task, select the task and then tap Activate - HP iPAQ 912c | HP iPAQ 900 Business Messenger Series - Product Guide (Version 2) - Page 69
received through synchronization with a computer using any synchronizing software or through wireless synchronization directly with an Exchange Server your HP iPAQ to connect by using a data capable cell phone. Text messages are sent and received through your wireless service provider using a phone - HP iPAQ 912c | HP iPAQ 900 Business Messenger Series - Product Guide (Version 2) - Page 70
download file attachments. NOTE: For more information on starting Outlook e-mail synchronization or changing synchronization settings, see the synchronization software's help on the computer. Text messages are not received via synchronization. Instead, they are sent to your HP iPAQ via your service - HP iPAQ 912c | HP iPAQ 900 Business Messenger Series - Product Guide (Version 2) - Page 71
settings automatically from the Internet check box. NOTE: Ensure that you clear the Try to get e-mail the Internet check box only when you want to manually configure your e-mail. 4. Tap Next. 5. downloading new messages. ● Download attachments. ● Limit the number of messages that are downloaded - HP iPAQ 912c | HP iPAQ 900 Business Messenger Series - Product Guide (Version 2) - Page 72
you to send personal information more securely. Note that if you select this and your ISP does not support an SSL connection, you might not be add a new account while connected. Tap Menu > Stop Send/Receive to disconnect. Change e-mail download options You can customize the following download - HP iPAQ 912c | HP iPAQ 900 Business Messenger Series - Product Guide (Version 2) - Page 73
short text messages to and from a mobile phone, fax machine, and/or IP address. A single text message cannot be longer than 160 alpha-numeric characters or cannot contain pictures or graphics. NOTE: The number of characters supported is dependent on your service provider. Sending text messages might - HP iPAQ 912c | HP iPAQ 900 Business Messenger Series - Product Guide (Version 2) - Page 74
the HP iPAQ DataConnect application detects the mobile phone service provider and automatically populates the MMS settings on the HP iPAQ. Alternately MMS message, tap the (Play) icon at the left bottom of the screen. NOTE: To use an available text-message template, tap Menu > Template > New from - HP iPAQ 912c | HP iPAQ 900 Business Messenger Series - Product Guide (Version 2) - Page 75
the IMAP4 account. 4. Tap Download Size Settings and select an option from the Download attachments list. 5. Tap Done attachments on a storage card rather than on the HP iPAQ, press the (Messaging) key > Menu > Options Rich Text Format (RTF) and TNEF support for your account. With TNEF enabled, - HP iPAQ 912c | HP iPAQ 900 Business Messenger Series - Product Guide (Version 2) - Page 76
you synchronize or connect to your e-mail server, and your HP iPAQ's calendar will be updated. Create or change a signature To create or change a To access addresses and phone numbers from Contacts, tap To or tap Menu > Add Recipient. 5. Enter your message. To quickly add common messages, tap Menu - HP iPAQ 912c | HP iPAQ 900 Business Messenger Series - Product Guide (Version 2) - Page 77
synchronization through ActiveSync. ● Text messages are automatically received when your HP iPAQ phone mode is switched on. When your HP iPAQ is switched off (in flight mode), messages are held by your service provider until the next time your HP iPAQ is turned on. TIP: By default, messages you send - HP iPAQ 912c | HP iPAQ 900 Business Messenger Series - Product Guide (Version 2) - Page 78
size of a message can vary between the server and the HP iPAQ. Install an online address book Many e-mail servers, including servers running Exchange Server, can verify names with an online address book called a directory service, using a protocol known as Lightweight Directory Access Protocol (LDAP - HP iPAQ 912c | HP iPAQ 900 Business Messenger Series - Product Guide (Version 2) - Page 79
12 Calendar Access calendar Use Calendar to schedule appointments, including meetings and other events. You can display appointments for the day on the Today screen. ▲ To access Calendar, press the Today screen. (Calendar) key or tap the (Calendar) icon on the Change the display of the work - HP iPAQ 912c | HP iPAQ 900 Business Messenger Series - Product Guide (Version 2) - Page 80
then tap ok. (Calendar) icon on the Update an appointment To update an appointment on your calendar: 1. To NOTE: This option only appears for recurring appointments. 4. Make the required changes, and then tap ok. Cancel an appointment When you delete an appointment in calendar on your HP iPAQ - HP iPAQ 912c | HP iPAQ 900 Business Messenger Series - Product Guide (Version 2) - Page 81
to the new contact. If most of the contacts you create have phone numbers that begin with the same area code, in Contacts, tap Menu is not listed in your contacts, you can create a contact from the call history. NOTE: For more information, from the same screen tap Start > Help. Delete a contact - HP iPAQ 912c | HP iPAQ 900 Business Messenger Series - Product Guide (Version 2) - Page 82
> Name. 3. Do one of the following: ● Begin entering a name or phone number in the provided text box until the contact you want is displayed. To show send the message from. NOTE: To quickly add a contact's address to a new message, tap To, Cc, or Bcc line, and then tap Menu > Add Recipient. Tap the - HP iPAQ 912c | HP iPAQ 900 Business Messenger Series - Product Guide (Version 2) - Page 83
Enter your message. To quickly add common messages, tap Menu > My Text and tap the required message. NOTE: To enter symbols, tap Shift . 4. Tap Picture. 5. Do one of the following: ● Tap the picture you want to add. ● Tap Camera and take a picture. To remove a picture from the contact information: 1. - HP iPAQ 912c | HP iPAQ 900 Business Messenger Series - Product Guide (Version 2) - Page 84
NOTE: To display a greater number of contacts on the screen, tap Menu > Options..., select the Show contact names only check box, and clear the Show alphabetical index check box. 72 Chapter 13 Contacts - HP iPAQ 912c | HP iPAQ 900 Business Messenger Series - Product Guide (Version 2) - Page 85
Tap Phone button to turn on/off the functions of Phone features. Flight mode is a condition when all wireless connections on your HP iPAQ are your wireless device. Your HP iPAQ can connect to an 802.11b/g Wi-Fi or connect directly to other Wi-Fi-enabled devices. NOTE: The alphabet following 802 - HP iPAQ 912c | HP iPAQ 900 Business Messenger Series - Product Guide (Version 2) - Page 86
-Fi network When you try to connect to a Wi-Fi network, the HP iPAQ automatically detects Wi-Fi networks that are broadcasting their signal. If your Wi-Fi network is not set to broadcast, then you have to connect to it manually. While trying to connect to a Wi-Fi network if authentication is - HP iPAQ 912c | HP iPAQ 900 Business Messenger Series - Product Guide (Version 2) - Page 87
Add New... 3. Enter the network name. 4. Select The Internet to connect to the Internet through an ISP or select Work to connect to a company network in the Connects to list. NOTE your HP iPAQ is able to access the network. To find an IP address: 1. Connect to a network automatically or manually by - HP iPAQ 912c | HP iPAQ 900 Business Messenger Series - Product Guide (Version 2) - Page 88
Service discovery Definition Verification of a numeric passkey before a connection or activity can be completed. Approval of a connection, access, or activity before it can be completed. Creating a trusted connection between your HP iPAQ manage daily business tasks ( HP iPAQ to the computer using USB - HP iPAQ 912c | HP iPAQ 900 Business Messenger Series - Product Guide (Version 2) - Page 89
instructions in synchronization software help on the computer for configuring Bluetooth on your computer to support ActiveSync. 2. On your HP iPAQ, Else, leave the passcode blank, and tap Next. NOTE: For creating partnerships with cellular phones, it is mandatory that you provide a numeric passcode. - HP iPAQ 912c | HP iPAQ 900 Business Messenger Series - Product Guide (Version 2) - Page 90
You can use your HP iPAQ as a wireless modem to connect your Bluetooth-enabled computer to the Internet. For more information, see To connect to a laptop using Bluetooth data connection on page 112 Bluetooth device profiles The functions that Bluetooth supports are called services or profiles. You - HP iPAQ 912c | HP iPAQ 900 Business Messenger Series - Product Guide (Version 2) - Page 91
transferred files in the Root directory box. 5. Tap ok. Set up an incoming or outgoing Bluetooth COM port To set up incoming or outgoing Bluetooth COM port: 1. Make sure your HP iPAQ is connected to the other device via Bluetooth. 2. Tap Start > Settings > Connections > Wireless Manager. 3. Tap Menu - HP iPAQ 912c | HP iPAQ 900 Business Messenger Series - Product Guide (Version 2) - Page 92
WCDMA or HSDPA is unavailable. Your HP iPAQ also supports WCDMA/HSDPA in three different frequency bands (850/1900/2100). GPRS/EDGE GPRS/EDGE technology provides a connection to the Mobile Phone Network that can be used for Web browsing, MMS messaging, or accessing your corporate network. NOTE: EDGE - HP iPAQ 912c | HP iPAQ 900 Business Messenger Series - Product Guide (Version 2) - Page 93
and operator and sets up the GPRS connection information for you. However, if your mobile phone service providers offer different subscription types, then HP iPAQ DataConnect will show a window on your screen that list the different subscriptions available. You need to select your subscription - HP iPAQ 912c | HP iPAQ 900 Business Messenger Series - Product Guide (Version 2) - Page 94
Connections > Connections > Advanced > Select Networks. 2. Select the iPAQ MMS option from the Programs that automatically connect to the Internet should required ISP from the displayed list, and then tap Edit... 5. Enter a service provider name in the Enter a name for the connection box and tap Next - HP iPAQ 912c | HP iPAQ 900 Business Messenger Series - Product Guide (Version 2) - Page 95
> Select Networks. 2. Select the iPAQ WAP option from the Programs that automatically the displayed list and tap Edit... 5. Enter a service provider name in the Enter a name for the connection reference. 4. Tap Modem > New... 5. Enter a service provider name in the Enter a name for the connection - HP iPAQ 912c | HP iPAQ 900 Business Messenger Series - Product Guide (Version 2) - Page 96
8. Enter a domain name if provided by your ISP. 9. Tap Finish. Troubleshoot automatic detection If the automatic detection setting fails, complete one or more of the following items: ● Check to see if the SIM card is present in the HP iPAQ. If it is not present, insert the SIM card and relaunch the - HP iPAQ 912c | HP iPAQ 900 Business Messenger Series - Product Guide (Version 2) - Page 97
(WAP) sites through Pocket Internet Explorer, configure your HP iPAQ to use a WAP gateway. Before you begin, obtain the following information from your ISP or network administrator: ● User name ● Password ● ISP server phone number ● WAP gateway server IP ● Port number To set up a WAP gateway: 1. Tap - HP iPAQ 912c | HP iPAQ 900 Business Messenger Series - Product Guide (Version 2) - Page 98
port number is 9201. 6. Enter any logon credentials required by the WAP gateway server. Configure advanced proxy settings To configure advanced proxy settings: 1. Tap Start > Settings > Connections > Connections > Advanced > Select Networks > Edit... to edit iPAQ rules check box. NOTE: You can edit - HP iPAQ 912c | HP iPAQ 900 Business Messenger Series - Product Guide (Version 2) - Page 99
Tasks. 2. Under My Work Network, tap Add a new VPN server connection and follow the instructions in the New Connection wizard. 3. Under most wizard or while changing settings, tap Help. Change a connection group name Your HP iPAQ is already set up with two groups of connection settings: My ISP and - HP iPAQ 912c | HP iPAQ 900 Business Messenger Series - Product Guide (Version 2) - Page 100
. It offers street maps, a route planner, and an urban business locator for numerous countries around the world. NOTE: Google offers maps for mobile for free, but mobile service providers might charge data-service rates for downloading and using the application with a limited data plan or no data - HP iPAQ 912c | HP iPAQ 900 Business Messenger Series - Product Guide (Version 2) - Page 101
Launch Google Search To launch Google Search: 1. Tap Start > Google Search. 2. Enter your search criteria in the Search box. 3. Tap Search to start the search. NOTE: Using this application might drain the battery quickly. Google Search 89 - HP iPAQ 912c | HP iPAQ 900 Business Messenger Series - Product Guide (Version 2) - Page 102
one at http://www.hp.com. For information on other GPS-centric accessories or other HP iPAQ mounting solutions, visit http://www.hp.com. Set Up the HP iPAQ If you have purchased a Global Positioning System (GPS) enabled HP iPAQ, follow the setup instructions in the printed guide that ships with your - HP iPAQ 912c | HP iPAQ 900 Business Messenger Series - Product Guide (Version 2) - Page 103
you are interested in purchasing additional GPS navigation software to use on your HP iPAQ, check with the GPS software supplier before you purchase, download, or install any GPS navigation software to determine that the software is compatible with your specific HP iPAQ model. Once you have verified - HP iPAQ 912c | HP iPAQ 900 Business Messenger Series - Product Guide (Version 2) - Page 104
or a need to perform a clean reset on the HP iPAQ. Configure and Manage My GPS Software to Connect to My HP iPAQ's GPS Receiver Automatically Your GPS enabled HP iPAQ uses Microsoft Windows Mobile 6.1, so the operating system automatically manages access to the HP iPAQ GPS receiver to allow multiple - HP iPAQ 912c | HP iPAQ 900 Business Messenger Series - Product Guide (Version 2) - Page 105
Troubleshoot Common Reasons For Interference When Using GPS Software Interference Type How to Avoid Vehicles with thermal glass windows and windshields. Place the HP iPAQ where there is a clear view of the sky or on the dashboard of a vehicle that does not have thermal glass windows. Equipment - HP iPAQ 912c | HP iPAQ 900 Business Messenger Series - Product Guide (Version 2) - Page 106
displays information such as manufacturer, firmware version, driver version, and software version about the system, integrated modules, and attached accessories. NOTE: Tap About to view the application name, version number, and copyright information. HP VoiceReply HP VoiceReply allows you to reply - HP iPAQ 912c | HP iPAQ 900 Business Messenger Series - Product Guide (Version 2) - Page 107
and Read views. 2. Next, in the recording window, tap the (Record) icon to record your HP iPAQ at any time. HP iPAQ Setup Assistant also allows you to perform a factory reset on your HP iPAQ and view detailed product information. Using HP iPAQ your HP iPAQ. NOTE: You need to install HP iPAQ Setup - HP iPAQ 912c | HP iPAQ 900 Business Messenger Series - Product Guide (Version 2) - Page 108
is not recommended unless you are being assisted by your mobile phone service provider. HP Photosmart Mobile You can use HP Photosmart Mobile to: ● View pictures stored on your HP iPAQ or a storage card. ● Add voice or text notes to pictures. ● Print pictures. ● View a slideshow. ● Send pictures via - HP iPAQ 912c | HP iPAQ 900 Business Messenger Series - Product Guide (Version 2) - Page 109
print, and then tap Save. You can now print the photos saved on the storage card. NOTE: Some printers do not support printing from a storage card. You need to set up the printer before you begin printing photos from a storage card. Setup instructions vary from printer to printer. HP applications 97 - HP iPAQ 912c | HP iPAQ 900 Business Messenger Series - Product Guide (Version 2) - Page 110
NOTE: You need to configure your e-mail messaging account to send pictures using e-mail. To send pictures through e-mail: 1. Tap Start > HP Photosmart Mobile the appropriate e-mail address or use Contacts by tapping Menu > Add Recipient. 7. Enter other appropriate information, such as an e-mail - HP iPAQ 912c | HP iPAQ 900 Business Messenger Series - Product Guide (Version 2) - Page 111
Tap Start to begin document processing. NOTE: The document enhancement feature processes only JPEG images. Set the screen saver Use your HP iPAQ to set a slideshow of your images as the screen. To set the screen saver: 1. Tap Start > HP Photosmart Mobile. 2. Tap Menu > Tools > Screen Saver. 3. Tap - HP iPAQ 912c | HP iPAQ 900 Business Messenger Series - Product Guide (Version 2) - Page 112
NOTE: HP Photosmart Mobile automatically displays the slideshow you selected, if your HP iPAQ is inactive while it is connected to the computer with the synchronization software note where you will paste the image. 2. On the Edit menu, tap Paste. Video support You can play videos using the HP - HP iPAQ 912c | HP iPAQ 900 Business Messenger Series - Product Guide (Version 2) - Page 113
HP Photosmart Mobile. 2. Select the video thumbnail and tap View. HP Printsmart Mobile Use HP PrintSmart Mobile to print information from your HP iPAQ mobile device to a compatible printer. HP PrintSmart Mobile application provides printing support when the HP iPAQ enters the standby mode. NOTE: When - HP iPAQ 912c | HP iPAQ 900 Business Messenger Series - Product Guide (Version 2) - Page 114
information about radio present, radio firmware version, and IMEI number. ● The GPS tab - displays information about the GPS present, GPS status, manufacturer, revision level, driver version, firmware version, and software version. HP CertEnroller HP CertEnroller is an enhanced security feature - HP iPAQ 912c | HP iPAQ 900 Business Messenger Series - Product Guide (Version 2) - Page 115
configure mobile services, diagnose the device, add/ remove applications, and lock/unlock/wipe the device in case it is lost or stolen. iPAQ File Store You can install programs and save files to the iPAQ File Store folder, which can be accessed from the File Explorer on your HP iPAQ. Programs - HP iPAQ 912c | HP iPAQ 900 Business Messenger Series - Product Guide (Version 2) - Page 116
screen, under Select Ring Tones to be removed from your device list, select the required ring tones. 3. Tap Remove. NOTE: You can use the HP iPAQ Ring Tone Manager application only to add and remove ring tones. This application lacks the ability to assign any file as a current ring tone. Manage - HP iPAQ 912c | HP iPAQ 900 Business Messenger Series - Product Guide (Version 2) - Page 117
> Refresh. Tap Menu > Exit. Search The search feature helps you locate files stored on your HP iPAQ. You can search for Calendar, Contacts, Excel Mobile, Help, Messaging, Notes, Outlook Mobile, Tasks, and Word Mobile files. You can also search for files that are larger then 64 KB. To search for - HP iPAQ 912c | HP iPAQ 900 Business Messenger Series - Product Guide (Version 2) - Page 118
HP iPAQ. Remote Desktop Mobile Use the Remote Desktop Mobile to log on to a Windows fit the remote desktop to your HP iPAQ screen. NOTE: After you connect to a terminal HP iPAQ. Java Virtual Machine Java Virtual Machine allows you to install and use Java applications on your HP iPAQ. You can download - HP iPAQ 912c | HP iPAQ 900 Business Messenger Series - Product Guide (Version 2) - Page 119
tap Menu > Clear Now Playing. Update a Library In most cases, Windows Media Player Mobile automatically updates your libraries. However, you can manually update a library to ensure that it has links to any new files that you might have recently copied to your HP iPAQ or a removable storage card. To - HP iPAQ 912c | HP iPAQ 900 Business Messenger Series - Product Guide (Version 2) - Page 120
HP iPAQ. 1. Press the Voice Commander key on your HP iPAQ. 2. Hold your HP iPAQ 10 cm (3.94 inches) away from your face and say Play Music (Media File Name) to play the media file. NOTE Excel Mobile You can create and edit workbooks and templates on your HP iPAQ with Excel Mobile. With Excel Mobile, - HP iPAQ 912c | HP iPAQ 900 Business Messenger Series - Product Guide (Version 2) - Page 121
slide show presentations created on your computer. With PowerPoint Mobile, you can: ● Open a presentation from an e-mail message. ● Download a presentation from a file share or the Internet. ● Copy a presentation to your HP iPAQ via a storage card. NOTE: Slide shows created in *.ppt or *.pps format - HP iPAQ 912c | HP iPAQ 900 Business Messenger Series - Product Guide (Version 2) - Page 122
Format the text inserted in a note. ● Add a numbered or bulleted list in a note. ● Insert pictures using the camera or from the HP iPAQ. ● Insert a voice recording in a note. ClearVue PDF You can view a Portable Document File that has the extension .pdf on your HP iPAQ. To view a file: 1. Tap Start - HP iPAQ 912c | HP iPAQ 900 Business Messenger Series - Product Guide (Version 2) - Page 123
and above. When a Windows Mobile powered device is connected to the computer for the first time, the driver will be installed to enable Internet Sharing over USB or RNDIS. If your computer does not automatically add your HP iPAQ as a new modem, you need to manually set up your HP iPAQ for Internet - HP iPAQ 912c | HP iPAQ 900 Business Messenger Series - Product Guide (Version 2) - Page 124
and download the USB driver file. 5. Click Finish. 6. After installing the driver, Smartphone USB Modem will be added to the device list in the Device Manager. 7. Next, disconnect your HP iPAQ from the computer. NOTE: 56 K modems are capable of receiving 56 Kbps from a compatible service provider - HP iPAQ 912c | HP iPAQ 900 Business Messenger Series - Product Guide (Version 2) - Page 125
updates and best software. ● HP Shopping - Buy desktops, laptops, printers, digital cameras, televisions, and ink and toner cartridges direct from HP. ● iPAQ Mobile - Use this site for products, support, and other HP iPAQ information. ● iPAQ Accessories - Buy HP iPAQ handheld accessories direct - HP iPAQ 912c | HP iPAQ 900 Business Messenger Series - Product Guide (Version 2) - Page 126
bar until Hotmail is displayed. 2. Tap the e-mail message to open your Inbox. To sign in to Messenger: 1. From the Today screen, tap the right or left arrow on the Windows Live Services bar till Messenger is displayed. 2. Tap Tap here to sign in. 3. Use the list to select your online status - HP iPAQ 912c | HP iPAQ 900 Business Messenger Series - Product Guide (Version 2) - Page 127
which might result in additional charges from your service provider. The session will not time out or end unless one of the following occurs: ● User ends the instant messenger session ● User accepts an incoming voice call ● An outgoing voice call is placed ● The HP iPAQ is turned off or moves out of - HP iPAQ 912c | HP iPAQ 900 Business Messenger Series - Product Guide (Version 2) - Page 128
It supports various value added services HP iPAQ stays on when using battery power or AC power. 3. Tap USB Charging and select the Use USB Charging check box to enable USB charging. Select any of the following options: ● Fast Charge - Charges at 500 mAh. ● Slow Charge - Charges at 100 mAh. NOTE - HP iPAQ 912c | HP iPAQ 900 Business Messenger Series - Product Guide (Version 2) - Page 129
, on your HP iPAQ, tap Start > Settings > System > HP Asset Viewer. System Feature Processor Operating System Memory External Power Display SD Slot Headphone Jack Antenna Battery Bluetooth Wi-Fi Phone/Modem Camera Description Marvell PXA270, 416 MHz Microsoft® Windows Mobile 6.1 Professional 128 - HP iPAQ 912c | HP iPAQ 900 Business Messenger Series - Product Guide (Version 2) - Page 130
4.49 inches 2.53 inches 0.71 inches ● With battery: 5.33 oz ● Without battery: 3.63 oz Operating environment Temperature Relative Humidity Operating Non 113.97 mm 64.18 mm 18.14 mm ● With battery: 151 g ● Without battery: 103 g Metric 0° to 45° C -40° to 85° C 90 % RH 90 - HP iPAQ 912c | HP iPAQ 900 Business Messenger Series - Product Guide (Version 2) - Page 131
and, if not installed and used in accordance with the instructions, may cause harmful interference to radio communications. However, there changes or modifications made to this device that are not expressly approved by HP may void the user's authority to operate the equipment. Cables To maintain - HP iPAQ 912c | HP iPAQ 900 Business Messenger Series - Product Guide (Version 2) - Page 132
HP-INVENT (1-800-474-6836) For questions regarding this FCC declaration, write to Hewlett-Packard Company P. O. Box 692000, Mail Stop 510101 Houston, TX 77269-2000 or call HP les exigences du Règlement sur le matériel brouilleur du Canada. European Union Notice Products bearing the CE marking comply - HP iPAQ 912c | HP iPAQ 900 Business Messenger Series - Product Guide (Version 2) - Page 133
body number is used. Refer to the regulatory label provided on this product. Hewlett-Packard GmbH, HQ-TRE, Herrenberger Strasse 140, D-71034 Böblingen, Germany The telecommunications CE declaration of conformity for this device may be found at www.hp.com/go/ certificates. European Union Notice 121 - HP iPAQ 912c | HP iPAQ 900 Business Messenger Series - Product Guide (Version 2) - Page 134
of used batteries according to the instructions. Battery Recycling HP encourages customers to recycle used electronic hardware, HP original print cartridges, and rechargeable batteries. For more information about recycling programs, visit http://www.hp.com/ recycle. Battery Disposal WARNING - HP iPAQ 912c | HP iPAQ 900 Business Messenger Series - Product Guide (Version 2) - Page 135
chemical information report for this product can be found at: www.hp.com/go/reach. Disposal of Waste Equipment by Users in Private Household recycling, please contact your local city office, your household waste disposal service or the shop where you purchased the product. . . . . Disposal - HP iPAQ 912c | HP iPAQ 900 Business Messenger Series - Product Guide (Version 2) - Page 136
Seadmete jäätmete kõrvaldamine eramajapidamistes Euroopa Liidus See tootel või selle pakendil olev sümbol näitab, et kõnealust toodet ei tohi koos teiste majapidamisjäätmetega kõrvaldada. Teie kohus on oma seadmete jäätmed kõrvaldada, viies need elektri- ja elektroonikaseadmete jäätmete ringlussevõ - HP iPAQ 912c | HP iPAQ 900 Business Messenger Series - Product Guide (Version 2) - Page 137
Disposal of Waste Equipment by Users in Private Household 125 - HP iPAQ 912c | HP iPAQ 900 Business Messenger Series - Product Guide (Version 2) - Page 138
Šis simbolis ant gaminio arba jo pa atliekoms perdirbti. Atskirai surenkam 126 Chapter 19 Regulatory notices - HP iPAQ 912c | HP iPAQ 900 Business Messenger Series - Product Guide (Version 2) - Page 139
Disposal of Waste Equipment by Users in Private Household 127 - HP iPAQ 912c | HP iPAQ 900 Business Messenger Series - Product Guide (Version 2) - Page 140
Bortskaffande av avfallsprodukter från användare i privathushåll inom Europeiska Unionen Om den här symbolen visas på produkten eller förpackningen betyder det att produkten inte får slängas på samma ställe som hushållssopor. I stället är det ditt ansvar att bortskaffa avfallet genom att överlämna - HP iPAQ 912c | HP iPAQ 900 Business Messenger Series - Product Guide (Version 2) - Page 141
the electrical outlet, grasp the cord by the plug or, in the case of the AC adapter, grasp the AC adapter and pull out from the electrical outlet. Do not use converter kits sold for appliances to power your HP iPAQ. Acoustics Warning WARNING! Listening to this device at high volume levels and - HP iPAQ 912c | HP iPAQ 900 Business Messenger Series - Product Guide (Version 2) - Page 142
headsets or earphones, always reset HP iPAQ in health care facilities or hospitals when there are posted restrictions requiring you to do so. SAR Notice THIS DEVICE MEETS INTERNATIONAL GUIDELINES FOR EXPOSURE TO RADIO WAVES. Your mobile frequency bands. device. Before a phone model is available - HP iPAQ 912c | HP iPAQ 900 Business Messenger Series - Product Guide (Version 2) - Page 143
reporting requirements and the network band. Wireless Notices In some should be minimized. No metallic body accessories are allowed and 2.0 cm spacing Aid Compatibility with Mobile Phones. When some mobile phones are used near unrated phones. T4 is the better/ higher of the two ratings. (Note that not - HP iPAQ 912c | HP iPAQ 900 Business Messenger Series - Product Guide (Version 2) - Page 144
Failure to observe this instruction may lead to suspension or denial of cellular services to the offender, or or telephone handset should not be used by the driver while the vehicle is moving, except in an from the road. ● As with other mobile radio transmitting equipment, users are advised that - HP iPAQ 912c | HP iPAQ 900 Business Messenger Series - Product Guide (Version 2) - Page 145
Wireless LAN 802.11b Devices Wireless LAN 802.11g Devices Bluetooth Devices Japanese Notice 133 - HP iPAQ 912c | HP iPAQ 900 Business Messenger Series - Product Guide (Version 2) - Page 146
Taiwan DGT Notice 1. SARඪ४࠽2.0W/Kg 0.785 W/Kgʯ 2 Korean Notice 134 Chapter 19 Regulatory notices - HP iPAQ 912c | HP iPAQ 900 Business Messenger Series - Product Guide (Version 2) - Page 147
information, see Step 3: Charge the battery on page 9. ● Perform a hard reset on your HP iPAQ by pressing and releasing the Reset button located at the top of your HP iPAQ with the stylus. I am unable to make or receive calls. How do I fix this? If you have problems making or receiving calls, please - HP iPAQ 912c | HP iPAQ 900 Business Messenger Series - Product Guide (Version 2) - Page 148
. When I answer calls on my HP iPAQ, the caller is unable to hear my voice clearly. What could be the problem? Is the reception of the network signal good? You might be located within closed boundaries. If yes, move to an open space or closer to a window. For more information, see Check connection - HP iPAQ 912c | HP iPAQ 900 Business Messenger Series - Product Guide (Version 2) - Page 149
is poor. Try to move to an open location when you use your HP iPAQ. ● If you are not using the Push e-mail service, a service that continuously checks for e-mail messages with the Web server, disable it as it consumes excessive battery capacity and reduces the standby time. ● If you are using a new - HP iPAQ 912c | HP iPAQ 900 Business Messenger Series - Product Guide (Version 2) - Page 150
on page 15. I have trouble charging my battery. What should I do? If you have trouble charging your battery, please perform the following checks: ● Is the battery charger correctly plugged into the mini-USB connector on the HP iPAQ? To know more about charging the battery, see Step 3: Charge the - HP iPAQ 912c | HP iPAQ 900 Business Messenger Series - Product Guide (Version 2) - Page 151
your HP iPAQ and the computer needs to be created only through a mini-USB synchronization cable using ActiveSync for Windows XP and WMDC for Windows the HP iPAQ when using GPS. Your HP iPAQ might also get a little warm when you charge it. Can I set up an active connection between my HP iPAQ and - HP iPAQ 912c | HP iPAQ 900 Business Messenger Series - Product Guide (Version 2) - Page 152
. General Precautions Heed service markings: Except as explained elsewhere in your product documentation, do not service your product yourself. bracket. Mount the product according to the manufacturer's instructions, and use a mounting accessory recommended by the manufacturer. Use the product with - HP iPAQ 912c | HP iPAQ 900 Business Messenger Series - Product Guide (Version 2) - Page 153
service partner, or local power company. For a product that operates from battery power or other sources, refer to the operating instructions with the product, a replacement AC adapter provided by HP, or an AC adapter purchased as an accessory from HP should be used with the product. Use an approved - HP iPAQ 912c | HP iPAQ 900 Business Messenger Series - Product Guide (Version 2) - Page 154
life, do not dispose of the battery pack in general household waste. Follow the local laws and regulations in your area for computer battery pack disposal. In Europe, dispose of or recycle the battery packs by using the public collection system or by returning them to HP, your service Accessories - HP iPAQ 912c | HP iPAQ 900 Business Messenger Series - Product Guide (Version 2) - Page 155
● Do not apply strong force or shock to your HP iPAQ. ● Keep the HP iPAQ and its accessories away from children. ● Do not insert metal objects into the mini-USB port of your HP iPAQ. This can short-circuit the battery. Cleaning your HP iPAQ ● Use a soft, clean, and slightly moistened cloth to clean - HP iPAQ 912c | HP iPAQ 900 Business Messenger Series - Product Guide (Version 2) - Page 156
GOEP GPRS GPS HFP HID HSDPA HSP ICNIRP Mobility Agent File Transfer Profile Generic Access Profile Generic Audio/Video Distribution Profile Generic Object Exchange Profile General Packet Radio Service Global Positioning System Hands-free Profile Human Interface Device Profile Host High Speed Download - HP iPAQ 912c | HP iPAQ 900 Business Messenger Series - Product Guide (Version 2) - Page 157
-typewriter Virtual Private Network Wireless Access Point Wideband Code Division Multiple Access Wireless Fidelity Wireless Local Area Network Windows Mobile Device Center Icons used Given below is a list of icons available on your HP iPAQ and used in this guide. Today screen icons Icons used 145 - HP iPAQ 912c | HP iPAQ 900 Business Messenger Series - Product Guide (Version 2) - Page 158
Icon Camera icons Icon 3M Description Images / Recording time balance Flash off Resolution HP PhotoSmart Mobile Settings Icon Brightness Stitch images Next Send image Play HP PhotoSmart Mobile icons Icon Description Sideshow Icon Delete MMS icons Icon Description Play preview Favorites - HP iPAQ 912c | HP iPAQ 900 Business Messenger Series - Product Guide (Version 2) - Page 159
Notes icons Icon Description Voice note Icon General icons Icon Description EMS Next Stop Record Input selector Shift lock Function lock Icon Description Recorded voice note Description Previous Play Stop (slideshow view) Pause Shift Function Icons used 147 - HP iPAQ 912c | HP iPAQ 900 Business Messenger Series - Product Guide (Version 2) - Page 160
106 Windows Live 113 Windows media player 107 B back cover 6 backlight 15 Backspace key using HP iPAQ 21 battery charging 9 install 8 remove 7 saving tips 19 Battery disposal notice 122 Bluetooth COM port 79 connect to computer 76 device profiles 78 edit partnerships 78 partnerships 77 services 79 - HP iPAQ 912c | HP iPAQ 900 Business Messenger Series - Product Guide (Version 2) - Page 161
iPAQ 143 clean your HP iPAQ 143 use accessories 143 use your HP iPAQ 143 H handsfree 25 Hard reset 39 Hearing Aid Compatibility (HAC) 35 HP applications HP Asset Viewer 102 HP CertEnroller 102 HP Enterprise Mobility Agent 103 HP Help and Support 94 HP iPAQ DataConnect 96 HP iPAQ keyguard 101 HP iPAQ - HP iPAQ 912c | HP iPAQ 900 Business Messenger Series - Product Guide (Version 2) - Page 162
and remove 15 open and close 16 protect your HP iPAQ with a password settings 18 Q QWERTY keyboard using HP iPAQ 21 R register 1 register your HP iPAQ 1 removable/rechargeable battery 2 Resets clean 38 data loss 39 factory settings 39 hard 38 Persistent Store 39 soft 38 S screen settings adjust - HP iPAQ 912c | HP iPAQ 900 Business Messenger Series - Product Guide (Version 2) - Page 163
use HP iPAQ HP Photosmart Mobile 96 voice commands 27 use messaging add attachment 65 compose 64 download messages 65 download messages from a server 65 forward 65 reply 65 send 64 Use the Keyboard using HP iPAQ 21 using HP iPAQ 21 using video recorder recording 42 V voice mail mail 25 voice notes
-
 1
1 -
 2
2 -
 3
3 -
 4
4 -
 5
5 -
 6
6 -
 7
7 -
8
-
9
-
10
-
11
-
12
-
13
-
14
-
15
-
16
-
17
-
18
-
19
-
20
-
21
-
22
-
23
-
24
-
25
-
26
-
27
-
28
-
29
-
30
-
31
-
32
-
33
-
34
-
35
-
36
-
37
-
38
-
39
-
40
-
41
-
42
-
43
-
44
-
45
-
46
-
47
-
48
-
49
-
50
-
51
-
52
-
53
-
54
-
55
-
56
-
57
-
58
-
59
-
60
-
61
-
62
-
63
-
64
-
65
-
66
-
67
-
68
-
69
-
70
-
71
-
72
-
73
-
74
-
75
-
76
-
77
-
78
-
79
-
80
-
81
-
82
-
83
-
84
-
85
-
86
-
87
-
88
-
89
-
90
-
91
-
92
-
93
-
94
-
95
-
96
-
97
-
98
-
99
-
100
-
101
-
102
-
103
-
104
-
105
-
106
-
107
-
108
-
109
-
110
-
111
-
112
-
113
-
114
-
115
-
116
-
117
-
118
-
119
-
120
-
121
-
122
-
123
-
124
-
125
-
126
-
127
-
128
-
129
-
130
-
131
-
132
-
133
-
134
-
135
-
136
-
137
-
138
-
139
-
140
-
141
-
142
-
143
-
144
-
145
-
146
-
147
-
148
-
149
-
150
-
151
-
152
-
153
-
154
-
155
-
156
-
157
-
158
-
159
-
160
-
161
-
162
-
163
 |
 |

HP iPAQ 900 Series
Product Guide