HP p650 HP p650 Digital Camera - User Manual - Page 48
Advanced Settings
 |
View all HP p650 manuals
Add to My Manuals
Save this manual to your list of manuals |
Page 48 highlights
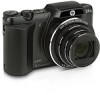
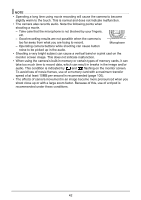
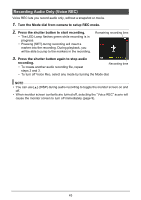
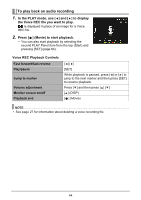
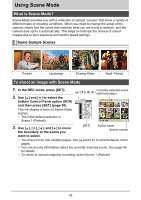
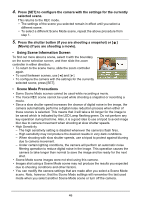
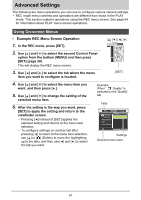
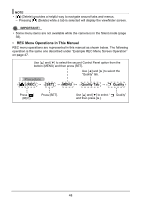
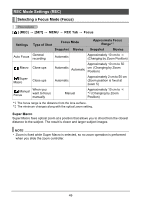
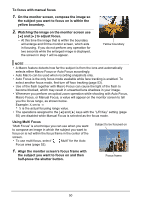
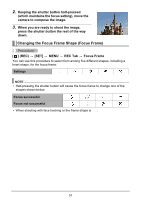
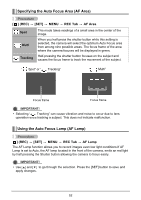
Advanced Settings The following are menu operations you can use to configure various camera settings. • REC mode menu contents and operations are different from those in the PLAY mode. This section explains operations using the REC menu screen. See page 64 for information about PLAY menu screen operations. Using On-screen Menus • Example REC Menu Screen Operation 1. In the REC mode, press [SET]. [ ][ ][ ][ ] 2. Use [ ] and [ ] to select the second Control Panel option from the bottom (MENU) and then press [SET] (page 30). This will display the REC menu screen. 3. Use [ ] and [ ] to select the tab where the menu item you want to configure is located. [SET] 4. Use [ ] and [ ] to select the menu item you want, and then press [ ]. 5. Use [ ] and [ ] to change the setting of the selected menu item. 6. After the setting is the way you want, press [SET] to apply the setting and return to the viewfinder screen. • Pressing [ ] instead of [SET] applies the selected setting and returns to the menu item selection. • To configure settings on another tab after pressing [ ] to return to the menu item selection, use [ ] or [ ] (Delete) to move the highlighting up to the tabs, and then use [ ] and [ ] to select the tab you want. Example: When " Quality" is selected on the "Quality" tab Tabs REC Quality Setup Quality EV Compensation White Balance ISO Color Mode Fine Normal Settings Selected menu item 47
-
 1
1 -
2
-
3
-
4
-
5
-
6
-
7
-
8
-
9
-
10
-
11
-
12
-
13
-
14
-
15
-
16
-
17
-
18
-
19
-
20
-
21
-
22
-
23
-
24
-
25
-
26
-
27
-
28
-
29
-
30
-
31
-
32
-
33
-
34
-
35
-
36
-
37
-
38
-
39
-
40
-
41
-
42
-
 43
43 -
 44
44 -
 45
45 -
 46
46 -
 47
47 -
 48
48 -
 49
49 -
 50
50 -
 51
51 -
 52
52 -
 53
53 -
54
-
55
-
56
-
57
-
58
-
59
-
60
-
61
-
62
-
63
-
64
-
65
-
66
-
67
-
68
-
69
-
70
-
71
-
72
-
73
-
74
-
75
-
76
-
77
-
78
-
79
-
80
-
81
-
82
-
83
-
84
-
85
-
86
-
87
-
88
-
89
-
90
-
91
-
92
-
93
-
94
-
95
-
96
-
97
-
98
-
99
-
100
-
101
-
102
-
103
-
104
-
105
-
106
-
107
-
108
-
109
-
110
-
111
-
112
-
113
 |
 |