Hitachi DZ-BD70AF Owners Guide - Page 123
ImageMixer 3 HD Edition
 |
UPC - 050585224094
View all Hitachi DZ-BD70AF manuals
Add to My Manuals
Save this manual to your list of manuals |
Page 123 highlights
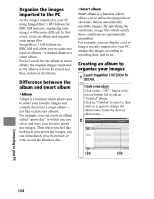
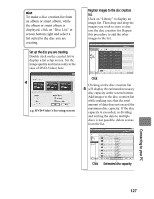
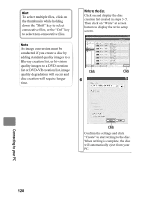
Import images to the PC. Select the thumbnail for the image you wish to store, then click "Import". The PC starts importing the image(s). Check the images imported to the PC. Click the library to display the thumbnails of the imported images. 5 4 Click Select the image(s) you wish to store. Hints • To select multiple files, click on the thumbnails while holding down the "Shift" key to select consecutive files. Or to select nonconsecutive files, hold down the "Ctrl" key and click another thumbnail. • The images are stored in the IMxLibrary folder in My Documents. To change the image storage location, select "Settings" → "Environment Settings", then change the "Library storage destination settings" from the ImageMixer 3 HD Edition for BDCAM menu. Note Importing Hi-Vision images will take longer compared to importing standard quality images. Click Play back the imported images. Click on the image you wish to play, then click "Playback" at the bottom of the screen. The image will be played back on a separate screen. 6 Click Choose an image to play back. Note Even if you are using a PC which satisfies the recommended system environment requirements, there may be cases where the Hi-Vision images are not played back smoothly. 123 Connecting to your PC
-
 1
1 -
2
-
3
-
4
-
5
-
6
-
7
-
8
-
9
-
10
-
11
-
12
-
13
-
14
-
15
-
16
-
17
-
18
-
19
-
20
-
21
-
22
-
23
-
24
-
25
-
26
-
27
-
28
-
29
-
30
-
31
-
32
-
33
-
34
-
35
-
36
-
37
-
38
-
39
-
40
-
41
-
42
-
43
-
44
-
45
-
46
-
47
-
48
-
49
-
50
-
51
-
52
-
53
-
54
-
55
-
56
-
57
-
58
-
59
-
60
-
61
-
62
-
63
-
64
-
65
-
66
-
67
-
68
-
69
-
70
-
71
-
72
-
73
-
74
-
75
-
76
-
77
-
78
-
79
-
80
-
81
-
82
-
83
-
84
-
85
-
86
-
87
-
88
-
89
-
90
-
91
-
92
-
93
-
94
-
95
-
96
-
97
-
98
-
99
-
100
-
101
-
102
-
103
-
104
-
105
-
106
-
107
-
108
-
109
-
110
-
111
-
112
-
113
-
114
-
115
-
116
-
117
-
 118
118 -
 119
119 -
 120
120 -
 121
121 -
 122
122 -
 123
123 -
 124
124 -
 125
125 -
 126
126 -
 127
127 -
 128
128 -
129
-
130
-
131
-
132
-
133
-
134
-
135
-
136
-
137
-
138
-
139
-
140
-
141
-
142
-
143
-
144
-
145
-
146
-
147
-
148
-
149
-
150
-
151
-
152
-
153
-
154
-
155
-
156
-
157
-
158
-
159
-
160
-
161
-
162
-
163
-
164
-
165
-
166
-
167
-
168
-
169
-
170
-
171
-
172
-
173
-
174
-
175
-
176
-
177
-
178
-
179
-
180
-
181
-
182
-
183
 |
 |
