Hitachi DZ-BD70AF Owners Guide - Page 68
Selecting a Recording, Mode to Match the, Conditions, Program AE
 |
UPC - 050585224094
View all Hitachi DZ-BD70AF manuals
Add to My Manuals
Save this manual to your list of manuals |
Page 68 highlights
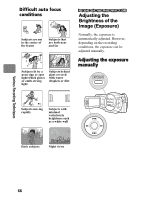
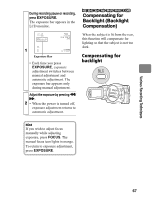
Various Recording Techniques During recording pause or recording, press BLC. The backlight compensation icon appears in the LCD monitor. 1 Backlight compensation icon • Each time you press BLC, the backlight setting turns On or Off. The backlight compensation icon appears only when this function is On. • When the power is turned off, the backlight compensation setting returns to Off. HDD BD-RE BD-R RAM -RW (VR) -RW (VF) R CARD Selecting a Recording Mode to Match the Conditions (Program AE) The camcorder automatically gauges the subject and surrounding conditions and determines the optimal settings for recording (during Auto). However, you can also select a recording mode that better suits the situation for even clearer images. Recording mode Auto (No icon appears.) Portrait Makes the subject, such as a person or pet, stand out from a blurred background. Spotlight Prevents overexposure of the subject in strong light, such as at a wedding or on stage. Sand&Snow Prevents underexposure of the subject in very bright conditions, such as at the beach or on a ski slope. Low Light Allows you to record in dark places with limited light. You can use the LCD monitor as a light source to record the scene by turning the LCD monitor 180° (Assist Light). 68
-
 1
1 -
2
-
3
-
4
-
5
-
6
-
7
-
8
-
9
-
10
-
11
-
12
-
13
-
14
-
15
-
16
-
17
-
18
-
19
-
20
-
21
-
22
-
23
-
24
-
25
-
26
-
27
-
28
-
29
-
30
-
31
-
32
-
33
-
34
-
35
-
36
-
37
-
38
-
39
-
40
-
41
-
42
-
43
-
44
-
45
-
46
-
47
-
48
-
49
-
50
-
51
-
52
-
53
-
54
-
55
-
56
-
57
-
58
-
59
-
60
-
61
-
62
-
 63
63 -
 64
64 -
 65
65 -
 66
66 -
 67
67 -
 68
68 -
 69
69 -
 70
70 -
 71
71 -
 72
72 -
 73
73 -
74
-
75
-
76
-
77
-
78
-
79
-
80
-
81
-
82
-
83
-
84
-
85
-
86
-
87
-
88
-
89
-
90
-
91
-
92
-
93
-
94
-
95
-
96
-
97
-
98
-
99
-
100
-
101
-
102
-
103
-
104
-
105
-
106
-
107
-
108
-
109
-
110
-
111
-
112
-
113
-
114
-
115
-
116
-
117
-
118
-
119
-
120
-
121
-
122
-
123
-
124
-
125
-
126
-
127
-
128
-
129
-
130
-
131
-
132
-
133
-
134
-
135
-
136
-
137
-
138
-
139
-
140
-
141
-
142
-
143
-
144
-
145
-
146
-
147
-
148
-
149
-
150
-
151
-
152
-
153
-
154
-
155
-
156
-
157
-
158
-
159
-
160
-
161
-
162
-
163
-
164
-
165
-
166
-
167
-
168
-
169
-
170
-
171
-
172
-
173
-
174
-
175
-
176
-
177
-
178
-
179
-
180
-
181
-
182
-
183
 |
 |
