Hitachi DZ-BD70AF Owners Guide - Page 72
Using the Electronic, Image Stabilizer EIS, Displaying Recording, Guidelines, Auxiliary Line
 |
UPC - 050585224094
View all Hitachi DZ-BD70AF manuals
Add to My Manuals
Save this manual to your list of manuals |
Page 72 highlights
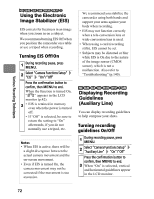
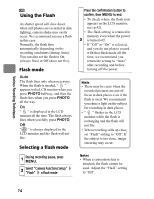
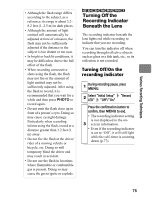
Various Recording Techniques HDD BD-RE BD-R RAM -RW (VR) -RW (VF) R Using the Electronic Image Stabilizer (EIS) EIS corrects for fuzziness in an image when you zoom in on a subject. We recommend turning EIS Off when you position the camcorder on a table or use a tripod when recording. Turning EIS Off/On 1 During recording pause, press MENU. 2 Select "Camera Functions Setup" "EIS" "On"/"Off" Press the confirmation button to confirm, then MENU to end. When the function is turned On, " " appears in the LCD monitor (p.42). 3 • EIS is retained in memory even when the power is turned off. • If "Off" is selected, be sure to return the setting to "On" afterwards, if you do not normally use a tripod, etc. Notes • When EIS is active, there will be a slight divergence between the actual camera movement and the on-screen movement. • Even if EIS is turned On, the camera movement may not be corrected if the movement is too excessive. We recommend you stabilize the camcorder using both hands and support your arms against your body when recording. • EIS may not function correctly when a tele-conversion lens or wide-conversion lens is used. • When using a card (recording stills), EIS cannot be set. • Subjects may be distorted or blur while EIS is On due to the nature of the image sensor (CMOS sensor), which is not a malfunction. Also refer to "Troubleshooting" (p.140). HDD BD-RE BD-R RAM -RW (VR) -RW (VF) R CARD Displaying Recording Guidelines (Auxiliary Line) You can display recording guidelines to help compose your shots. Turning recording guidelines On/Off 1 During recording pause, press MENU. 2 Select "Camera Functions Setup" "Auxiliary Line" "On"/"Off" Press the confirmation button to confirm, then MENU to end. 3 When "On" is selected, vertical and horizontal guidelines appear in the LCD monitor. 72
-
 1
1 -
2
-
3
-
4
-
5
-
6
-
7
-
8
-
9
-
10
-
11
-
12
-
13
-
14
-
15
-
16
-
17
-
18
-
19
-
20
-
21
-
22
-
23
-
24
-
25
-
26
-
27
-
28
-
29
-
30
-
31
-
32
-
33
-
34
-
35
-
36
-
37
-
38
-
39
-
40
-
41
-
42
-
43
-
44
-
45
-
46
-
47
-
48
-
49
-
50
-
51
-
52
-
53
-
54
-
55
-
56
-
57
-
58
-
59
-
60
-
61
-
62
-
63
-
64
-
65
-
66
-
 67
67 -
 68
68 -
 69
69 -
 70
70 -
 71
71 -
 72
72 -
 73
73 -
 74
74 -
 75
75 -
 76
76 -
 77
77 -
78
-
79
-
80
-
81
-
82
-
83
-
84
-
85
-
86
-
87
-
88
-
89
-
90
-
91
-
92
-
93
-
94
-
95
-
96
-
97
-
98
-
99
-
100
-
101
-
102
-
103
-
104
-
105
-
106
-
107
-
108
-
109
-
110
-
111
-
112
-
113
-
114
-
115
-
116
-
117
-
118
-
119
-
120
-
121
-
122
-
123
-
124
-
125
-
126
-
127
-
128
-
129
-
130
-
131
-
132
-
133
-
134
-
135
-
136
-
137
-
138
-
139
-
140
-
141
-
142
-
143
-
144
-
145
-
146
-
147
-
148
-
149
-
150
-
151
-
152
-
153
-
154
-
155
-
156
-
157
-
158
-
159
-
160
-
161
-
162
-
163
-
164
-
165
-
166
-
167
-
168
-
169
-
170
-
171
-
172
-
173
-
174
-
175
-
176
-
177
-
178
-
179
-
180
-
181
-
182
-
183
 |
 |
