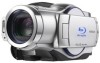
Hitachi DZ-BD70AF Owners Guide - Page 74
Using the Flash
 |
UPC - 050585224094
View all Hitachi DZ-BD70AF manuals
Add to My Manuals
Save this manual to your list of manuals |
Page 74 highlights
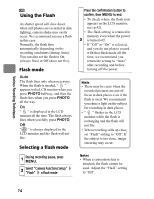
Various Recording Techniques CARD Using the Flash As shutter speed will slow down when still photos are recorded in dim lighting, camera shake may easily occur. We recommend you use a flash in this case. Normally, the flash fires automatically depending on the recording conditions (during Auto). You can also set the flash to On (always fires) or Off (does not fire). Flash mode Auto The flash fires only when necessary. When the flash is needed, " " appears in the LCD monitor when you press PHOTO halfway, and then the flash fires when you press PHOTO all the way. On " " is displayed in the LCD monitor all the time. The flash always fires when you fully press PHOTO. Off " " is always displayed in the LCD monitor and the flash will not fire. Selecting a flash mode 1 During recording pause, press MENU. 2 Select "Camera Functions Setup" "Flash" a flash mode Press the confirmation button to confirm, then MENU to end. • To check where the flash icon appears in the LCD monitor, see (p.42). • The flash setting is retained in memory even when the power 3 is turned off. • If "Off" or "On" is selected, and you do not plan to record with that flash mode all the time, we recommend you return the setting to "Auto" after recording and before turning off the power. Hints • There may be cases when the recorded pictures are out-offocus in dark places even if the flash is used. We recommend you shine a light on the subject for recording in dark places. • " " flashes in the LCD monitor while the flash is recharging and the flash will not fire. • When recording stills up close, set "Flash" setting to "Off". If the subject is too close, image smearing may occur. Notes • When a conversion lens is attached, the flash cannot be used. Adjust the "Flash" setting to "Off". 74
-
 1
1 -
2
-
3
-
4
-
5
-
6
-
7
-
8
-
9
-
10
-
11
-
12
-
13
-
14
-
15
-
16
-
17
-
18
-
19
-
20
-
21
-
22
-
23
-
24
-
25
-
26
-
27
-
28
-
29
-
30
-
31
-
32
-
33
-
34
-
35
-
36
-
37
-
38
-
39
-
40
-
41
-
42
-
43
-
44
-
45
-
46
-
47
-
48
-
49
-
50
-
51
-
52
-
53
-
54
-
55
-
56
-
57
-
58
-
59
-
60
-
61
-
62
-
63
-
64
-
65
-
66
-
67
-
68
-
 69
69 -
 70
70 -
 71
71 -
 72
72 -
 73
73 -
 74
74 -
 75
75 -
 76
76 -
 77
77 -
 78
78 -
 79
79 -
80
-
81
-
82
-
83
-
84
-
85
-
86
-
87
-
88
-
89
-
90
-
91
-
92
-
93
-
94
-
95
-
96
-
97
-
98
-
99
-
100
-
101
-
102
-
103
-
104
-
105
-
106
-
107
-
108
-
109
-
110
-
111
-
112
-
113
-
114
-
115
-
116
-
117
-
118
-
119
-
120
-
121
-
122
-
123
-
124
-
125
-
126
-
127
-
128
-
129
-
130
-
131
-
132
-
133
-
134
-
135
-
136
-
137
-
138
-
139
-
140
-
141
-
142
-
143
-
144
-
145
-
146
-
147
-
148
-
149
-
150
-
151
-
152
-
153
-
154
-
155
-
156
-
157
-
158
-
159
-
160
-
161
-
162
-
163
-
164
-
165
-
166
-
167
-
168
-
169
-
170
-
171
-
172
-
173
-
174
-
175
-
176
-
177
-
178
-
179
-
180
-
181
-
182
-
183
 |
 |
