IBM 326m Hardware Maintenance Manual - Page 42
Removing, cover, bezel
 |
UPC - 000435835093
View all IBM 326m manuals
Add to My Manuals
Save this manual to your list of manuals |
Page 42 highlights
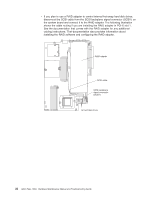
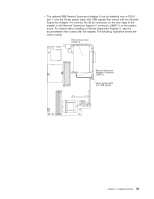
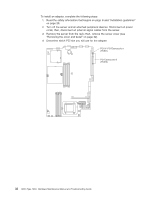
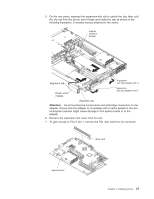
Removing the cover and bezel Important: Before you install optional hardware, make sure that the server is working correctly. Start the server, and make sure that the operating system starts, if an operating system is installed, or that a 19990305 error code is displayed, indicating that an operating system was not found but the server is otherwise working correctly. If the server is not working correctly, see Chapter 3, "Diagnostics," on page 17. To remove the cover and bezel (with the server out of the rack), complete the following steps: 1. Read the safety information that begins on page iii and "Installation guidelines" on page 29. 2. Turn off the server and all attached peripheral devices. Disconnect all power cords; then, disconnect all external signal cables from the server. 3. Remove the server from the rack. Lift the cover release latch; the cover slides to the rear approximately 13 mm (0.5 inch). Captive screws Bezel retention tabs USB option tray Bezel retention tabs Retention clip 4. Lift the cover off the server. Attention: For proper cooling and airflow, replace the cover before turning on the server. Operating the server for extended periods of time (more than 30 minutes) with the cover removed might damage server components. 5. If you are installing a non-hot-swap hard disk drive, remove the USB option tray. Press in on the USB option tray (below hard disk drive bay 1) to release it and slide the tray out until it stops; then, press the retention clip at the bottom rear of the tray and remove the tray from the server. Note: You need to remove the USB option tray and the bezel only if you are installing a non-hot-swap hard disk drive. It is not necessary if you are installing other options in the server. 6. Press on the bezel retention tabs on the top, right side and bottom of the server, and pull the bezel directly away from the server. 32 326m Type 7969: Hardware Maintenance Manual and Troubleshooting Guide
-
 1
1 -
2
-
3
-
4
-
5
-
6
-
7
-
8
-
9
-
10
-
11
-
12
-
13
-
14
-
15
-
16
-
17
-
18
-
19
-
20
-
21
-
22
-
23
-
24
-
25
-
26
-
27
-
28
-
29
-
30
-
31
-
32
-
33
-
34
-
35
-
36
-
 37
37 -
 38
38 -
 39
39 -
 40
40 -
 41
41 -
 42
42 -
 43
43 -
 44
44 -
 45
45 -
 46
46 -
 47
47 -
48
-
49
-
50
-
51
-
52
-
53
-
54
-
55
-
56
-
57
-
58
-
59
-
60
-
61
-
62
-
63
-
64
-
65
-
66
-
67
-
68
-
69
-
70
-
71
-
72
-
73
-
74
-
75
-
76
-
77
-
78
-
79
-
80
-
81
-
82
-
83
-
84
-
85
-
86
-
87
-
88
-
89
-
90
-
91
-
92
-
93
-
94
-
95
-
96
-
97
-
98
-
99
-
100
-
101
-
102
-
103
-
104
-
105
-
106
-
107
-
108
-
109
-
110
-
111
-
112
-
113
-
114
-
115
-
116
-
117
-
118
-
119
-
120
-
121
-
122
-
123
-
124
-
125
-
126
-
127
-
128
-
129
-
130
-
131
-
132
-
133
-
134
-
135
-
136
-
137
-
138
-
139
-
140
-
141
-
142
-
143
-
144
-
145
-
146
-
147
-
148
-
149
-
150
-
151
-
152
-
153
-
154
-
155
-
156
-
157
-
158
-
159
-
160
-
161
-
162
-
163
-
164
-
165
-
166
-
167
-
168
-
169
-
170
-
171
-
172
 |
 |
