Intel SBXD132 User Guide - Page 29
Removing a SAS Hard Disk Drive
 |
UPC - 735858189408
View all Intel SBXD132 manuals
Add to My Manuals
Save this manual to your list of manuals |
Page 29 highlights
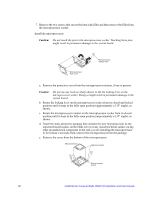
b. Install the SAS connector 1 drive tray. Secure the drive tray to the system board with the screws from the option kit. Caution: Do not press on the top of the drive. Pressing on the top might damage the drive. 7. Put the drive into the tray and push it, from the rear edge of the drive, into the connector until the drive moves past the lever at the back of the tray. If you have other options to install or remove, do so now; otherwise, go to "Completing the Installation" on page 32. Removing a SAS Hard Disk Drive The following illustration shows how to remove a SAS hard disk drive. SAS ID 1 Hard disk drive release lever SAS ID 0 Hard disk drive release lever AF000934 To remove a SAS hard disk drive, complete the following steps: 1. Read the safety information beginning on page vii and "Installation Guidelines" on page 15. 2. Shutdown the operating system, turn off the blade server, and remove the blade server from the SBCE unit (see "Removing the Blade Server from the Intel® Blade Server Chassis SBCE" on page 16 for instructions). 3. Carefully lay the blade server on a flat, static-protective surface. 4. Open the blade server cover (see "Opening the Blade Server Cover" on page 17 for instructions). 5. Locate SAS connector 0 (J136) or SAS connector 1 (J137). Slowly pull the blue lever at the back of the hard disk drive tray away from the hard disk drive to disengage the drive from its tray. 6. From the rear edge of the drive, slide the drive out of the SAS connector. Intel® Server Compute Blade SBXD132 Installation and User's Guide 21
-
 1
1 -
2
-
3
-
4
-
5
-
6
-
7
-
8
-
9
-
10
-
11
-
12
-
13
-
14
-
15
-
16
-
17
-
18
-
19
-
20
-
21
-
22
-
23
-
 24
24 -
 25
25 -
 26
26 -
 27
27 -
 28
28 -
 29
29 -
 30
30 -
 31
31 -
 32
32 -
 33
33 -
 34
34 -
35
-
36
-
37
-
38
-
39
-
40
-
41
-
42
-
43
-
44
-
45
-
46
-
47
-
48
-
49
-
50
-
51
-
52
-
53
-
54
-
55
-
56
-
57
-
58
-
59
-
60
-
61
-
62
-
63
-
64
-
65
-
66
-
67
-
68
-
69
-
70
-
71
-
72
-
73
-
74
-
75
-
76
-
77
-
78
-
79
-
80
-
81
-
82
-
83
-
84
-
85
-
86
-
87
-
88
-
89
-
90
-
91
-
92
-
93
-
94
-
95
-
96
-
97
-
98
-
99
-
100
-
101
-
102
-
103
-
104
-
105
-
106
-
107
-
108
-
109
-
110
-
111
-
112
-
113
-
114
-
115
-
116
-
117
-
118
-
119
-
120
-
121
-
122
-
123
-
124
-
125
-
126
-
127
-
128
-
129
-
130
 |
 |
