Intel SBXD132 User Guide - Page 32
Installing an Additional Microprocessor, Caution, Important, Notes
 |
UPC - 735858189408
View all Intel SBXD132 manuals
Add to My Manuals
Save this manual to your list of manuals |
Page 32 highlights
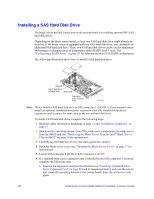
6. If a Memory and I/O Expansion Blade is installed and you are installing DIMMs on the system board, remove the expansion blade (see "Removing an Expansion Unit" on page 18). 7. Locate the DIMM connectors (see the illustrations in "Blade Server Connectors" on page 12). Determine the connectors into which you will install the DIMMs. 8. Touch the static-protective package that contains the DIMM to any unpainted metal surface on the SBCE unit or any unpainted metal surface on any other grounded rack component in the rack in which you are installing the DIMM for at least 2 seconds; then, remove the DIMM from its package. 9. To install the DIMMs, repeat the following steps for each DIMM that you install: a. Turn the DIMM so that the DIMM keys align correctly with the connector on the system board. Caution: To avoid breaking the retaining clips or damaging the DIMM connectors, handle the clips gently. b. Insert the DIMM by pressing the DIMM along the guides into the connector. Make sure that the retaining clips snap into the closed positions. Important: If there is a gap between the DIMM and the retaining clips, the DIMM has not been correctly installed. In this case, open the retaining clips and remove the DIMM; then, reinsert the DIMM. 10. If you have other options to install or remove, do so now; otherwise, go to "Completing the Installation" on page 32. If memory is installed in the Memory and I/O Expansion Blade, it can be configured to provide memory mirroring using the Configuration/Setup Utility program. See Advanced Setup -> Memory Settings under "Configuration/Setup Utility Menu Choices" on page 58 for more information. Installing an Additional Microprocessor The blade server comes with at lease one microprocessor. If the blade server comes with one microprocessor, you can install a second microprocessor. If more than one microprocessor is installed, the blade server can now operate as a symmetric multiprocessing (SMP) server. With SMP, certain operating systems and application programs can distribute the processing load between the microprocessors. Notes: 1. You can not remove the single microprocessor and replace it with a different type of microprocessor of greater or lesser speed. 2. If you install a second microprocessor, you must install the same microprocessor type and speed as the first microprocessor. To use SMP, obtain an SMP-capable operating system. For a list of supported operating systems and other options, go to http://support.intel.com/support/. 24 Intel® Server Compute Blade SBXD132 Installation and User's Guide
-
 1
1 -
2
-
3
-
4
-
5
-
6
-
7
-
8
-
9
-
10
-
11
-
12
-
13
-
14
-
15
-
16
-
17
-
18
-
19
-
20
-
21
-
22
-
23
-
24
-
25
-
26
-
 27
27 -
 28
28 -
 29
29 -
 30
30 -
 31
31 -
 32
32 -
 33
33 -
 34
34 -
 35
35 -
 36
36 -
 37
37 -
38
-
39
-
40
-
41
-
42
-
43
-
44
-
45
-
46
-
47
-
48
-
49
-
50
-
51
-
52
-
53
-
54
-
55
-
56
-
57
-
58
-
59
-
60
-
61
-
62
-
63
-
64
-
65
-
66
-
67
-
68
-
69
-
70
-
71
-
72
-
73
-
74
-
75
-
76
-
77
-
78
-
79
-
80
-
81
-
82
-
83
-
84
-
85
-
86
-
87
-
88
-
89
-
90
-
91
-
92
-
93
-
94
-
95
-
96
-
97
-
98
-
99
-
100
-
101
-
102
-
103
-
104
-
105
-
106
-
107
-
108
-
109
-
110
-
111
-
112
-
113
-
114
-
115
-
116
-
117
-
118
-
119
-
120
-
121
-
122
-
123
-
124
-
125
-
126
-
127
-
128
-
129
-
130
 |
 |
