Intel SBXD132 User Guide - Page 38
Installing a Standard-form-factor Expansion Card, Removing a SAS Hard Disk Drive
 |
UPC - 735858189408
View all Intel SBXD132 manuals
Add to My Manuals
Save this manual to your list of manuals |
Page 38 highlights
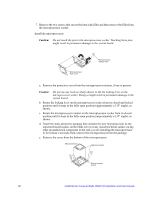
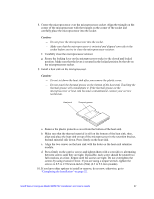
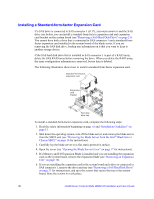
Installing a Standard-form-factor Expansion Card If a SAS drive is connected to SAS connector 1 (J137), you must remove it and the SAS drive tray before you can install a standard-form-factor expansion card and expansion card bracket on the system board (see "Removing a SAS Hard Disk Drive" on page 21). You cannot have both a drive that is connected to SAS connector 1 and a standard-formfactor expansion card installed in the system board of the blade server. If you are removing the SAS disk drive, backup any information on it that you want to keep to another storage device. If the SAS hard disk drive that is installed in SAS connector 1 is part of a RAID array, delete the SAS RAID array before removing the drive. When you delete the RAID array, the array configuration information is removed, but no data is deleted. The following illustration shows how to install a standard-form-factor expansion card. Standard-form-factor expansion card Expansion card bracket INPSRTAELSLISNHGERCEARWDHEN Hard disk drive tray To install a standard-form-factor expansion card, complete the following steps: 1. Read the safety information beginning on page vii and "Installation Guidelines" on page 15. 2. Shut down the operating system, turn off the blade server, and remove the blade server from the SBCE unit (see "Removing the Blade Server from the Intel® Blade Server Chassis SBCE" on page 16 for instructions). 3. Carefully lay the blade server on a flat, static-protective surface. 4. Open the cover (see "Opening the Blade Server Cover" on page 17 for instructions). 5. If a Memory and I/O Expansion Blade is installed and you are installing the expansion card on the system board, remove the expansion blade (see "Removing an Expansion Unit" on page 18). 6. If you are installing the expansion card in the system board and a drive is connected to SAS connector 1, remove the drive and tray (see "Removing a SAS Hard Disk Drive" on page 21 for instructions), and save the screws that secure the tray to the system board. Store the screws in a safe place. 30 Intel® Server Compute Blade SBXD132 Installation and User's Guide
-
 1
1 -
2
-
3
-
4
-
5
-
6
-
7
-
8
-
9
-
10
-
11
-
12
-
13
-
14
-
15
-
16
-
17
-
18
-
19
-
20
-
21
-
22
-
23
-
24
-
25
-
26
-
27
-
28
-
29
-
30
-
31
-
32
-
 33
33 -
 34
34 -
 35
35 -
 36
36 -
 37
37 -
 38
38 -
 39
39 -
 40
40 -
 41
41 -
 42
42 -
 43
43 -
44
-
45
-
46
-
47
-
48
-
49
-
50
-
51
-
52
-
53
-
54
-
55
-
56
-
57
-
58
-
59
-
60
-
61
-
62
-
63
-
64
-
65
-
66
-
67
-
68
-
69
-
70
-
71
-
72
-
73
-
74
-
75
-
76
-
77
-
78
-
79
-
80
-
81
-
82
-
83
-
84
-
85
-
86
-
87
-
88
-
89
-
90
-
91
-
92
-
93
-
94
-
95
-
96
-
97
-
98
-
99
-
100
-
101
-
102
-
103
-
104
-
105
-
106
-
107
-
108
-
109
-
110
-
111
-
112
-
113
-
114
-
115
-
116
-
117
-
118
-
119
-
120
-
121
-
122
-
123
-
124
-
125
-
126
-
127
-
128
-
129
-
130
 |
 |
