Intel SBXD132 User Guide - Page 50
Installing an I/O-expansion Card on Install a ServeRAID
 |
UPC - 735858189408
View all Intel SBXD132 manuals
Add to My Manuals
Save this manual to your list of manuals |
Page 50 highlights
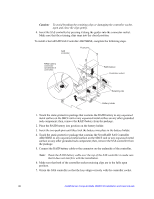
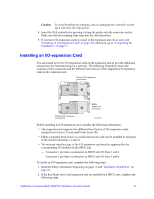
Complete the following steps to install the expansion unit: 1. Read the Safety information beginning on page vii and "Installation Guidelines" on page 39. 2. If the host blade server is installed in a SBCE unit, shut down the operating system and turn off the blade server; then, remove the blade server from the SBCE unit (see the documentation that comes with the blade server for more information). 3. Carefully lay the blade server on a flat, static-protective surface. 4. Open the blade server cover and lift it off of the blade server (see the documentation that comes with the blade server for more information). 5. Locate the blade expansion connector near the rear of the host blade server and remove the cover from the connector. 6. Touch the static-protective package that contains the expansion unit to any unpainted metal surface on the SBCE unit or any unpainted metal surface on another grounded rack component; then, remove the expansion unit from the package. 7. Orient the expansion unit over the blade server. 8. Lower the expansion unit so that the slots at the rear slide down onto the pins at the rear of the blade server. 9. Pivot the expansion unit closed and press it firmly into place until the cover-release latches click. The connector on the expansion unit automatically aligns with and connects to the blade expansion connector on the blade server. 10. Install a ServeRAID™ SAS controller in the expansion unit (see "Installing a ServeRAID SAS Controller" on page 45). 11. If you have I/O-expansion cards to install in the expansion unit, do so now (see "Installing an I/O-expansion Card" on page 47); otherwise, go to "Completing the Installation" on page 51. 42 Intel® Server Compute Blade SBXD132 Installation and User's Guide
-
 1
1 -
2
-
3
-
4
-
5
-
6
-
7
-
8
-
9
-
10
-
11
-
12
-
13
-
14
-
15
-
16
-
17
-
18
-
19
-
20
-
21
-
22
-
23
-
24
-
25
-
26
-
27
-
28
-
29
-
30
-
31
-
32
-
33
-
34
-
35
-
36
-
37
-
38
-
39
-
40
-
41
-
42
-
43
-
44
-
 45
45 -
 46
46 -
 47
47 -
 48
48 -
 49
49 -
 50
50 -
 51
51 -
 52
52 -
 53
53 -
 54
54 -
 55
55 -
56
-
57
-
58
-
59
-
60
-
61
-
62
-
63
-
64
-
65
-
66
-
67
-
68
-
69
-
70
-
71
-
72
-
73
-
74
-
75
-
76
-
77
-
78
-
79
-
80
-
81
-
82
-
83
-
84
-
85
-
86
-
87
-
88
-
89
-
90
-
91
-
92
-
93
-
94
-
95
-
96
-
97
-
98
-
99
-
100
-
101
-
102
-
103
-
104
-
105
-
106
-
107
-
108
-
109
-
110
-
111
-
112
-
113
-
114
-
115
-
116
-
117
-
118
-
119
-
120
-
121
-
122
-
123
-
124
-
125
-
126
-
127
-
128
-
129
-
130
 |
 |
