Intel SBXD132 User Guide - Page 54
Route the RAID battery cable over the top of the SAS controller to make sure
 |
UPC - 735858189408
View all Intel SBXD132 manuals
Add to My Manuals
Save this manual to your list of manuals |
Page 54 highlights
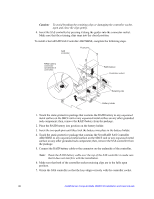
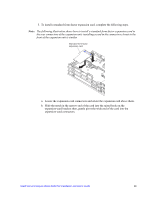
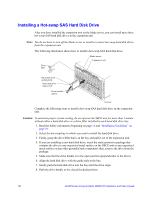
Caution: To avoid breaking the retaining clips or damaging the controller socket, open and close the clips gently. 4. Insert the SAS controller by pressing it along the guides into the connector socket. Make sure that the retaining clips snap into the closed position. To install a ServeRAID SAS Controller AB256BSE, complete the following steps. SAS controller Push pins RAID battery connector (underside of controller) RAID battery Controller socket Retaining clips Battery holder 1. Touch the static-protective package that contains the RAID battery to any unpainted metal surface on the SBCE unit or any unpainted metal surface on any other grounded rack component; then, remove the RAID battery from the package. 2. Place the RAID battery into position on the battery holder. 3. Insert the two push pins until they lock the battery into place in the battery holder. 4. Touch the static-protective package that contains the ServeRAID SAS Controller AB256BSE to any unpainted metal surface on the SBCE unit or any unpainted metal surface on any other grounded rack component; then, remove the SAS controller from the package. 5. Connect the RAID battery cable to the connector on the underside of the controller. Note: Route the RAID battery cable over the top of the SAS controller to make sure that it does not interfere with the installation. 6. Make sure that both of the controller socket retaining clips are in the fully open position. 7. Orient the SAS controller so that the keys align correctly with the controller socket. 46 Intel® Server Compute Blade SBXD132 Installation and User's Guide
-
 1
1 -
2
-
3
-
4
-
5
-
6
-
7
-
8
-
9
-
10
-
11
-
12
-
13
-
14
-
15
-
16
-
17
-
18
-
19
-
20
-
21
-
22
-
23
-
24
-
25
-
26
-
27
-
28
-
29
-
30
-
31
-
32
-
33
-
34
-
35
-
36
-
37
-
38
-
39
-
40
-
41
-
42
-
43
-
44
-
45
-
46
-
47
-
48
-
 49
49 -
 50
50 -
 51
51 -
 52
52 -
 53
53 -
 54
54 -
 55
55 -
 56
56 -
 57
57 -
 58
58 -
 59
59 -
60
-
61
-
62
-
63
-
64
-
65
-
66
-
67
-
68
-
69
-
70
-
71
-
72
-
73
-
74
-
75
-
76
-
77
-
78
-
79
-
80
-
81
-
82
-
83
-
84
-
85
-
86
-
87
-
88
-
89
-
90
-
91
-
92
-
93
-
94
-
95
-
96
-
97
-
98
-
99
-
100
-
101
-
102
-
103
-
104
-
105
-
106
-
107
-
108
-
109
-
110
-
111
-
112
-
113
-
114
-
115
-
116
-
117
-
118
-
119
-
120
-
121
-
122
-
123
-
124
-
125
-
126
-
127
-
128
-
129
-
130
 |
 |
