Intel SBXD132 User Guide - Page 58
Installing a Hot-swap SAS Hard Disk Drive, contains the drive to any
 |
UPC - 735858189408
View all Intel SBXD132 manuals
Add to My Manuals
Save this manual to your list of manuals |
Page 58 highlights
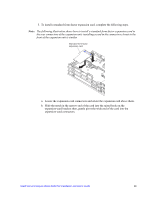
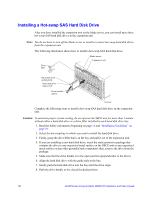
Installing a Hot-swap SAS Hard Disk Drive After you have installed the expansion unit on the blade server, you can install up to three hot-swap SAS hard disk drives in the expansion unit. Note: You do not have to turn off the blade server to install or remove hot-swap hard disk drives from the expansion unit. The following illustration shows how to install a hot-swap SAS hard disk drive. Blade server Expansion unit Drive filler Hard disk drive activity LED Hard disk drive status LED Drive handle (open) AF000940 Complete the following steps to install a hot-swap SAS hard disk drive in the expansion unit. Caution: To maintain proper system cooling, do not operate the SBCE unit for more than 1 minute without either a hard disk drive or a drive filler installed in each hard disk drive bay. 1. Read the Safety information beginning on page vii and "Installation Guidelines" on page 39. 2. Select the hot-swap bay in which you want to install the hard disk drive. 3. Firmly grasp the drive filler that is in the bay and pull it out of the expansion unit. 4. If you are installing a new hard disk drive, touch the static-protective package that contains the drive to any unpainted metal surface on the SBCE unit or any unpainted metal surface on any other grounded rack component; then, remove the drive from the package. 5. Make sure that the drive handle is in the open position (perpendicular to the drive). 6. Align the hard disk drive with the guide rails in the bay. 7. Gently push the hard disk drive into the bay until the drive stops. 8. Push the drive handle to the closed (locked) position. 50 Intel® Server Compute Blade SBXD132 Installation and User's Guide
-
 1
1 -
2
-
3
-
4
-
5
-
6
-
7
-
8
-
9
-
10
-
11
-
12
-
13
-
14
-
15
-
16
-
17
-
18
-
19
-
20
-
21
-
22
-
23
-
24
-
25
-
26
-
27
-
28
-
29
-
30
-
31
-
32
-
33
-
34
-
35
-
36
-
37
-
38
-
39
-
40
-
41
-
42
-
43
-
44
-
45
-
46
-
47
-
48
-
49
-
50
-
51
-
52
-
 53
53 -
 54
54 -
 55
55 -
 56
56 -
 57
57 -
 58
58 -
 59
59 -
 60
60 -
 61
61 -
 62
62 -
 63
63 -
64
-
65
-
66
-
67
-
68
-
69
-
70
-
71
-
72
-
73
-
74
-
75
-
76
-
77
-
78
-
79
-
80
-
81
-
82
-
83
-
84
-
85
-
86
-
87
-
88
-
89
-
90
-
91
-
92
-
93
-
94
-
95
-
96
-
97
-
98
-
99
-
100
-
101
-
102
-
103
-
104
-
105
-
106
-
107
-
108
-
109
-
110
-
111
-
112
-
113
-
114
-
115
-
116
-
117
-
118
-
119
-
120
-
121
-
122
-
123
-
124
-
125
-
126
-
127
-
128
-
129
-
130
 |
 |
