JVC BR-DV6000U User Manual - Page 40
Setting date and time
 |
UPC - 046838325557
View all JVC BR-DV6000U manuals
Add to My Manuals
Save this manual to your list of manuals |
Page 40 highlights
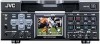
PREPARATION - Setting/Displaying date and time - This function sets up the date and time of the built-in clock. With the built-in chargeable battery, the date and time data that have been set are maintained even after the main power is turned off. The set date and time data are displayed on the monitor or the LCD display according to the settings in the Menu screen. Set DATE REC in the TC/UB/CLOCK (2/2) screen to ON if the date/time display is to be recorded on the tape as video signals. With DV signal input, date/time data are not re- corded. (☞ Page 42 "Setting date/time recording") MENU button 8 button : button OPERATE button SET button ; button 9 button Mini MENU DISP RESET SEARCH- SET SEARCH+ MIC HOLD BLANK CUE UP PHONES REC LEVEL CH-1/3 CH-2/4 PROFESSIONAL BR-DV6000 OPERATE A.DUB REC PLAY PAUSE EJECT REW STOP FF AUDIO INPUT COUNTER MONITOR OUTPUT SELECT CTL L CH-1/2 DV TC MIX MIX LINE UB R CH-3/4 Y/C (CPN) REMOTE LOCAL Setting date and time The date and time are set up at the CLOCK ADJUST Menu screen. The CLOCK ADJUST Menu screen is found under the TC/UB/CLOCK (2/2) Menu. Setting can be performed while checking the information shown on the monitor connected to the VIDEO MONITOR OUT terminal. TC/UB/CLOCK (2/2) Menu screen - - - T C / U B / C L O C K ( 2 / 2 )- - - U- B I T ( PAL ) --- DATE REC OFF CLOCK ADJUST . . PAGE BACK Cursor CLOCK ADJUST Menu screen Date (MM/DD/YY) - - -CLOCK ADJUST - - - DATE 03 / 04 / 03 T I ME 00 : 00 : 00 PAGE BACK Time (Hour, minute) - - -CLOCK ADJUST - - - DATE 03 / 04 / 03 T I ME 12 : 00 : PAGE BACK Ⅵ Press the OPERATE button to turn on the power and set it to the STOP mode. 1. Press the MENU button to display the TOP MENU screen. 2. Displaying the CLOCK ADJUST Menu. 1 Press the 8 or 9 button to bring the cursor to the desired TC/ UB/CLOCK item. Press SET or the : button. 2 Press the 8 or 9 button to bring the cursor to the NEXT PAGE item in the TC/UB/CLOCK (1/2) Menu screen. Press SET or the : button. 3 Press the 8 or 9 button to bring the cursor to the CLOCK ADJUST item in the TC/UB/CLOCK (2/2) Menu screen. Press SET or the : button. 3. Setting the date and time in the CLOCK ADJUST Menu screen. 1 Press the 8 or 9 button to bring the cursor to the date or time item. Press SET or the : button. 2 Press the : or ; button to select the digit for setting. The selected digit starts blinking. 3 Press the 8 or 9 to set the value. 4 Repeat step 1 - 3. After completing the required setting, press the SET button. 40
-
 1
1 -
2
-
3
-
4
-
5
-
6
-
7
-
8
-
9
-
10
-
11
-
12
-
13
-
14
-
15
-
16
-
17
-
18
-
19
-
20
-
21
-
22
-
23
-
24
-
25
-
26
-
27
-
28
-
29
-
30
-
31
-
32
-
33
-
34
-
 35
35 -
 36
36 -
 37
37 -
 38
38 -
 39
39 -
 40
40 -
 41
41 -
 42
42 -
 43
43 -
 44
44 -
 45
45 -
46
-
47
-
48
-
49
-
50
-
51
-
52
-
53
-
54
-
55
-
56
-
57
-
58
-
59
-
60
-
61
-
62
-
63
-
64
-
65
-
66
-
67
-
68
-
69
-
70
-
71
-
72
-
73
-
74
-
75
-
76
-
77
-
78
-
79
-
80
-
81
-
82
-
83
-
84
-
85
-
86
-
87
-
88
-
89
-
90
-
91
-
92
-
93
-
94
-
95
-
96
-
97
-
98
-
99
-
100
-
101
-
102
-
103
-
104
-
105
-
106
 |
 |
