JVC BR-DV6000U User Manual - Page 43
Recording index signals
 |
UPC - 046838325557
View all JVC BR-DV6000U manuals
Add to My Manuals
Save this manual to your list of manuals |
Page 43 highlights
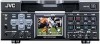
RECORDING 3. REC button - Recording procedure - 3. 5 PLAY button Mini MENU DISP RESET SEARCH- SET SEARCH+ MIC HOLD BLANK CUE UP PHONES REC LEVEL CH-1/3 CH-2/4 PROFESSIONAL BR-DV6000 OPERATE A.DUB REC PLAY PAUSE EJECT REW STOP FF 4. PAUSE button AUDIO INPUT COUNTER MONITOR OUTPUT SELECT CTL L CH-1/2 DV TC MIX MIX LINE UB R CH-3/4 Y/C (CPN) REMOTE LOCAL 2. REC LEVEL volume 6. STOP button Memo ● The tape protection function enables BR-DV6000 automatically to go into the STOP mode when there is a long recording pause. The time to go into the STOP mode can be set with LONG PAUSE TIME in the SYSTEM (1/2) Menu screen. ● When a home-use DV VCR is used to play tapes recorded with BR-DV6000, the sound level may be reduced. 1. Load the cassette tape. • Before loading the cassette tape, please ensure that the rear slide of the cassette tape is pushed to REC. ¥ The unit is turned on. 2. Adjust the audio recording level. • Adjust the REC LEVEL volume. Adjust it such a way that, with the maximum volume, the audio level meter does not display OVER. ❈ During DV input, the REC LEVEL volume cannot be adjusted. 3. Start recording. • Press the PLAY button while holding down the REC button. 4. Pause recording. • Press the PAUSE button. 5. Resume recording. • Press the PLAY button. 6. Stop recording. • Press the STOP button. Recording index signals If INDEX WRITE is set to ON in the SYSTEM (2/2) Menu screen, an index signal is recorded at the recording starting position of the tape. In the PLAYBACK mode, the position where the index signal is recorded can be searched. (Index search) Memo If recording is performed right after the RECORDING PAUSE mode is exited, index signals are not recorded. Ⅵ Press the REC button to record index signals during recording ❈ It is not possible to record only index signals after the recording. Allow at least an interval of 1 minute between recordings of index. ❈ Index signals cannot be recorded with the REC button of the remote controller. Use the record button of BR-DV6000. 43
-
 1
1 -
2
-
3
-
4
-
5
-
6
-
7
-
8
-
9
-
10
-
11
-
12
-
13
-
14
-
15
-
16
-
17
-
18
-
19
-
20
-
21
-
22
-
23
-
24
-
25
-
26
-
27
-
28
-
29
-
30
-
31
-
32
-
33
-
34
-
35
-
36
-
37
-
 38
38 -
 39
39 -
 40
40 -
 41
41 -
 42
42 -
 43
43 -
 44
44 -
 45
45 -
 46
46 -
 47
47 -
 48
48 -
49
-
50
-
51
-
52
-
53
-
54
-
55
-
56
-
57
-
58
-
59
-
60
-
61
-
62
-
63
-
64
-
65
-
66
-
67
-
68
-
69
-
70
-
71
-
72
-
73
-
74
-
75
-
76
-
77
-
78
-
79
-
80
-
81
-
82
-
83
-
84
-
85
-
86
-
87
-
88
-
89
-
90
-
91
-
92
-
93
-
94
-
95
-
96
-
97
-
98
-
99
-
100
-
101
-
102
-
103
-
104
-
105
-
106
 |
 |
