JVC GY-DV300REM Instruction Manual - Page 13
Indications on LCD Screen and Viewfinder Screen
 |
View all JVC GY-DV300REM manuals
Add to My Manuals
Save this manual to your list of manuals |
Page 13 highlights
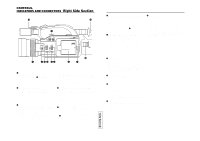
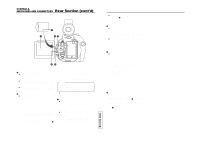
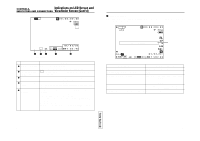
CONTROLS, INDICATORS AND CONNECTORS Indications on LCD Screen and Viewfinder Screen In addition to the E-E picture and the playback picture, the following indications are displayed on the LCD screen and the viewfinder screen. Ⅲ Status screens (screens for use in checking the current camera settings) Ⅲ Event indications Ⅲ Alarm indications Ⅲ Menu setting screens Ⅲ Auto white balance operation indicator When the LCD screen is used, the above indicators are not shown on the viewfinder screen. When the LCD screen is faced toward the viewfinder screen side and the LCD door is closed, the above indictors appear on the viewfinder screen. Ⅵ Status Screens The contents of the status screens differ in the camera shooting mode and in the VTR playback mode. Also, the items displayed on the status screen differ with the direction that the LCD screen is facing, i.e., toward the viewfinder (normal display) or toward the lens (vertically inverted display). Normal display in the shooting mode Vertically inverted display in the shooting mode Battery symbol For a part of the status indicators it is possible to select whether or not the item should be displayed by making a selection on the DISPLAY [2/2] menu screen. VTR operation symbol (Recording or pause) In relation to the normal display, the vertically inverted display is reversed left to right, and only the battery symbol and the recording symbol/pause symbol are displayed. ● When the LCD screen is faced toward the lens side and the LCD door is closed, the normal display will be seen. Memo: After-images will increase on the LCD screen when used under cold circumstances. 22 TENTATIVE Normal display in the shooting mode q w e r t y No. Item Contents 1 Zoom ratio (Characters, Displayed during zoom operation. The characters indicate the wide- numeric value) angle (W) and telephoto (T) zoom positions. The numeric value indicates the approximate zoom ratio. 2 Time code display Shows the time code (hours, minutes, seconds, frames). Whether this should be displayed can be selected by setting the TIME CODE item on the DISPLAY [2/2] menu screen. 3 Recording time mode indication Shows the recording speed at the time of the recording. SP : Standard Play mode LP : Long Play mode When the remaining tape indication is OFF, this indication is shown at the 4 position. 4 Remaining tape time indication Indicates the remaining tape amount (minutes) in 1-minute steps. Whether this indication should be ON or OFF can be selected by setting the TAPE REMAIN item on the DISPLAY [2/2] menu screen. * The indication may not appear when a new tape is loaded, after the tape runs, the indication appears. 5 Remaining battery power indication The remaining battery power is indicated by four different indicators. 6 Camera-shake compensation on indication Fully charged battery Blinking indicator (no remaining battery power) Displayed when the camera-shake compensation function is on (OIS item on the OPERATION menu screen is set to ON). 23
-
 1
1 -
2
-
3
-
4
-
5
-
6
-
7
-
 8
8 -
 9
9 -
 10
10 -
 11
11 -
 12
12 -
 13
13 -
 14
14 -
 15
15 -
 16
16 -
 17
17 -
 18
18 -
19
-
20
-
21
-
22
-
23
-
24
-
25
-
26
-
27
-
28
-
29
-
30
-
31
-
32
-
33
-
34
-
35
-
36
-
37
-
38
-
39
-
40
-
41
-
42
-
43
-
44
-
45
-
46
-
47
-
48
-
49
-
50
-
51
-
52
-
53
-
54
-
55
-
56
-
57
 |
 |
