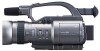
JVC GY-DV300REM Instruction Manual - Page 21
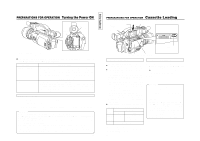
PREPARATIONS FOR OPERATION, Turning the Power ON, Cassette Loading
 |
View all JVC GY-DV300REM manuals
Add to My Manuals
Save this manual to your list of manuals |
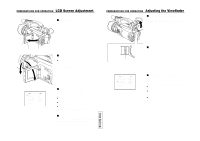
Page 21 highlights
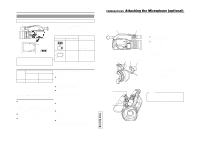
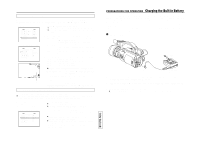
PREPARATIONS FOR OPERATION Turning the Power ON POWER switch MODE switch POWER OFF ON MODE CAM-B CAM-A VTR GAIN SHUTTER PUSH BAR AW MENU FWD REV CH-1 AUDIO CH-2 MIC1 MIC2 MONITOR CH-1 CH-2 MIX 1. Slide the POWER switch to "ON". Power is now supplied to the unit. Ⅲ The GY-DV300 operation mode when the power is turned ON will differ depending on the setting of the MODE switch as described in the following: MODE Switch Operation Mode "CAM-A" or "CAM-B" The GY-DV300 starts up be in the shooting mode. The camera image appears in the viewfinder or on the LCD screen. When a recordable videocassette is loaded, the GY-DV300 enters the recording-standby mode automatically. "STBY" is displayed in the VTR operation mode indication area on the LCD screen and the viewfinder screen. In this condition, press the REC START/STOP button to start recording. VTR The GY-DV300 starts up in the VTR playback mode. The camera image does not appear in the viewfinder or on the LCD screen. If videocassette is loaded, the mode will be the STOP mode. "STOP" is indicated in the section for displaying the VTR operation mode on the LCD screen or viewfinder screen. Turning the Power OFF 1. Place the GY-DV300 in the recording-standby or STOP mode. 2. Slide the POWER switch to "OFF". 3. Remove the battery pack or the power supply to the DC INPUT connector. (When the GY-DV300 is not going to be used for at long time.) CAUTION: • Do not set the POWER switch to "OFF" while recording is taking place. Confirm that the STBY or STOP indication is shown in the VTR operation mode indication area before the power is turned off. Should the POWER switch accidentally be set to "OFF" during a recording, wait at least 5 seconds before turning the power on again. • Before the power supply is disconnected, be sure to set the GY-DV300's POWER switch to "OFF". If the battery is removed or the power supply from the AC adapter is disconnected while the GYDV300's POWER switch is set to "ON", the manual mode operation setting values (IRIS, zoom, gain, shutter speed, white balance, etc.) are not backed up. 37 TENTATIVE PREPARATIONS FOR OPERATION Cassette Loading Erasure-prevention switch Cassette holder Tape window EJECT W VOLUME T EJECT switch Cassette cover Videocassette Loading the Cassette Use a videocassette tape marked MiniDV. ● To record, slide the switch on the back for use in preventing accidental erasure to the "REC" side. ● Remove any the tape slack before loading. 1. Slide the EJECT switch on the top section of the GY-DV300 and then open the cassette cover. 2. Insert a videocassette into the cassette slot. With the window in the cassette facing outward and the erasure-prevention switch up, push down on the center section of the cassette back, ensuring that the cassette is inserted straight and all the way. 3. Slowly push the "PUSH HERE" section on the cassette holder with a finger until a click is heard. Confirm that the cassette holder does not come up when you remove your finger. 4. Gently close the cassette cover by pushing it in all the way. Ⅲ When the power is turned on, the condition varies as shown in the following table. MODE Erasure-Prevention Switch Position Switch REC SAVE CAM A Recording- STOP mode. REC or standby mode INHIBIT displayed on the LCD screen and CAM B the viewfinder screen. VTR STOP mode * After the cassette cover is closed, it takes about 11 seconds before the unit can start recording or before it enters the STOP mode. 38 Unloading the Cassette 1. In the recording-standby or STOP mode, slide the EJECT switch to the side and then fully open the cassette cover. ● Tape ejection starts. It takes a few seconds before the cassette is ejected. 2. Take out the videocassette. 3. Close the cassette cover. CAUTION: • Do not slide the EJECT switch during recording. If the EJECT switch is slid during recording, the tape is ejected. • Do not leave the unit for a long period with the cassette cover open. Dirt or other foreign objects may enter the unit and cause malfunction. • When the cassette tape is inserted, press the "PUSH HERE" section on the cassette holder to lock the cassette holder properly. Then close the cassette cover. Refrain from repeatedly raising and lowering the cassette holder when the cassette holder is not completely locked. The tape could become slack as a result of the operation.
-
 1
1 -
2
-
3
-
4
-
5
-
6
-
7
-
8
-
9
-
10
-
11
-
12
-
13
-
14
-
15
-
 16
16 -
 17
17 -
 18
18 -
 19
19 -
 20
20 -
 21
21 -
 22
22 -
 23
23 -
 24
24 -
 25
25 -
 26
26 -
27
-
28
-
29
-
30
-
31
-
32
-
33
-
34
-
35
-
36
-
37
-
38
-
39
-
40
-
41
-
42
-
43
-
44
-
45
-
46
-
47
-
48
-
49
-
50
-
51
-
52
-
53
-
54
-
55
-
56
-
57
 |
 |
