JVC GY-DV300REM Instruction Manual - Page 36
Manual Iris Adjustment, Engaging the Manual Iris Adjustment Mode, Manual White Balance Adjustment
 |
View all JVC GY-DV300REM manuals
Add to My Manuals
Save this manual to your list of manuals |
Page 36 highlights
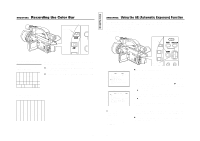
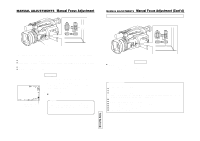
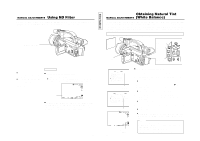
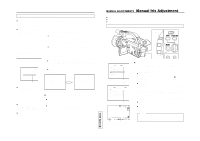
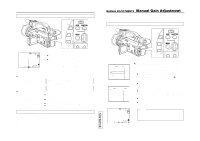
2. Manual White Balance Adjustment ● White balance adjustment is inhibited when PRESET is selected. The colour temperature is fixed at 3200K. ● The result of the manual white balance adjustment is stored in memory of the selected white balance mode. Even after the power has been turned off, the stored white balance condition is recalled when the relevant white balance mode is selected again. Error indication when auto white balance adjustment is not completed normally. An error message appears for about 3 seconds in the position indicated below. AUTO WH I TE NG: OBJECT 1. Set the ND FILTER switch in accordance with the lighting conditions. 2. Place a white object (white paper, etc.) near the centre of the screen and zoom in to fill the screen with white. 3. Select the mode in which the white balance setting should be memorized. q Press the AW button. The current white balance setting mode is displayed for about 3 seconds, after which the condition becomes the one in which adjustment of the white balance is enabled. (PRESET, MEMORY 1, 2, 3) w Rotate the SELECT dial to select the mode for memorizing the white balance setting. (Select the mode from among the MEMORY 1, 2, and 3 options.) When rotation of the SELECT dial stops, the selected mode is displayed for about 3 seconds. 4. Press the AW button for 1 second or more, and then release it. ● The auto white balance adjustment is invoked. During white balance adjustment, "AUTO WHITE OPERATION" appears on the LCD screen and the viewfinder screen. ● When correct white balance is obtained, "AUTO WHITE OK" is displayed for about 3 seconds. Error indication area ● NG: OBJECT (Improper subject) Displayed when there is not enough white color on an object or the color temperature is not suitable. Replace the white subject or change the setting of the ND FILTER switch. ● ERROR: LOW LIGHT (Insufficient illumination) Displayed when the illumination is dim. ● ERROR: OVER LIGHT (Excessive illumination) Displayed when the light is excessively bright. AUTO WH I TE OPERATION AUTO WH I TE OK During operation Completed correctly Ⅲ To return to the auto white balance adjustment mode, use either of the following methods. ● Set the WHITE BALANCE item to AUTO on the OPERATION menu screen or ● Set the MODE item to AUTO on the TOP MENU screen. In this case the shooting mode becomes the auto mode. 67 TENTATIVE MANUAL ADJUSTMENTS Manual Iris Adjustment Adjust the iris (lens opening) manually in the following cases. ● For backlight compensation ● When the subject is too bright compared with the background ● When panning quickly from a bright place to a dark place 1. Engaging the Manual Iris Adjustment Mode MENU button GAIN SHUTTER MENU SELECT dial TOP MENU screen MENU MO D E MANU AL E A R PHON E LEV EL 1 0 S YS T EM S E T . . D I S PLAY SE T . . CAME RA S E T [ C AM - A ] . . OPER AT I ON [ CAM- A ] . . C LOC K / TC . . MENU A L L R ESE T CANCE L EX I T MANUAL OPERATION menu screen OPERA T I ON [ A ] AE OFF IRI S MANUAL SHU T T E R STEP WH I T E BA LA NC E PU SH AUTO OIS ON CH1 AUD I O L EVE L AUTO CH2 AUD I O L EVE L AUTO PAGE BACK MANUAL M Iris (F-value) 68 Manual iris adjustment mode indication Ⅲ Engage the recording-standby mode. 1. Press the MENU button to display the TOP MENU screen. 2. Using the SELECT dial, set the MODE item on the TOP MENU screen to MANUAL. ● The unit enters the manual shooting mode. 3. Rotate the SELECT dial to align the cursor (f) with the OPERATION SET item on the TOP MENU screen, and then press the SELECT dial. ● The OPERATION menu screen is displayed. 4. Using the SELECT dial, set the AE item on the OPERATION menu screen to OFF, and then press the SELECT dial. 5. Using the SELECT dial, set the IRIS item to MANUAL, and then press the SELECT dial. 6. To return to the normal screen, use either of the following methods. ● Press the MENU button or ● Return to the TOP MENU screen and then select the EXIT item from the TOP MENU screen before pressing the SELECT dial. Memo: The iris value (F-value) and "M" are displayed on the LCD screen and the viewfinder screen in the manual iris adjustment mode.
-
 1
1 -
2
-
3
-
4
-
5
-
6
-
7
-
8
-
9
-
10
-
11
-
12
-
13
-
14
-
15
-
16
-
17
-
18
-
19
-
20
-
21
-
22
-
23
-
24
-
25
-
26
-
27
-
28
-
29
-
30
-
 31
31 -
 32
32 -
 33
33 -
 34
34 -
 35
35 -
 36
36 -
 37
37 -
 38
38 -
 39
39 -
 40
40 -
 41
41 -
42
-
43
-
44
-
45
-
46
-
47
-
48
-
49
-
50
-
51
-
52
-
53
-
54
-
55
-
56
-
57
 |
 |
