JVC GY-DV300REM Instruction Manual - Page 32
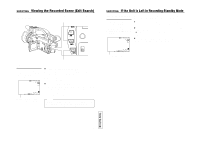
Viewing the Recorded Scene (Edit Search), If the Unit is Left in Recording- Standby Mode
 |
View all JVC GY-DV300REM manuals
Add to My Manuals
Save this manual to your list of manuals |
Page 32 highlights
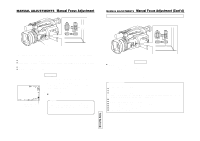
SHOOTING Viewing the Recorded Scene (Edit Search) The recorded scene can be checked and the position for recording the next scene can be searched in the recording-standby mode. FWD button BAR AW FWD REV Screen indication during edit search The VTR mode is indicated as ED.FWD or ED.REV on the LCD screen and the viewfinder screen during edit search. A ED. FWD ED.FWD : Forward search ED.REV : Reverse search REV button Enter the recording-standby mode Ⅲ To advance the tape in forward direction. 1. Press the FWD button. Playback is performed at normal speed as long as the button is pressed down. 2. When the FWD button is released, the unit returns to the recording-standby mode. Ⅲ To rewind the tape in reverse direction. 1. Press the REV button. Playback in reverse direction is performed at normal speed as long as the button is pressed down. 2. When the REV button is released, the unit returns to the recording-standby mode. Memo: When the recording speed mode (SP/LP) setting differs from the setting used for the part already recorded on the tape, the picture may be disturbed at the switching point. SHOOTING If the Unit is Left in Recording-Standby Mode Setting the time before the tape protection mode is engaged The time before the tape protection mode is engaged from the recording-standby mode can be set as 30 minutes or 3 minutes by the LONG PAUSE TIME item on the SYSTEM [1/2] screen menu. When the recording-standby mode has continued for about 30 minutes, the GY-DV300 automatically stops drum rotation in order to protect the tape. (Tape protect mode) ● In the tape protect mode, STOP is shown as the VTR mode indication on the LCD screen and the viewfinder screen. Ⅲ To start recording from the tape protect mode, press the REC START/STOP button. ● The drum starts rotating, and recording starts after about 3 seconds. Ⅲ To return to the recording-standby mode from the tape protect mode, press the REC START/STOP button twice. A STOP VTR mode indication TENTATIVE 59 60
-
 1
1 -
2
-
3
-
4
-
5
-
6
-
7
-
8
-
9
-
10
-
11
-
12
-
13
-
14
-
15
-
16
-
17
-
18
-
19
-
20
-
21
-
22
-
23
-
24
-
25
-
26
-
 27
27 -
 28
28 -
 29
29 -
 30
30 -
 31
31 -
 32
32 -
 33
33 -
 34
34 -
 35
35 -
 36
36 -
 37
37 -
38
-
39
-
40
-
41
-
42
-
43
-
44
-
45
-
46
-
47
-
48
-
49
-
50
-
51
-
52
-
53
-
54
-
55
-
56
-
57
 |
 |
