JVC GY-DV300REM Instruction Manual - Page 19
Power Supply Preparation, AC Operation, Batter y Pack Operation
 |
View all JVC GY-DV300REM manuals
Add to My Manuals
Save this manual to your list of manuals |
Page 19 highlights
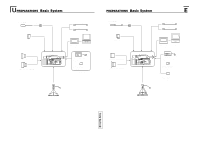
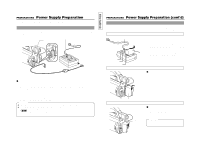
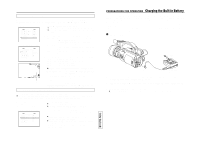
PREPARATIONS Power Supply Preparation The GY-DV300 is operable with AC power supply or battery pack. AC Operation Use the provided (U MODEL)/optional (E MODEL)AC Adapter/Charger AA-P30 as the AC power supply. The DC INPUT connector on the GY-DV300 accepts power voltage in the range of DC 6V to DC 12V. POWER switch POWER lamp To AC outlet AC cord DC INPUT connector DC cable AA-P30 DC OUTPUT connector Ⅵ Set the POWER switch on the GY-DV300 to OFF. If a battery pack is attached to the unit, detach the battery pack. 1. Plug one end of the DC cable provided with the AC Adapter/Charger into the DC INPUT connector of the GY-DV300, and then connect the other end to the DC OUTPUT connector on the AC Adapter/ Charger. 2. Plug the AC cable of the AC Adapter/Charger into an AC outlet. The POWER lamp illuminates when power is supplied to the AC Adapter/Charger. * For details, see the instruction manual for the AA-P30. CAUTION: ● Do not disconnect or connect the DC cable or AC cord while recording is taking place. ● Remaining battery power indication when the AC adapter is used When the optional Network Pack KA-DV300 is connected, the remaining battery power indication for fully charged battery may not be displayed. Fully charged 33 TENTATIVE PREPARATIONS Power Supply Preparation (cont'd) Battery Pack Operation Use the provided battery pack BN-V428 for battery pack operation. (U MODEL) Use the optional battery pack BN-V416 or BN-V428 for battery pack operation. (E MODEL) The BN-V416 battery pack cannot be used when the optional Network Pack KA-DV300 is used. (E MODEL) Charging the Battery Pack AC outlet AC cord CHARGE lamp 1 POWER lamp CHARGE lamp 2 Battery pack AA-P30 Before use the battery pack should be charged using the provided AC Adapter/Charger AA-P30. 1. Plug the AC cable of the AC Adapter/Charger into an AC outlet. The POWER lamp illuminates. 2. While pushing the battery pack down, slide it in the direction of the arrow to mount it on the AC Adapter/Charger. Charging starts, and the CHARGE lamp blinks green. It changes to light steadily when charging is completed. 3. When charging is completed, remove the battery by sliding it in the opposite direction of the mounting direction. * For details, see the instruction manual for the AA-P30. Attaching the Battery Pack on the GY-DV300 Ⅵ If the DC cable is connected to the GY-DC300, unplug the cable. 1. Hold the battery pack with the connector side facing the GY-DC300. 2. While pressing the battery pack against the GY- DC300, slide it downward to attach it to the GYDV300. Connector Battery pack Detaching the Battery Pack from the GY-DV300 Ⅵ Ensure that the POWER switch on the GYDV300 is set to OFF. 1. While pressing the battery lock release button, slide the battery pack upward to remove it. Battery lock release button CAUTION: Do not detach the battery pack while recording is taking place. 34
-
 1
1 -
2
-
3
-
4
-
5
-
6
-
7
-
8
-
9
-
10
-
11
-
12
-
13
-
 14
14 -
 15
15 -
 16
16 -
 17
17 -
 18
18 -
 19
19 -
 20
20 -
 21
21 -
 22
22 -
 23
23 -
 24
24 -
25
-
26
-
27
-
28
-
29
-
30
-
31
-
32
-
33
-
34
-
35
-
36
-
37
-
38
-
39
-
40
-
41
-
42
-
43
-
44
-
45
-
46
-
47
-
48
-
49
-
50
-
51
-
52
-
53
-
54
-
55
-
56
-
57
 |
 |
