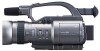
JVC GY-DV300REM Instruction Manual - Page 43
Adjusting the Playback Sound Volume, BLANK Search
 |
View all JVC GY-DV300REM manuals
Add to My Manuals
Save this manual to your list of manuals |
Page 43 highlights
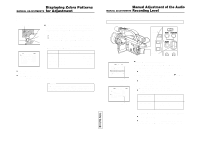
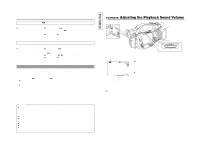
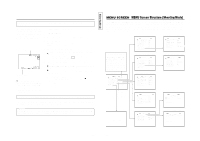
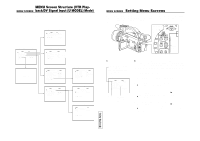
Fast-Forward, Rewind (h) ● Fast-forward and rewind may take longer than normally under cold conditions. Ⅲ Press the FWD (g) button in stop mode to fast forward the tape. Press the REV (h) button in stop mode to rewind the tape. Ⅲ Press the AW (a) button to stop fast forwarding or rewinding. Search (Fast-Forward Playback/Rewind Playback) ● Video noise may be observed on the screen or the image may become unstable during the search. Ⅲ Press the FWD (g) button in the play mode or still mode to play back the tape in forward direction at high speed. Press the REV (h) button to search the tape in reverse direction. Ⅲ Press the BAR (f/ w) button to resume normal playback. Ⅲ Press the AW (a) button to stop. BLANK Search Used to locate blank (unrecorded) sections on the tape, such as after the end point of a recording. 1. Enter the stop mode. 2. Press the FWD (g) button and REV (h) button simultaneously. ● Blank search starts. When a blank (unrecorded) section on the tape is located, the GY-DV300 enters the stop mode. ● During blank search, "BSRH" is displayed in the section indicating the operation mode on the LCD screen or viewfinder screen. Memo: ● When the still picture mode has continued for a specified period of time, the unit automatically switches to the tape protect mode. The time until the tape protect mode is initiated can be set to 30 minutes or 3 minutes with the LONG PAUSE TIME item on the SYSTEM [1/2] menu screen. Tape protect mode: Drum rotation stops to protect the tape. ● Noise may appear in the picture during still mode. ● When the automatic tracking function is activated at the start of the playback mode, digital noise may appear in the picture. ● The GY-DV300 does not allow manual tracking adjustment. ● When playing back a tape recorded on another unit, digital noise may appear during playback. ● The data recorded on the tape for the date and time and time code can be displayed on the screen. Whether or not the data should be displayed can selected on the DISPLAY [2/2] menu screen. 81 TENTATIVE PLAYBACK Adjusting the Playback Sound Volume AUDIO OUT connector Built-in speaker EARPHONE jack W VOLUME T ZOOM lever Playback audio volume VOL. P L AY The level of the playback sound can be controlled with the ZOOM lever on the top section of the GY-DV300. Ⅲ Pressing the lever toward the TELE (+) side raises the playback sound level, and pressing it toward the WIDE (-) side lowers it. The playback sound is output through the built-in speaker, EARPHONE jack and AUDIO OUT connector. ● Characters indicating the playback sound volume are displayed on the LCD screen and the viewfinder screen. Audio level meters (Display of these is selected on the DISPLAY [2/2] menu screen.) ● Built-in speaker The audio from the built-in speaker is not output when an earphone is plugged into the EARPHONE jack. 82
-
 1
1 -
2
-
3
-
4
-
5
-
6
-
7
-
8
-
9
-
10
-
11
-
12
-
13
-
14
-
15
-
16
-
17
-
18
-
19
-
20
-
21
-
22
-
23
-
24
-
25
-
26
-
27
-
28
-
29
-
30
-
31
-
32
-
33
-
34
-
35
-
36
-
37
-
 38
38 -
 39
39 -
 40
40 -
 41
41 -
 42
42 -
 43
43 -
 44
44 -
 45
45 -
 46
46 -
 47
47 -
 48
48 -
49
-
50
-
51
-
52
-
53
-
54
-
55
-
56
-
57
 |
 |
