JVC GY-DV300REM Instruction Manual - Page 49
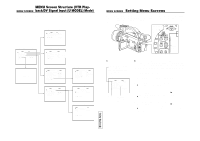
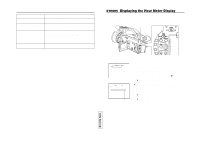
SYSTEM Menu Screens (VTR Playback mode), DISPLAY Menu Screen, MENU SCREEN
 |
View all JVC GY-DV300REM manuals
Add to My Manuals
Save this manual to your list of manuals |
Page 49 highlights
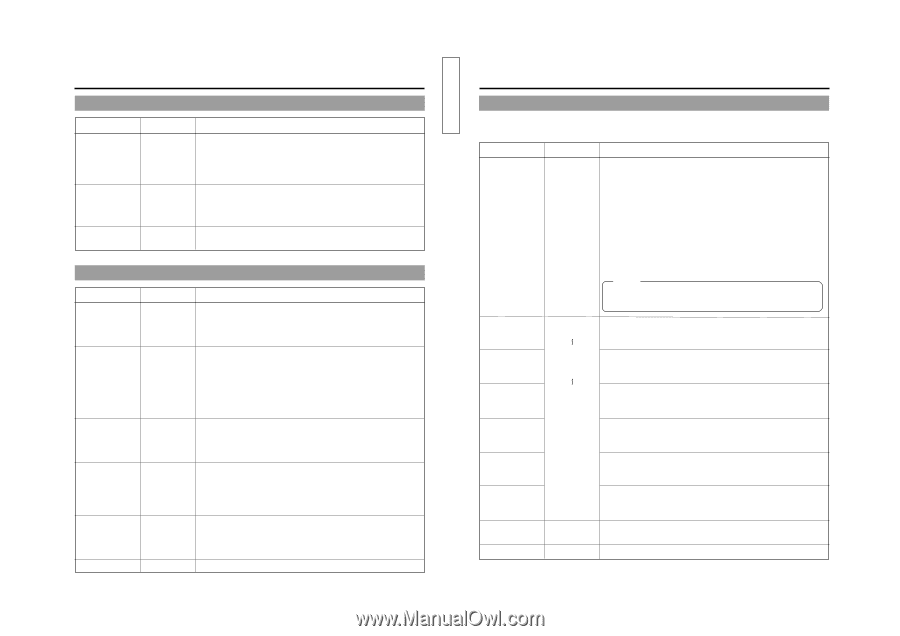
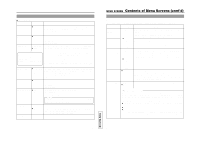
SYSTEM Menu Screens (Shooting mode) (Cont'd) Item NET REMOTE SET UP (U MODEL) PAGE BACK Set Value OFF ● ON OFF ● ON Contents Used when the optional network pack KA-DV300 is mounted. Selects whether the GY-DV300 should be controlled by external signals. OFF : Not controlled. ON : Controlled Selects whether the composite video or Y/C separate signal should be provided with the setup level at the time of recording. OFF : Setup level not provided. ON : Setup level provided. (Level 7.5%) The SYSTEM [1/2] menu screen returns when the SELECT dial is pressed. SYSTEM Menu Screens (VTR Playback mode) Item REC MODE (U MODEL) LONG PAUSE TIME TALLY (U MODEL) NET REMOTE SET UP (U MODEL) PAGE BACK Set Value ● SP LP 3 MIN ● 30 MIN OFF ● ON OFF ● ON OFF ● ON Contents Selects the recording speed mode when recording DV signals. SP: Standard recording speed LP : Long time recording speed mode (allows 1.5 times longer recording than in the SP mode on the same amount of tape.) Selects the time (minutes) before the tape protection mode is engaged when the recording-standby mode or still mode continues. Tape protection mode: Drum rotation stops automatically. 3 MIN : 3 minutes 30 MIN : 30 minutes When used in a cold environment, this becomes 3 minutes regardless of the setting. Selects whether or not the TALLY lamp should light when recording DV signals. OFF : The TALLY lamp does not light. ON : The TALLY lamp lights. Used when the optional network pack KA-DV300 is mounted. Selects when the GY-DV300 should be controlled by external signals. OFF : Not controlled. ON : Controlled Selects whether the composite video or Y/C separate signal should be provided with the setup level at the time of playback. OFF : Setup level not provided. ON : Setup level provided. (Level 7.5%) The TOP MENU returns when the SELECT dial is pressed. 93 TENTATIVE MENU SCREEN Contents of Menu Screens (cont'd) DISPLAY Menu Screen The DISPLAY Menu Screen consists of two screens (1/2 Screen and 2/2 Screen). Ⅲ DISPLAY [1/2] Menu Screen Item Set Value Contents ZEBRA ● OFF Selects whether zebra patterns should be shown on the LCD 70 - 80% screen and the viewfinder screen, and sets the luminance level 85 - 95% of the subject areas where the zebra pattern is displayed OVER 95% OFF: Not displayed. OVER 100% 70 - 80% : Zebra pattern displayed in areas with a luminance level of 70% to 80%. 85 - 95% : Zebra pattern displayed in areas with a luminance level of 85% to 95%. OVER 95% : Zebra pattern displayed in areas with a luminance level above 95%. OVER 100% : Zebra pattern displayed in areas with a luminance level above 100%. Memo: When the MODE switch is set to VTR (VTR playback /DV input mode), this item is not displayed. LCD BRIGHTNESS LCD COLOR LCD PEAKING VF BRIGHTNESS VF COLOR VF PEAKING NEXT PAGE PAGE BACK MAX 4 1 ● NORMAL -1 Adjusts the brightness of the LCD screen. To brighten ... Make value higher To dim ... Make value lower Adjusts the color saturation of the LCD screen. Higher color saturation ...... Make value higher Lower color saturation ....... Make value lower -4 Adjusts the contrast of the LCD screen. MIN To make contours sharper ...Make value higher To soften contours ... Make value lower Adjusts the brightness of the viewfinder screen. To brighten ...... Make value higher To dim Make value lower Adjusts the color saturation of the viewfinder screen. Higher color saturation ...... Make value higher Lower color saturation ....... Make value lower Adjusts the contrast of the viewfinder screen. To make contours sharper ....... Make value higher To soften contours Make value lower The DISPLAY [2/2] menu screen returns when the SELECT dial is pressed. (Menu screen for selecting display items) The TOP MENU returns when the SELECT dial is pressed. 94
-
 1
1 -
2
-
3
-
4
-
5
-
6
-
7
-
8
-
9
-
10
-
11
-
12
-
13
-
14
-
15
-
16
-
17
-
18
-
19
-
20
-
21
-
22
-
23
-
24
-
25
-
26
-
27
-
28
-
29
-
30
-
31
-
32
-
33
-
34
-
35
-
36
-
37
-
38
-
39
-
40
-
41
-
42
-
43
-
 44
44 -
 45
45 -
 46
46 -
 47
47 -
 48
48 -
 49
49 -
 50
50 -
 51
51 -
 52
52 -
 53
53 -
 54
54 -
55
-
56
-
57
 |
 |