JVC GY-DV300REM Instruction Manual - Page 25
Setting, Displaying and Recording the Time Code, Displaying the Time Code on the Screen
 |
View all JVC GY-DV300REM manuals
Add to My Manuals
Save this manual to your list of manuals |
Page 25 highlights
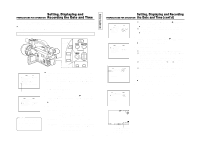
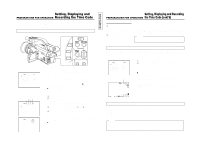
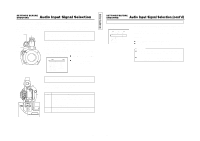
Setting, Displaying and PREPARATIONS FOR OPERATION Recording the Time Code Time code data should be set in the built-in time code generator. User's bits cannot be set. During recording, the time code is automatically recorded on the tape. When recording starts from the beginning of the tape, recording starts from the set time code. Presetting the Time Code MENU button GAIN SHUTTER MENU CLOCK/TC menu screen C LOCK / TC TC PRESET . . CLOCK ADJ US T . . DATE STYLE MM / DD / Y Y T I ME STYLE 2 4 HOUR SEC D I S PL AY ON P AG E BAC K TC PRESET screen Minutes Frames Hours Seconds T C PRESET TC 0 0:00 : 00: 00 CL E AR CANCE L P AGE BACK T C PRESET TC 0 0:00 : 00: 00 CL E AR CANCE L P AGE BACK SELECT dial The time code is preset on the CLOCK/TC menu screen. 1.Display the CLOCK/TC menu screen. To display the CLOCK/TC menu screen, perform the operations described in steps 1 to 3 in "Setting the Date and Time" on page 41. 2. Rotate the SELECT dial to align the cursor (f) with the TC PRESET item, and then press the SELECT dial. ● The TC PRESET screen appears. 3. Set the time code (hours, minutes, seconds, frames). The blinking digit is the one to be set. 1 When the SELECT dial is pressed, the blinking digit changes. 2 When the SELECT dial is rotated, the value of the blinking digit changes. When the SELECT dial is rotated upward, the value becomes higher. When rotated downward, the value becomes smaller. 3 Repeat the procedure described in 1 and 2 above to set the desired value for all digits. 4 The setting values are confirmed and entered when the frame digit blinks and the SELECT dial is pressed. 4. When setting of all the digits is completed, rotate the SELECT dial to align the cursor with the PAGE BACK item, and then press the SELECT dial. ● The CLOCK/TC menu screen returns. 45 TENTATIVE Setting, Displaying and Recording PREPARATIONS FOR OPERATION the Time Code (cont'd) To zero-set the time code 1 Rotate the SELECT dial to align the cursor with the CLEAR item, and then press the SELECT dial. 2 Rotate the SELECT dial to set the CLEAR item to EXECUTE, and then press the SELECT dial. 5. To return to the normal screen, use either of the following methods. Press the MENU button or Return to the TOP MENU screen and then select the EXIT item from the TOP MENU screen before pressing the SELECT dial. Memo: The preset time code value is reset when the power is turned off. Displaying the Time Code on the Screen Whether or not the time code should be displayed on the screen is set with the TIME CODE item on the DISPLAY [2/2] menu screen. DISPLAY [2/2] menu screen D I SPLAY [ 2 / 2 ] TAPE REMA I N ON T I ME CODE ON T I ME/ DATE DI SPLAY DI S P STYLE DATE + T I ME AUD I O LE V EL ON C EN TER MARK OF F OUT PU T CHAR. MIX PAGE BACK Time code indication 1. Display the DISPLAY [2/2] menu screen. 1 Select the DISPLAY SET item on the TOP MENU screen. 2 Select the NEXT PAGE item on the DISPLAY [1/2] menu screen. 2. Set the TIME CODE item on the DISPLAY [2/2] menu screen. To display the time code, set the item to ON. Ⅲ Display of the time code in the various operation modes. In shooting mode : The current value of the built-in time code generator is displayed. In VTR playback mode : The time code recorded on the tape is displayed. During DV signal recording : The current value of the built-in time (U MODEL) code generator is displayed. A Recording the Time Code The time code is recorded on the tape during recording. The time code formats are fixed as drop frame (U MODEL), and regeneration mode. Drop frame : Time code data matching the actual time. (U MODEL) REGEN : The time code already recorded on the tape is read, and the time code is recorded in continuation of the existing data. It will start from "00" if there is no time code recorded at the location where the recording is started. Memo: • The time code recorded at the beginning of a tape may not be read. • The preset time code is only valid when recorded from the beginning of the tape. (REC RUN operation only) REC RUN: The time code starts counting from when recording is started. 46
-
 1
1 -
2
-
3
-
4
-
5
-
6
-
7
-
8
-
9
-
10
-
11
-
12
-
13
-
14
-
15
-
16
-
17
-
18
-
19
-
 20
20 -
 21
21 -
 22
22 -
 23
23 -
 24
24 -
 25
25 -
 26
26 -
 27
27 -
 28
28 -
 29
29 -
 30
30 -
31
-
32
-
33
-
34
-
35
-
36
-
37
-
38
-
39
-
40
-
41
-
42
-
43
-
44
-
45
-
46
-
47
-
48
-
49
-
50
-
51
-
52
-
53
-
54
-
55
-
56
-
57
 |
 |
