JVC GZ-VX700BUS User Manual - English - Page 195
Names of Parts, Front, Rear - gz vx700 battery
 |
View all JVC GZ-VX700BUS manuals
Add to My Manuals
Save this manual to your list of manuals |
Page 195 highlights
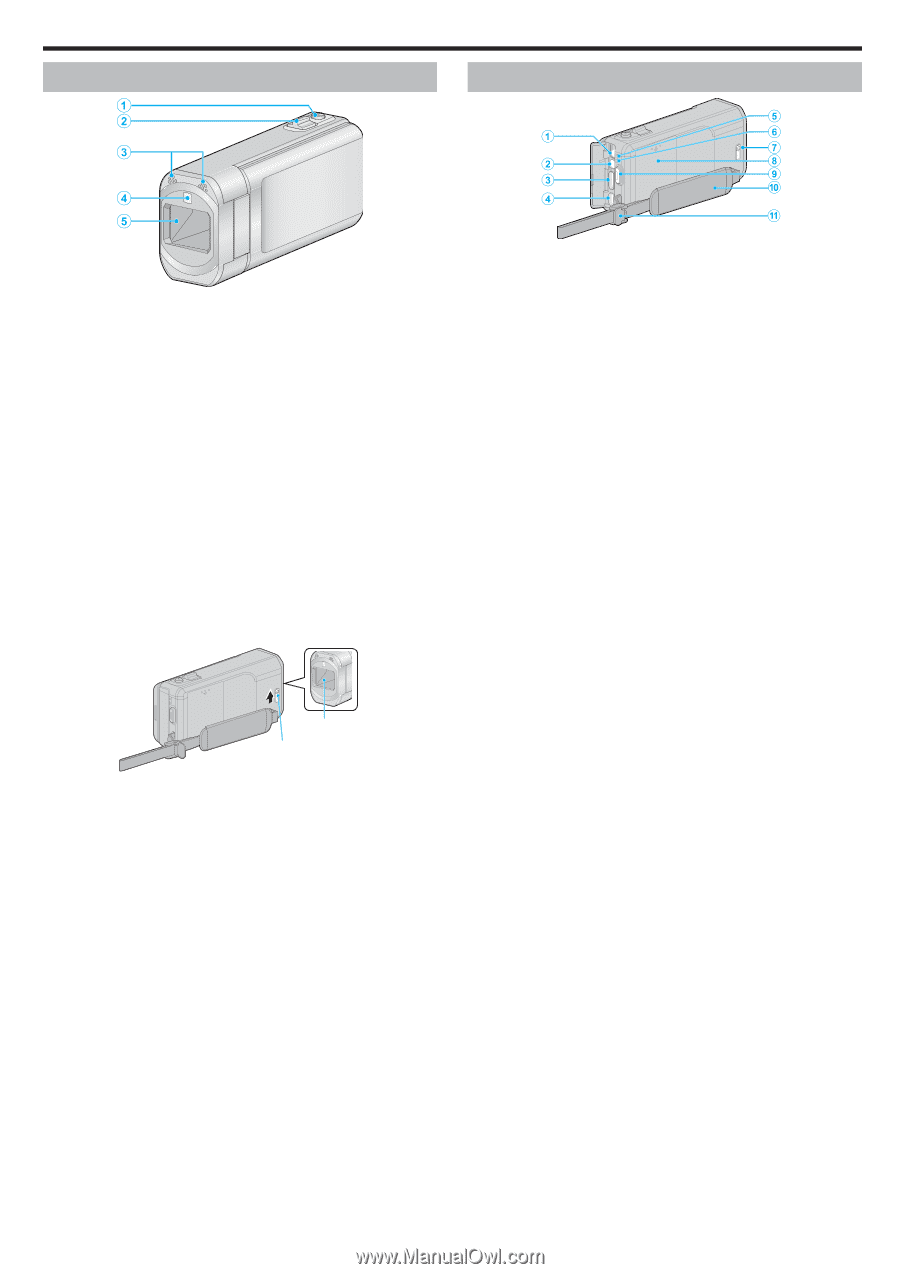
Front Rear Names of Parts . 1 SNAPSHOT (Still Image Recording) Button 0 Takes a still image. 2 Zoom/Volume Lever 0 During shooting: Adjusts the shooting range. 0 During playback (index screen): Moves to the next or previous page. 0 During video playback: Adjusts the volume. 3 Stereo Microphone 0 Do not cover the microphone with your fingers during video recording. 4 Light/Flash (GZ-VX705) Light (GZ-VX700) 0 Turn on the light when shooting in dark places. " LIGHT " (A p. 168) 5 Lens/Lens Cover 0 Do not touch the lens and lens cover. 0 Do not cover the lens with your fingers during recording. 0 When the power is turned on, the lens cover opens automatically. After using, slide the lens cover switch to close the lens cover. (The lens cover does not close automatically.) Lens Cover Lens Cover Switch . . 1 DC Connector 0 Connects to an AC adapter to charge the battery. 2 AV Connector 0 Connects to the AV connector of a TV, etc. 3 HDMI Mini Connector 0 Connects to TV using an HDMI mini cable. 4 USB Connector 0 Connects to computer using a USB cable. 5 ACCESS (Access) Lamp 0 Lights up/blinks during recording or playback. Do not remove the battery pack, AC adapter, or SD card. 6 POWER/CHARGE (Power/Charge) Lamp 0 Lights up: Power "ON" 0 Blinks: Charging in progress 0 Goes out: Charging finished 7 Lens Cover Switch 0 Opens and closes the lens cover. 8 Battery Cover "Charging the Battery Pack" (A p. 63) 9 START/STOP (Video Recording) Button 0 Starts/stops video recording. 10 Grip Belt 0 Pass your hand through the grip belt to hold this unit firmly. "Grip Adjustment" (A p. 64) 11 Strap Lock 195
-
 1
1 -
2
-
3
-
4
-
5
-
6
-
7
-
8
-
9
-
10
-
11
-
12
-
13
-
14
-
15
-
16
-
17
-
18
-
19
-
20
-
21
-
22
-
23
-
24
-
25
-
26
-
27
-
28
-
29
-
30
-
31
-
32
-
33
-
34
-
35
-
36
-
37
-
38
-
39
-
40
-
41
-
42
-
43
-
44
-
45
-
46
-
47
-
48
-
49
-
50
-
51
-
52
-
53
-
54
-
55
-
56
-
57
-
58
-
59
-
60
-
61
-
62
-
63
-
64
-
65
-
66
-
67
-
68
-
69
-
70
-
71
-
72
-
73
-
74
-
75
-
76
-
77
-
78
-
79
-
80
-
81
-
82
-
83
-
84
-
85
-
86
-
87
-
88
-
89
-
90
-
91
-
92
-
93
-
94
-
95
-
96
-
97
-
98
-
99
-
100
-
101
-
102
-
103
-
104
-
105
-
106
-
107
-
108
-
109
-
110
-
111
-
112
-
113
-
114
-
115
-
116
-
117
-
118
-
119
-
120
-
121
-
122
-
123
-
124
-
125
-
126
-
127
-
128
-
129
-
130
-
131
-
132
-
133
-
134
-
135
-
136
-
137
-
138
-
139
-
140
-
141
-
142
-
143
-
144
-
145
-
146
-
147
-
148
-
149
-
150
-
151
-
152
-
153
-
154
-
155
-
156
-
157
-
158
-
159
-
160
-
161
-
162
-
163
-
164
-
165
-
166
-
167
-
168
-
169
-
170
-
171
-
172
-
173
-
174
-
175
-
176
-
177
-
178
-
179
-
180
-
181
-
182
-
183
-
184
-
185
-
186
-
187
-
188
-
189
-
 190
190 -
 191
191 -
 192
192 -
 193
193 -
 194
194 -
 195
195 -
 196
196 -
 197
197 -
 198
198 -
 199
199 -
 200
200 -
201
-
202
-
203
-
204
-
205
-
206
-
207
-
208
-
209
 |
 |