JVC GZ-VX700BUS User Manual - English - Page 98
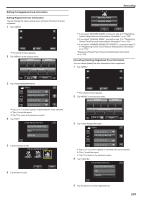
Recording while Displaying a Magnified View of a Selected Face (FACE SUB-WINDOW)
 |
View all JVC GZ-VX700BUS manuals
Add to My Manuals
Save this manual to your list of manuals |
Page 98 highlights
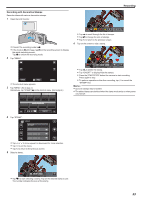
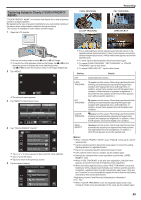
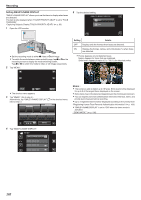
Recording 0 A still image is automatically captured when faces of pets are detected. ˻PLAY REC MENU . 0 PHOTO lights up when a still image is being captured. Memo : 0 The camera is able to detect up to 6 faces of pets. 0 "PET SHOT" may not work properly depending on the type of pet, shooting conditions (distance, angle, brightness, etc.) and the subject (direction of face, etc.). It is also particularly difficult to detect faces of pets that are totally black, covered in long hair, or in backlight. 0 Subjects other than your pet may be detected by mistake sometimes. Make use of "PET SHOT" only for pets such as dogs or cats. 0 After a pet is detected and captured, it takes time before the next recording may be performed. 0 "PET SHOT" does not work in the following cases: - when menu is being displayed - when remaining recording time is being displayed - when "FACE SUB-WINDOW" is set - when "ANIMATION EFFECT" is set - when "DECORATE FACE EFFECT" is set - when "STAMP" is set - when "HANDWRITING EFFECT" is set - when "AUTO REC" is set - when "DATE/TIME RECORDING" is set "Recording while Displaying a Magnified View of a Selected Face (FACE SUB-WINDOW)" (A p. 98) "Recording with Effects" (A p. 89) Caution : 0 When "PET SHOT" is set to "ON", "TOUCH PRIORITY AE/AF" will be set to "PET TRACKING" automatically. Even when "PET SHOT" is set to "ON" , if "TOUCH PRIORITY AE/AF" is not set to "PET TRACKING", "PET SHOT" will be set to "OFF" automatically. 0 If appropriate results cannot be obtained, record with "PET SHOT" set to "OFF". Recording while Displaying a Magnified View of a Selected Face (FACE SUB-WINDOW) You can record while viewing both the overall image of the scene and magnified image of a subject's expression. Frames appear around the faces that can be magnified. Tap a frame to track and magnify the face in a subwindow. 1 Open the LCD monitor. A . 0 Check if the recording mode is A. 0 If the mode is B still image, tap B on the recording screen to display the mode switching screen. Tap A to switch the mode to video. 2 Tap "MENU". ˻PLAY REC . 0 The shortcut menu appears. 3 Tap "MENU" in the shortcut menu. MENU MENU . 4 Tap "FACE SUB-WINDOW". VIDEO FACE SUB-WINDOW . 5 Tap on the frame of the face to magnify. 0:00:00 [0:54] ˻PLAY REC MENU . 0 When the face within a frame is tapped, it is displayed in a sub- window. The display position of the sub-window is set automatically according to the position of the tapped face. 0 The frame of the tapped face changes to blue. 98
-
 1
1 -
2
-
3
-
4
-
5
-
6
-
7
-
8
-
9
-
10
-
11
-
12
-
13
-
14
-
15
-
16
-
17
-
18
-
19
-
20
-
21
-
22
-
23
-
24
-
25
-
26
-
27
-
28
-
29
-
30
-
31
-
32
-
33
-
34
-
35
-
36
-
37
-
38
-
39
-
40
-
41
-
42
-
43
-
44
-
45
-
46
-
47
-
48
-
49
-
50
-
51
-
52
-
53
-
54
-
55
-
56
-
57
-
58
-
59
-
60
-
61
-
62
-
63
-
64
-
65
-
66
-
67
-
68
-
69
-
70
-
71
-
72
-
73
-
74
-
75
-
76
-
77
-
78
-
79
-
80
-
81
-
82
-
83
-
84
-
85
-
86
-
87
-
88
-
89
-
90
-
91
-
92
-
 93
93 -
 94
94 -
 95
95 -
 96
96 -
 97
97 -
 98
98 -
 99
99 -
 100
100 -
 101
101 -
 102
102 -
 103
103 -
104
-
105
-
106
-
107
-
108
-
109
-
110
-
111
-
112
-
113
-
114
-
115
-
116
-
117
-
118
-
119
-
120
-
121
-
122
-
123
-
124
-
125
-
126
-
127
-
128
-
129
-
130
-
131
-
132
-
133
-
134
-
135
-
136
-
137
-
138
-
139
-
140
-
141
-
142
-
143
-
144
-
145
-
146
-
147
-
148
-
149
-
150
-
151
-
152
-
153
-
154
-
155
-
156
-
157
-
158
-
159
-
160
-
161
-
162
-
163
-
164
-
165
-
166
-
167
-
168
-
169
-
170
-
171
-
172
-
173
-
174
-
175
-
176
-
177
-
178
-
179
-
180
-
181
-
182
-
183
-
184
-
185
-
186
-
187
-
188
-
189
-
190
-
191
-
192
-
193
-
194
-
195
-
196
-
197
-
198
-
199
-
200
-
201
-
202
-
203
-
204
-
205
-
206
-
207
-
208
-
209
 |
 |
