JVC GZ-VX700BUS User Manual - English - Page 73
Recording, Taking Videos in Auto Mode
 |
View all JVC GZ-VX700BUS manuals
Add to My Manuals
Save this manual to your list of manuals |
Page 73 highlights
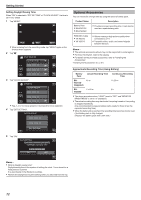
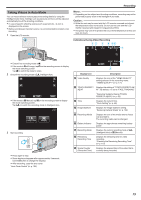
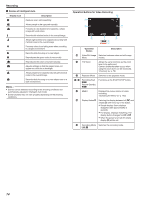
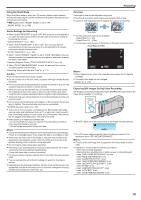
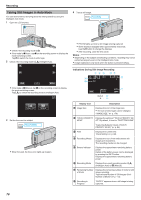
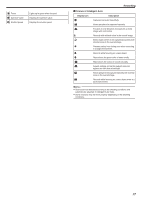
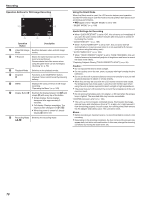
Taking Videos in Auto Mode You can record without worrying about the setting details by using the Intelligent Auto mode. Settings such as exposure and focus will be adjusted automatically to suit the shooting conditions. 0 In case of specific shooting scenes such as person etc., its icon is displayed on the screen. 0 Before recording an important scene, it is recommended to conduct a trial recording. 1 Open the LCD monitor. A Recording Memo : 0 Depending on the subject and shooting conditions, recording may not be performed properly even in the Intelligent Auto mode. Caution : 0 While this unit may be used with the LCD monitor reversed and closed, the temperature rises more easily. Do not use this unit with the LCD monitor reversed and closed for long periods of time. 0 The power may turn off to protect the circuit if the temperature of this unit rises too much. Indications During Video Recording 10:10 . 0 Check if the recording mode is A. 0 If the mode is B still image, tap B on the recording screen to display the mode switching screen. Tap A to switch the mode to video. 2 Check if the recording mode is P Intelligent Auto. ˻PLAY REC MENU . 0 If the mode is H Manual, tap H on the recording screen to display the mode switching screen. Tap P to switch the recording mode to Intelligent Auto. intelligent AUTO MANUAL . 3 Start recording. . 0 Press again to stop. 0 Some displays disappear after approximately 3 seconds. Use the n button to change the displays. 0 After recording, close the lens cover. "Lens Cover Switch" (A p. 195) ˻PLAY 0:00:00 [2:04] REC MENU . Display Icon A Video Quality Description Displays the icon of the "VIDEO QUALITY" setting selected in the recording menu. " VIDEO QUALITY " (A p. 171) B TOUCH PRIORITY AE/AF Displays the setting of "TOUCH PRIORITY AE/ AF". By default, it is set to "FACE TRACKING" . "Capturing Subjects Clearly (TOUCH PRIORITY AE/AF)" (A p. 95) C Time Displays the current time. "Clock Setting" (A p. 68) D Image Stabilizer Displays the image stabilizer setting. "Reducing Camera Shake" (A p. 104) E Recording Media F Battery Indicator G Recording Mode H Remaining Recording Time Displays the icon of the media where videos are recorded to. The recording media can be changed. Displays the approximate remaining battery power. Displays the current recording mode of P (Intelligent Auto) or H (Manual). Displays the remaining time for video recording. "Checking the Remaining Recording Time" (A p. 112) I Scene Counter (Recorded Time) Displays the elapsed time of the video that is currently being recorded. 73
-
 1
1 -
2
-
3
-
4
-
5
-
6
-
7
-
8
-
9
-
10
-
11
-
12
-
13
-
14
-
15
-
16
-
17
-
18
-
19
-
20
-
21
-
22
-
23
-
24
-
25
-
26
-
27
-
28
-
29
-
30
-
31
-
32
-
33
-
34
-
35
-
36
-
37
-
38
-
39
-
40
-
41
-
42
-
43
-
44
-
45
-
46
-
47
-
48
-
49
-
50
-
51
-
52
-
53
-
54
-
55
-
56
-
57
-
58
-
59
-
60
-
61
-
62
-
63
-
64
-
65
-
66
-
67
-
 68
68 -
 69
69 -
 70
70 -
 71
71 -
 72
72 -
 73
73 -
 74
74 -
 75
75 -
 76
76 -
 77
77 -
 78
78 -
79
-
80
-
81
-
82
-
83
-
84
-
85
-
86
-
87
-
88
-
89
-
90
-
91
-
92
-
93
-
94
-
95
-
96
-
97
-
98
-
99
-
100
-
101
-
102
-
103
-
104
-
105
-
106
-
107
-
108
-
109
-
110
-
111
-
112
-
113
-
114
-
115
-
116
-
117
-
118
-
119
-
120
-
121
-
122
-
123
-
124
-
125
-
126
-
127
-
128
-
129
-
130
-
131
-
132
-
133
-
134
-
135
-
136
-
137
-
138
-
139
-
140
-
141
-
142
-
143
-
144
-
145
-
146
-
147
-
148
-
149
-
150
-
151
-
152
-
153
-
154
-
155
-
156
-
157
-
158
-
159
-
160
-
161
-
162
-
163
-
164
-
165
-
166
-
167
-
168
-
169
-
170
-
171
-
172
-
173
-
174
-
175
-
176
-
177
-
178
-
179
-
180
-
181
-
182
-
183
-
184
-
185
-
186
-
187
-
188
-
189
-
190
-
191
-
192
-
193
-
194
-
195
-
196
-
197
-
198
-
199
-
200
-
201
-
202
-
203
-
204
-
205
-
206
-
207
-
208
-
209
 |
 |
