Kodak ESP 5250 User Manual - Page 26
Transferring pictures to a computer, Transferring, pictures to a, WINDOWS, OS-based, computer - parts
 |
View all Kodak ESP 5250 manuals
Add to My Manuals
Save this manual to your list of manuals |
Page 26 highlights
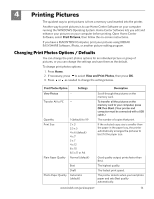
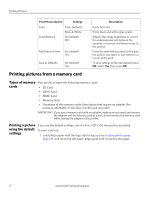
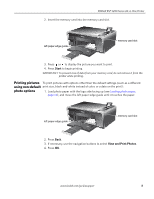
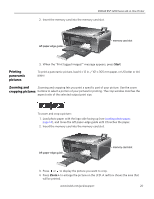
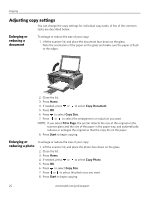
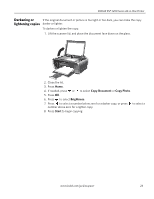
Printing Pictures NOTE: You can press Zoom + repeatedly to enlarge the picture in increments of 0.25 up to a magnification of 5X. Press Zoom - to decrease the magnification in increments of 0.25 back down to 1X. 5. Use the navigation buttons to move the picture on the LCD up, down, left, or right. Only the part of the picture in the red box will print. 6. After you have pressed the zoom button(s), press Rotate if you want to rotate the red box in 90 degree increments. This will determine the content that is printed. NOTE: Zooming and cropping does not change the saved picture on the memory card. 7. When you are satisfied with the picture, press OK. The picture appears in the original view with a red box around the portion of the picture that will print. 8. Press Start to begin printing. Transferring pictures to a computer You can transfer .jpg, .mov, and .wav files from a memory card in the printer to your computer. To transfer these files, the printer must be connected to your computer with a USB cable. NOTE: If you have large video files or a large number of pictures (400 or more), we recommend that you use a memory card reader attached directly to your computer to transfer them. Transferring pictures to a WINDOWS OS-based computer 1. Insert the memory card into the memory card slot on the printer. 2. Press Back. 3. If necessary, use the navigation buttons to select View and Print Photos. 4. Press OK. 5. Press to select Transfer All to PC, then press OK. 6. Press Start. 7. If your computer is connected to a wireless network and with a USB cable, select the USB-connected printer (no number after the printer name). 8. Follow the on-screen instructions on your computer. Transferring pictures to a MACINTOSH Computer 1. Insert the memory card into the memory card slot on the printer. 2. Press Back. 3. If necessary, use the navigation buttons to select View and Print Photos. 4. Press OK. 5. Press to select Transfer All to PC, then press OK. 6. Press Start. 7. If your computer is connected to a wireless network and with a USB cable, select the USB-connected printer (no number after the printer name). 8. Use iPhoto or Image Capture on your computer to complete the transfer. 21 www.kodak.com/go/aiosupport
-
 1
1 -
2
-
3
-
4
-
5
-
6
-
7
-
8
-
9
-
10
-
11
-
12
-
13
-
14
-
15
-
16
-
17
-
18
-
19
-
20
-
 21
21 -
 22
22 -
 23
23 -
 24
24 -
 25
25 -
 26
26 -
 27
27 -
 28
28 -
 29
29 -
 30
30 -
 31
31 -
32
-
33
-
34
-
35
-
36
-
37
-
38
-
39
-
40
-
41
-
42
-
43
-
44
-
45
-
46
-
47
-
48
-
49
-
50
-
51
-
52
-
53
-
54
-
55
-
56
-
57
-
58
-
59
-
60
-
61
-
62
 |
 |