Kodak ESP 5250 User Manual - Page 9
Configuring Your Printer, Configuring printer settings - reset
 |
View all Kodak ESP 5250 manuals
Add to My Manuals
Save this manual to your list of manuals |
Page 9 highlights
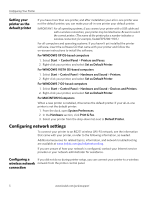
2 Configuring Your Printer This chapter presumes that you have set up your printer and that you may or may not have installed the printer software. This chapter tells you how to configure or change your printer settings and your network settings. Configuring printer settings Configuring basic NOTE: When you first power on the printer, the printer automatically steps you printer settings through the process of selecting the Language and Country/Region. To set or change basic printer settings: 1. Press Home. 2. Press to select Printer Settings, then press OK. 3. Press to select one of the following settings: • Date and Time* - Press OK, then press to select Year, Month, Day, Hour, or Minute. Press or to change the values; press OK when you are done. • Time to Low Power - Press to change the time to energy-saving low power (select from 1 to 4 hours in 0.5 hour increments). After the Time to Low Power, the printer goes into a low-power mode. • Tagged Images Printing (see Printing tagged pictures, page 19) - Press to select On or Off. If you select On, when you are printing pictures, the printer LCD prompts you to verify that you want to print pictures that were tagged (or marked) using your camera. Different cameras use different terminology; KODAK Digital Cameras use "marked" images; others use either tagged images or DPOF. • Language - Press OK, press to select a language, then press OK. • Country/Region - Press OK, press to select a country or region, then press OK. • Reset All Settings (see Resetting factory defaults, page 40) NOTE: Resetting factory defaults does not change the date and time, language, or country/region. 4. Press Back. * You can also synchronize the printer's date and time to your computer from Home Center Settings under Tools in Home Center Software. www.kodak.com/go/aiosupport 4
-
 1
1 -
2
-
3
-
 4
4 -
 5
5 -
 6
6 -
 7
7 -
 8
8 -
 9
9 -
 10
10 -
 11
11 -
 12
12 -
 13
13 -
 14
14 -
15
-
16
-
17
-
18
-
19
-
20
-
21
-
22
-
23
-
24
-
25
-
26
-
27
-
28
-
29
-
30
-
31
-
32
-
33
-
34
-
35
-
36
-
37
-
38
-
39
-
40
-
41
-
42
-
43
-
44
-
45
-
46
-
47
-
48
-
49
-
50
-
51
-
52
-
53
-
54
-
55
-
56
-
57
-
58
-
59
-
60
-
61
-
62
 |
 |