Kodak ESP 5250 User Manual - Page 33
Scanning multiple pictures simultaneously, Scanning multiple pictures with a WINDOWS OS-based computer - software
 |
View all Kodak ESP 5250 manuals
Add to My Manuals
Save this manual to your list of manuals |
Page 33 highlights
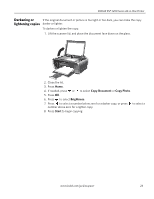
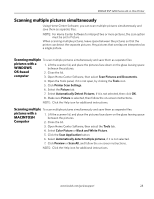
KODAK ESP 5200 Series All-in-One Printer Scanning multiple pictures simultaneously Using Home Center Software, you can scan multiple pictures simultaneously and save them as separate files. NOTE: For Home Center Software to interpret two or more pictures, the scan option must be set to Picture. When scanning multiple pictures, leave space between the pictures so that the printer can detect the separate pictures. Any pictures that overlap are interpreted as a single picture. Scanning multiple To scan multiple pictures simultaneously and save them as separate files: pictures with a WINDOWS 1. Lift the scanner lid, and place the pictures face down on the glass leaving space between the pictures. OS-based 2. Close the lid. computer 3. Open Home Center Software, then select Scan Pictures and Documents. 4. Open the Tools panel, if it is not open, by clicking the Tools icon. 5. Click Printer Scan Settings. 6. Select the Picture tab. 7. Select Automatically Detect Pictures, if it is not selected, then click OK. 8. Make sure Picture is selected, then follow the on-screen instructions. NOTE: Click the Help icon for additional instructions. Scanning multiple To scan multiple pictures simultaneously and save them as separate files: pictures with a MACINTOSH 1. Lift the scanner lid, and place the pictures face down on the glass leaving space between the pictures. Computer 2. Close the lid. 3. Open Home Center Software, then select the Tools tab. 4. Select Color Picture or Black and White Picture. 5. Click the Scan Application button. 6. Select Automatically detect multiple pictures, if it is not selected. 7. Click Preview or Scan All, and follow the on-screen instructions. NOTE: Click the Help icon for additional instructions. www.kodak.com/go/aiosupport 28
-
 1
1 -
2
-
3
-
4
-
5
-
6
-
7
-
8
-
9
-
10
-
11
-
12
-
13
-
14
-
15
-
16
-
17
-
18
-
19
-
20
-
21
-
22
-
23
-
24
-
25
-
26
-
27
-
 28
28 -
 29
29 -
 30
30 -
 31
31 -
 32
32 -
 33
33 -
 34
34 -
 35
35 -
 36
36 -
 37
37 -
 38
38 -
39
-
40
-
41
-
42
-
43
-
44
-
45
-
46
-
47
-
48
-
49
-
50
-
51
-
52
-
53
-
54
-
55
-
56
-
57
-
58
-
59
-
60
-
61
-
62
 |
 |