Konica Minolta bizhub 42 bizhub 36/42 Fax Operations User Guide - Page 102
Creating a fax cover sheet
 |
View all Konica Minolta bizhub 42 manuals
Add to My Manuals
Save this manual to your list of manuals |
Page 102 highlights
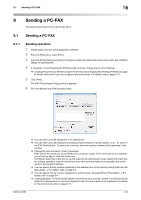
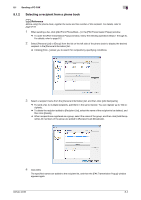
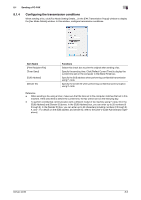
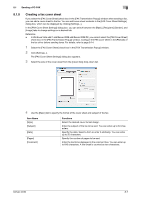
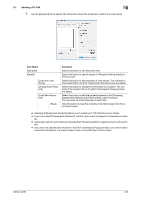
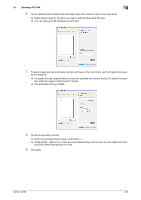
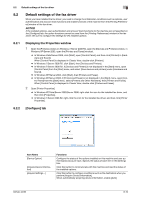
8.1 Sending a PC-FAX 8 8.1.5 Creating a fax cover sheet If you select the [FAX Cover Sheet] check box in the [FAX Transmission Popup] window when sending a fax, you can add a cover sheet to the fax. You can edit cover sheet contents in the [FAX Cover Sheet Settings] dialog box, which can be displayed by clicking [Settings...]. In the [FAX Cover Sheet Settings] dialog box, you can switch between the [Basic], [Recipient], [Sender], and [Image] tabs to change settings on a desired tab. Reference - In Windows Vista x64/7 x64/Server 2008 x64/Server 2008 R2, you cannot select the [FAX Cover Sheet] check box in the [FAX Transmission Popup] window. Configure the FAX cover sheet in the [FAX] tab of the fax driver before sending faxes. For details, refer to page 8-14. 1 Select the [FAX Cover Sheet] check box in the [FAX Transmission Popup] window. 2 Click [Settings...]. The [FAX Cover Sheet Settings] dialog box appears. 3 Select the size of the cover sheet from the [Cover Size] drop-down list. 4 Use the [Basic] tab to specify the format of the cover sheet and subject of the fax. Item Name [Style] [Subject] [Date] [Pages] [Comment] Functions Select the desired cover format design. Enter the subject of the fax to be sent. You can enter up to 64 characters. Specify the date. Select a form or enter it arbitrarily. You can enter up to 20 characters. Specify the number of pages to be sent. Enter the text to be displayed in the comment box. You can enter up to 640 characters. A line break is counted as two characters. bizhub 42/36 8-7
-
 1
1 -
2
-
3
-
4
-
5
-
6
-
7
-
8
-
9
-
10
-
11
-
12
-
13
-
14
-
15
-
16
-
17
-
18
-
19
-
20
-
21
-
22
-
23
-
24
-
25
-
26
-
27
-
28
-
29
-
30
-
31
-
32
-
33
-
34
-
35
-
36
-
37
-
38
-
39
-
40
-
41
-
42
-
43
-
44
-
45
-
46
-
47
-
48
-
49
-
50
-
51
-
52
-
53
-
54
-
55
-
56
-
57
-
58
-
59
-
60
-
61
-
62
-
63
-
64
-
65
-
66
-
67
-
68
-
69
-
70
-
71
-
72
-
73
-
74
-
75
-
76
-
77
-
78
-
79
-
80
-
81
-
82
-
83
-
84
-
85
-
86
-
87
-
88
-
89
-
90
-
91
-
92
-
93
-
94
-
95
-
96
-
 97
97 -
 98
98 -
 99
99 -
 100
100 -
 101
101 -
 102
102 -
 103
103 -
 104
104 -
 105
105 -
 106
106 -
 107
107 -
108
-
109
-
110
-
111
-
112
-
113
-
114
-
115
-
116
-
117
-
118
-
119
-
120
-
121
-
122
-
123
-
124
-
125
-
126
-
127
-
128
-
129
-
130
-
131
-
132
-
133
-
134
-
135
-
136
-
137
-
138
-
139
-
140
-
141
-
142
-
143
-
144
-
145
-
146
-
147
-
148
-
149
-
150
-
151
-
152
-
153
-
154
-
155
-
156
-
157
-
158
-
159
-
160
-
161
-
162
-
163
-
164
-
165
-
166
-
167
-
168
-
169
-
170
-
171
-
172
-
173
-
174
-
175
-
176
-
177
-
178
-
179
-
180
-
181
-
182
-
183
-
184
-
185
-
186
-
187
-
188
-
189
-
190
-
191
-
192
-
193
-
194
-
195
 |
 |
