Konica Minolta bizhub 42 bizhub 36/42 Fax Operations User Guide - Page 107
Common Settings
 |
View all Konica Minolta bizhub 42 manuals
Add to My Manuals
Save this manual to your list of manuals |
Page 107 highlights
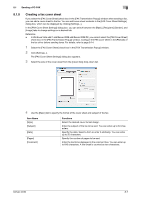
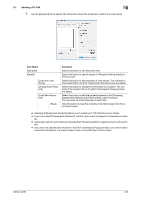
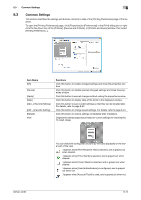
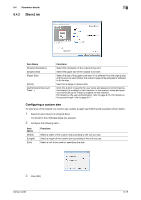
8.3 Common Settings 8 8.3 Common Settings This section describes the settings and buttons common to tabs of the [Printing Preferences] page of the fax driver. To open the [Printing Preferences] page, click [Properties] (or [Preferences]) in the [Print] dialog box or rightclick the fax driver icon of the [Printers], [Devices and Printers], or [Printers and Faxes] window, then select [Printing Preferences...]. Item Name [OK] [Cancel] [Apply] [Help] [Add...] (Favorite Setting) [Edit...] (Favorite Setting) [Default] View Functions Click this button to enable changed settings and close the properties window. Click this button to disable (cancel) changed settings and close the properties window. Click this button to save all changes without exiting the properties window. Click this button to display Help of the items in the displayed window. Click this button to save current settings so that they can be recalled later. For details, refer to page 8-23. Click this button to change saved settings. For details, refer to page 8-24. Click this button to restore settings immediately after installation. Displays the sample page layout based on current settings for checking the TX result image. bizhub 42/36 You can check the configured functions by the icons displayed on the lower part of the view. : Appears when [Print Recipient File] is selected, and is grayed out when cleared. : Appears when [Timer Send] is selected, and is grayed out when cleared. : Appears when [Cover Sheet] is selected, and is grayed out when cleared. : Appears when [User Authentication] is configured, and is grayed out when not. : Appears when [Account Track] is used, and is grayed out when not. 8-12
-
 1
1 -
2
-
3
-
4
-
5
-
6
-
7
-
8
-
9
-
10
-
11
-
12
-
13
-
14
-
15
-
16
-
17
-
18
-
19
-
20
-
21
-
22
-
23
-
24
-
25
-
26
-
27
-
28
-
29
-
30
-
31
-
32
-
33
-
34
-
35
-
36
-
37
-
38
-
39
-
40
-
41
-
42
-
43
-
44
-
45
-
46
-
47
-
48
-
49
-
50
-
51
-
52
-
53
-
54
-
55
-
56
-
57
-
58
-
59
-
60
-
61
-
62
-
63
-
64
-
65
-
66
-
67
-
68
-
69
-
70
-
71
-
72
-
73
-
74
-
75
-
76
-
77
-
78
-
79
-
80
-
81
-
82
-
83
-
84
-
85
-
86
-
87
-
88
-
89
-
90
-
91
-
92
-
93
-
94
-
95
-
96
-
97
-
98
-
99
-
100
-
101
-
 102
102 -
 103
103 -
 104
104 -
 105
105 -
 106
106 -
 107
107 -
 108
108 -
 109
109 -
 110
110 -
 111
111 -
 112
112 -
113
-
114
-
115
-
116
-
117
-
118
-
119
-
120
-
121
-
122
-
123
-
124
-
125
-
126
-
127
-
128
-
129
-
130
-
131
-
132
-
133
-
134
-
135
-
136
-
137
-
138
-
139
-
140
-
141
-
142
-
143
-
144
-
145
-
146
-
147
-
148
-
149
-
150
-
151
-
152
-
153
-
154
-
155
-
156
-
157
-
158
-
159
-
160
-
161
-
162
-
163
-
164
-
165
-
166
-
167
-
168
-
169
-
170
-
171
-
172
-
173
-
174
-
175
-
176
-
177
-
178
-
179
-
180
-
181
-
182
-
183
-
184
-
185
-
186
-
187
-
188
-
189
-
190
-
191
-
192
-
193
-
194
-
195
 |
 |
