Konica Minolta bizhub 42 bizhub 36/42 Fax Operations User Guide - Page 43
Installer-based auto install, Item Name, Functions - review
 |
View all Konica Minolta bizhub 42 manuals
Add to My Manuals
Save this manual to your list of manuals |
Page 43 highlights
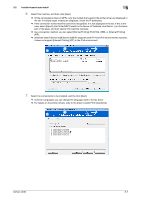
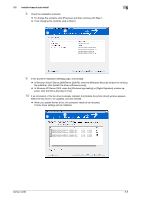
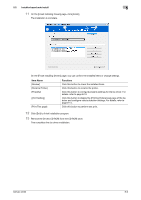
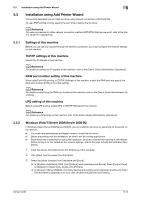
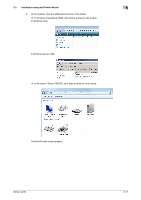
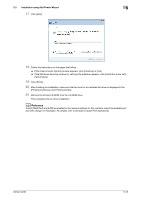
5.2 Installer-based auto install 5 11 On the [Finish Installing Drivers] page, click [Finish]. The installation is complete. On the [Finish Installing Drivers] page, you can confirm the installed items or change settings. Item Name [Review] [Rename Printer] [Property] [Print Setting] [Print Test page] Functions Click this button to check the installed items. Click this button to rename the printer. Click this button to configure property settings for the fax driver. For details, refer to page 8-10. Click this button to display the [Printing Preferences] page of the fax driver and configure various function settings. For details, refer to page 8-14. Click this button to perform test print. 12 Click [Exit] to finish installation program. 13 Remove the Drivers CD-ROM from the CD-ROM drive. This completes the fax driver installation. bizhub 42/36 5-9
-
 1
1 -
2
-
3
-
4
-
5
-
6
-
7
-
8
-
9
-
10
-
11
-
12
-
13
-
14
-
15
-
16
-
17
-
18
-
19
-
20
-
21
-
22
-
23
-
24
-
25
-
26
-
27
-
28
-
29
-
30
-
31
-
32
-
33
-
34
-
35
-
36
-
37
-
 38
38 -
 39
39 -
 40
40 -
 41
41 -
 42
42 -
 43
43 -
 44
44 -
 45
45 -
 46
46 -
 47
47 -
 48
48 -
49
-
50
-
51
-
52
-
53
-
54
-
55
-
56
-
57
-
58
-
59
-
60
-
61
-
62
-
63
-
64
-
65
-
66
-
67
-
68
-
69
-
70
-
71
-
72
-
73
-
74
-
75
-
76
-
77
-
78
-
79
-
80
-
81
-
82
-
83
-
84
-
85
-
86
-
87
-
88
-
89
-
90
-
91
-
92
-
93
-
94
-
95
-
96
-
97
-
98
-
99
-
100
-
101
-
102
-
103
-
104
-
105
-
106
-
107
-
108
-
109
-
110
-
111
-
112
-
113
-
114
-
115
-
116
-
117
-
118
-
119
-
120
-
121
-
122
-
123
-
124
-
125
-
126
-
127
-
128
-
129
-
130
-
131
-
132
-
133
-
134
-
135
-
136
-
137
-
138
-
139
-
140
-
141
-
142
-
143
-
144
-
145
-
146
-
147
-
148
-
149
-
150
-
151
-
152
-
153
-
154
-
155
-
156
-
157
-
158
-
159
-
160
-
161
-
162
-
163
-
164
-
165
-
166
-
167
-
168
-
169
-
170
-
171
-
172
-
173
-
174
-
175
-
176
-
177
-
178
-
179
-
180
-
181
-
182
-
183
-
184
-
185
-
186
-
187
-
188
-
189
-
190
-
191
-
192
-
193
-
194
-
195
 |
 |
