Kyocera FS 1900 Operation Guide - Page 141
Cleaning the Charger Grid, The grid cleaner pad is supplied with water soaked. Perform
 |
UPC - 783310458241
View all Kyocera FS 1900 manuals
Add to My Manuals
Save this manual to your list of manuals |
Page 141 highlights
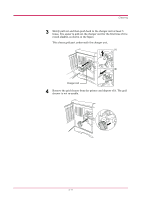
Cleaning Cleaning the Charger Grid The charger grid is a part located at the bottom of the charger unit, which also needs to be cleaned. You should use a grid cleaner attaching it to the printer and pull out the charger unit as instructed below. 1 Take the grid cleaner from protective bag in the new toner kit, and remove the cap. Cap Protective Bag Grid Cleaner The grid cleaner pad is supplied with water soaked. Perform the following procedure before the pad dries. Note 2 Attach the grid cleaner to the printer with the pad at the top, as shown in the figure. 3-10 Grid Cleaner
-
 1
1 -
2
-
3
-
4
-
5
-
6
-
7
-
8
-
9
-
10
-
11
-
12
-
13
-
14
-
15
-
16
-
17
-
18
-
19
-
20
-
21
-
22
-
23
-
24
-
25
-
26
-
27
-
28
-
29
-
30
-
31
-
32
-
33
-
34
-
35
-
36
-
37
-
38
-
39
-
40
-
41
-
42
-
43
-
44
-
45
-
46
-
47
-
48
-
49
-
50
-
51
-
52
-
53
-
54
-
55
-
56
-
57
-
58
-
59
-
60
-
61
-
62
-
63
-
64
-
65
-
66
-
67
-
68
-
69
-
70
-
71
-
72
-
73
-
74
-
75
-
76
-
77
-
78
-
79
-
80
-
81
-
82
-
83
-
84
-
85
-
86
-
87
-
88
-
89
-
90
-
91
-
92
-
93
-
94
-
95
-
96
-
97
-
98
-
99
-
100
-
101
-
102
-
103
-
104
-
105
-
106
-
107
-
108
-
109
-
110
-
111
-
112
-
113
-
114
-
115
-
116
-
117
-
118
-
119
-
120
-
121
-
122
-
123
-
124
-
125
-
126
-
127
-
128
-
129
-
130
-
131
-
132
-
133
-
134
-
135
-
 136
136 -
 137
137 -
 138
138 -
 139
139 -
 140
140 -
 141
141 -
 142
142 -
 143
143 -
 144
144 -
 145
145 -
 146
146 -
147
-
148
-
149
-
150
-
151
-
152
-
153
-
154
-
155
-
156
-
157
-
158
-
159
-
160
-
161
-
162
-
163
-
164
-
165
-
166
-
167
-
168
-
169
-
170
-
171
-
172
-
173
-
174
-
175
-
176
-
177
-
178
-
179
-
180
-
181
-
182
-
183
-
184
-
185
-
186
-
187
-
188
-
189
-
190
-
191
-
192
-
193
-
194
-
195
-
196
-
197
-
198
-
199
-
200
-
201
-
202
-
203
-
204
-
205
-
206
-
207
-
208
-
209
-
210
-
211
-
212
-
213
-
214
-
215
-
216
-
217
-
218
-
219
-
220
-
221
-
222
-
223
-
224
-
225
-
226
-
227
-
228
-
229
-
230
-
231
-
232
-
233
-
234
-
235
-
236
-
237
-
238
-
239
-
240
-
241
-
242
-
243
-
244
-
245
-
246
-
247
-
248
-
249
-
250
-
251
-
252
-
253
-
254
-
255
-
256
-
257
-
258
-
259
-
260
-
261
-
262
-
263
-
264
-
265
-
266
-
267
-
268
-
269
-
270
-
271
-
272
-
273
-
274
-
275
-
276
-
277
-
278
-
279
-
280
-
281
-
282
-
283
-
284
-
285
-
286
 |
 |

Cleaning
3-10
Cleaning the Charger Grid
The charger grid is a part located at the bottom of the charger unit, which
also needs to be cleaned. You should use a grid cleaner attaching it to the
printer and pull out the charger unit as instructed below.
1
Take the grid cleaner from protective bag in the new toner kit, and
remove the cap.
The grid cleaner pad is supplied with water soaked. Perform the
following procedure before the pad dries.
2
Attach the grid cleaner to the printer with the pad at the top, as
shown in the figure.
Protective Bag
Cap
Grid Cleaner
Note
Grid Cleaner