Kyocera FS 1900 Operation Guide - Page 47
>Type Adjust, Custom 1, Setting the Paper Weight, Setting the Duplex Path
 |
UPC - 783310458241
View all Kyocera FS 1900 manuals
Add to My Manuals
Save this manual to your list of manuals |
Page 47 highlights
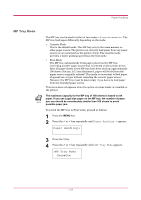
Paper Handling 5 Press the ENTER key. A blinking question mark (?) appears. >Type Adjust > ? Custom 1 6 Press the or key to display the desired paper type. The display changes as shown below. Custom (1 to 8) Plain Transparency Preprinted Labels Bond Recycled Vellum Rough Letterhead Color Prepunched Envelope Cardstock 7 When the paper type to be customized is displayed, press the ENTER key. 8 Press the > key and proceed to Setting the Paper Weight on the following page. Proceed to Setting the Paper Weight and Setting the Duplex Path starting from the following page. 1-33
-
 1
1 -
2
-
3
-
4
-
5
-
6
-
7
-
8
-
9
-
10
-
11
-
12
-
13
-
14
-
15
-
16
-
17
-
18
-
19
-
20
-
21
-
22
-
23
-
24
-
25
-
26
-
27
-
28
-
29
-
30
-
31
-
32
-
33
-
34
-
35
-
36
-
37
-
38
-
39
-
40
-
41
-
 42
42 -
 43
43 -
 44
44 -
 45
45 -
 46
46 -
 47
47 -
 48
48 -
 49
49 -
 50
50 -
 51
51 -
 52
52 -
53
-
54
-
55
-
56
-
57
-
58
-
59
-
60
-
61
-
62
-
63
-
64
-
65
-
66
-
67
-
68
-
69
-
70
-
71
-
72
-
73
-
74
-
75
-
76
-
77
-
78
-
79
-
80
-
81
-
82
-
83
-
84
-
85
-
86
-
87
-
88
-
89
-
90
-
91
-
92
-
93
-
94
-
95
-
96
-
97
-
98
-
99
-
100
-
101
-
102
-
103
-
104
-
105
-
106
-
107
-
108
-
109
-
110
-
111
-
112
-
113
-
114
-
115
-
116
-
117
-
118
-
119
-
120
-
121
-
122
-
123
-
124
-
125
-
126
-
127
-
128
-
129
-
130
-
131
-
132
-
133
-
134
-
135
-
136
-
137
-
138
-
139
-
140
-
141
-
142
-
143
-
144
-
145
-
146
-
147
-
148
-
149
-
150
-
151
-
152
-
153
-
154
-
155
-
156
-
157
-
158
-
159
-
160
-
161
-
162
-
163
-
164
-
165
-
166
-
167
-
168
-
169
-
170
-
171
-
172
-
173
-
174
-
175
-
176
-
177
-
178
-
179
-
180
-
181
-
182
-
183
-
184
-
185
-
186
-
187
-
188
-
189
-
190
-
191
-
192
-
193
-
194
-
195
-
196
-
197
-
198
-
199
-
200
-
201
-
202
-
203
-
204
-
205
-
206
-
207
-
208
-
209
-
210
-
211
-
212
-
213
-
214
-
215
-
216
-
217
-
218
-
219
-
220
-
221
-
222
-
223
-
224
-
225
-
226
-
227
-
228
-
229
-
230
-
231
-
232
-
233
-
234
-
235
-
236
-
237
-
238
-
239
-
240
-
241
-
242
-
243
-
244
-
245
-
246
-
247
-
248
-
249
-
250
-
251
-
252
-
253
-
254
-
255
-
256
-
257
-
258
-
259
-
260
-
261
-
262
-
263
-
264
-
265
-
266
-
267
-
268
-
269
-
270
-
271
-
272
-
273
-
274
-
275
-
276
-
277
-
278
-
279
-
280
-
281
-
282
-
283
-
284
-
285
-
286
 |
 |

Paper Handling
1-33
5
Press the
ENTER
key. A blinking question mark (
?
) appears.
6
Press the
or
key to display the desired paper type. The display
changes as shown below.
Custom
(
1
to
8
)
Plain
Transparency
Preprinted
Labels
Bond
Recycled
Vellum
Rough
Letterhead
Color
Prepunched
Envelope
Cardstock
7
When the paper type to be customized is displayed, press the
ENTER
key.
8
Press the
>
key and proceed to
Setting the Paper Weight
on the
following page.
Proceed to
Setting the Paper Weight
and
Setting the Duplex Path
starting from the following page.
>Type Adjust
>
? Custom 1