Kyocera KM-1500 KM/CS-1500 Operation Guide Rev-2.0 - Page 34
Basic Operation, Notes
 |
View all Kyocera KM-1500 manuals
Add to My Manuals
Save this manual to your list of manuals |
Page 34 highlights
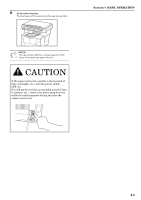
Section 4 BASIC OPERATION 5 Adjusting the copy exposure The copy exposure can be manually adjusted in all of the image quality modes, except for the Auto Exposure Adjustment mode. If you want to make the exposure darker, press the right exposure adjustment key to move the lit indicator to the right. If you want to make the exposure lighter, press the left exposure adjustment key to move the lit indicator to the left. 7 Setting an original Open the original cover and set the original that you want to copy face-down onto the platen. Be sure to align the original flush up against the left rear corner of the platen. NOTE The copy exposure scale can be set to either 5 or 7 levels of adjustment. (See "Exposure Steps" on page 6-1.) 6 Setting the number of copies to be made Press the Number of Copies / Zoom(+) key if you want to increase the number of copies to be made and the Number of Copies / Zoom(-) key if you want to decrease the number of copies to be made. You can also press the Number of Copies / Zoom(-) key for at least 3 seconds to shift the number of copies to be made from "1" up to "99" in one step, or the Number of Copies / Zoom(+) key to shift the number of copies to be made from "99" to "1". Make sure the desired number of copies to be made is shown on the copy quantity/magnification display. The setting can be made to any number up to "99". NOTES • If the optional Document Processor is installed on your copier, set the original(s) in the Document Processor. (See "Document Processor" on page 7-1.) • Shadows may appear around the edges and up the middle of copies made from open-faced originals (such as books, etc.). • When the copier is in a copy-ready state, the optical lamp will be lit. This does NOT indicate trouble with the copier. 8 Start copying Press the Start key. Copying will begin immediately once the Start indicator is lit green. NOTE It is possible for you to limit the number of copies or copy sets that can be made at one time. (See "Copy Limit" on page 6-3.) 4-2
-
 1
1 -
2
-
3
-
4
-
5
-
6
-
7
-
8
-
9
-
10
-
11
-
12
-
13
-
14
-
15
-
16
-
17
-
18
-
19
-
20
-
21
-
22
-
23
-
24
-
25
-
26
-
27
-
28
-
 29
29 -
 30
30 -
 31
31 -
 32
32 -
 33
33 -
 34
34 -
 35
35 -
 36
36 -
 37
37 -
 38
38 -
 39
39 -
40
-
41
-
42
-
43
-
44
-
45
-
46
-
47
-
48
-
49
-
50
-
51
-
52
-
53
-
54
-
55
-
56
-
57
-
58
-
59
-
60
-
61
-
62
-
63
-
64
-
65
-
66
-
67
-
68
-
69
-
70
-
71
-
72
-
73
-
74
-
75
-
76
-
77
-
78
-
79
-
80
-
81
-
82
-
83
-
84
-
85
-
86
-
87
-
88
-
89
-
90
-
91
-
92
 |
 |
