Kyocera TASKalfa 2420w TASKalfa 2420w PrintNet Client Operation Guide - Page 50
Scanning to Mailbox Queue, Printer This is the Email
 |
View all Kyocera TASKalfa 2420w manuals
Add to My Manuals
Save this manual to your list of manuals |
Page 50 highlights
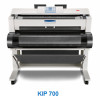
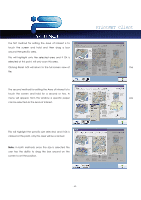
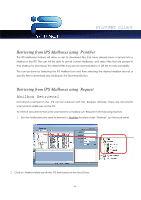
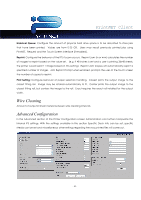
PrintNET Client 6. Insert the file 7. Scan entire file to e-mail or just a specific portion of the file by previewing the file and selecting an area of interest to scan to e-mail. 8. When scan is completed it will appear in the Job Queue and all information that it was created with it will be logged when printed. Scanning to Mailbox Queue With the E-mail Plug in settings in PrintNet set to Move to IPS Mailbox (Hold) from the IPS touch Screen do the following: 1. Select Color Scan to File 2. Select Scan to E-mail (Please note the E-mail shown in the example is NOT the e-mail address this has to be set to, just an example of what could be created for this functionality to work) 3. Enter the e-mail address of the Printer (This is the Email address assigned to the printer by the I/T Admin) 4. Enter the Subject - This can be something simple 5. Or any of the Key words that will allow a specific setting for the output of the file can be entered into the body. - 48 -
-
 1
1 -
2
-
3
-
4
-
5
-
6
-
7
-
8
-
9
-
10
-
11
-
12
-
13
-
14
-
15
-
16
-
17
-
18
-
19
-
20
-
21
-
22
-
23
-
24
-
25
-
26
-
27
-
28
-
29
-
30
-
31
-
32
-
33
-
34
-
35
-
36
-
37
-
38
-
39
-
40
-
41
-
42
-
43
-
44
-
 45
45 -
 46
46 -
 47
47 -
 48
48 -
 49
49 -
 50
50 -
 51
51 -
 52
52 -
 53
53 -
 54
54 -
 55
55 -
56
-
57
-
58
-
59
-
60
-
61
-
62
 |
 |