Kyocera TASKalfa 520i 420i/520i Printer Driver User Guide Rev-10.5 - Page 49
Punching a Print Job, Separation, Rotate Copies
 |
View all Kyocera TASKalfa 520i manuals
Add to My Manuals
Save this manual to your list of manuals |
Page 49 highlights
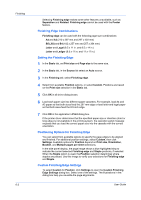
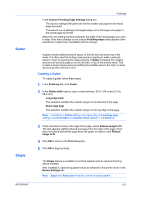
Finishing 2 hole option available in the Finishing tab. 2 & 3 hole 2 hole and 3 hole options available in the Finishing tab (inches based). 2 & 4 hole 2 hole and 4 hole options available in the Finishing tab (metric based). 3 Click OK. Punching a Print Job The finishing device must support the Punch feature. Available punch options are set in the Device Settings tab and depend on the punch unit installed on the device and selected. 1 In the Finishing tab, select Punch. 2 Select the number of hole punches: 2 or 4 hole (metric), or 2 or 3 hole (inches). The print job will be punched by the finishing device and delivered to the output tray. Separation The Separation feature stacks print jobs so that one print job can be distinguished from another. Select Rotate copies to print each copy of a print job at right angles. Select Offset jobs to physically shift each print job in the output tray. To ensure consistent offset stacking, all users printing to the same printing system should select Offset jobs as the default setting. Rotate Copies Rotate copies stacks each copy of a print job at a right angle in the output tray. This feature requires the following: Paper size selections are limited to Letter, A4, 16K, or B5 (JIS). The selected paper size must be loaded into two paper sources, one horizontally and one vertically. The print job must contain multiple pages and be specified to print multiple copies. Rotating Copies Rotate copies stacks each copy of a print job at right angles. 1 In the Basic tab, under Destination, select an option that is not a finishing tray, for example: Top tray (face-down). 2 Select a number of copies greater than 1. 3 Click the Finishing tab, then select Separation > Rotate copies. KX DRIVER 6-5
-
 1
1 -
2
-
3
-
4
-
5
-
6
-
7
-
8
-
9
-
10
-
11
-
12
-
13
-
14
-
15
-
16
-
17
-
18
-
19
-
20
-
21
-
22
-
23
-
24
-
25
-
26
-
27
-
28
-
29
-
30
-
31
-
32
-
33
-
34
-
35
-
36
-
37
-
38
-
39
-
40
-
41
-
42
-
43
-
 44
44 -
 45
45 -
 46
46 -
 47
47 -
 48
48 -
 49
49 -
 50
50 -
 51
51 -
 52
52 -
 53
53 -
 54
54 -
55
-
56
-
57
-
58
-
59
-
60
-
61
-
62
-
63
-
64
-
65
-
66
-
67
-
68
-
69
-
70
-
71
-
72
-
73
-
74
-
75
-
76
-
77
-
78
-
79
-
80
-
81
-
82
-
83
-
84
-
85
-
86
-
87
-
88
-
89
-
90
-
91
-
92
-
93
 |
 |