Lexmark 11N1000 User's Guide - Page 52
Changing Caller ID pattern using the control panel
 |
UPC - 734646043731
View all Lexmark 11N1000 manuals
Add to My Manuals
Save this manual to your list of manuals |
Page 52 highlights
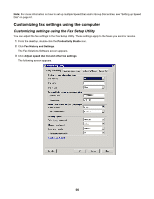
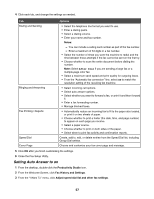
Changing Caller ID pattern using the control panel The printer supports two distinct Caller ID patterns: Pattern 1 (FSK) and Pattern 2 (DTMF). Depending on the country or region you live in and the telecommunications company you subscribe to, you may need to switch the pattern for the printer to display Caller ID information. 1 From the control panel, press Settings. 2 Press or repeatedly until Device Setup appears. 3 Press . 4 Press or repeatedly until Caller ID Pattern appears. 5 Press . 6 Press or repeatedly until the Caller ID pattern setting indicated by an * appears. Note: The number of patterns is defined by the country or region setting and only the number of patterns defined for the selected country or region is shown. 7 If you want to change the Caller ID pattern: a Press or repeatedly until the Caller ID pattern you want appears. b Press to save the setting. Printing fax activity reports using the control panel 1 From the control panel, press Fax Mode. 2 Press . 3 Press or repeatedly until Fax Setup appears. 4 Press . 5 Press or repeatedly until Reports appears. 6 Press . 7 Press or repeatedly until the type of report you want to print appears. 8 Press . 9 Press or repeatedly until the setting you want appears. 10 Press to print the report. Canceling a fax after a document is loaded using the control panel If you have loaded a document into the Automatic Document Feeder (ADF) and the printer roller has started pulling it into the printer, but you have not yet initiated your fax job: 1 Pull the control panel up. 2 Gently lift your original document out of the ADF. 3 Push the control panel down until it snaps into place. 52
-
 1
1 -
2
-
3
-
4
-
5
-
6
-
7
-
8
-
9
-
10
-
11
-
12
-
13
-
14
-
15
-
16
-
17
-
18
-
19
-
20
-
21
-
22
-
23
-
24
-
25
-
26
-
27
-
28
-
29
-
30
-
31
-
32
-
33
-
34
-
35
-
36
-
37
-
38
-
39
-
40
-
41
-
42
-
43
-
44
-
45
-
46
-
 47
47 -
 48
48 -
 49
49 -
 50
50 -
 51
51 -
 52
52 -
 53
53 -
 54
54 -
 55
55 -
 56
56 -
 57
57 -
58
-
59
-
60
-
61
-
62
-
63
-
64
-
65
-
66
-
67
-
68
-
69
-
70
-
71
-
72
-
73
-
74
-
75
-
76
-
77
-
78
-
79
-
80
-
81
-
82
-
83
-
84
-
85
-
86
-
87
-
88
-
89
-
90
-
91
-
92
-
93
-
94
-
95
-
96
-
97
-
98
-
99
-
100
-
101
-
102
-
103
-
104
-
105
-
106
-
107
-
108
-
109
-
110
-
111
-
112
-
113
-
114
-
115
-
116
-
117
-
118
-
119
-
120
-
121
-
122
-
123
-
124
-
125
-
126
-
127
-
128
-
129
-
130
-
131
-
132
-
133
-
134
-
135
-
136
-
137
-
138
-
139
-
140
-
141
-
142
-
143
-
144
-
145
-
146
-
147
-
148
-
149
-
150
-
151
-
152
-
153
-
154
-
155
-
156
-
157
-
158
-
159
-
160
-
161
-
162
-
163
-
164
-
165
-
166
-
167
-
168
-
169
-
170
-
171
 |
 |
