Lexmark 11N1000 User's Guide - Page 84
Connecting a PictBridge-enabled digital camera, Understanding the PictBridge menu, PictBridge Camera
 |
UPC - 734646043731
View all Lexmark 11N1000 manuals
Add to My Manuals
Save this manual to your list of manuals |
Page 84 highlights
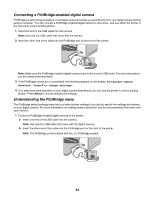
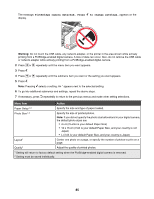
Connecting a PictBridge-enabled digital camera PictBridge is a technology available in most digital cameras that lets you print directly from your digital camera without using a computer. You can connect a PictBridge-enabled digital camera to the printer, and use either the printer or the camera to control printing photos. 1 Insert one end of the USB cable into the camera. Note: Use only the USB cable that came with the camera. 2 Insert the other end of the cable into the PictBridge port on the front of the printer. Note: Make sure the PictBridge-enabled digital camera is set to the correct USB mode. For more information, see the camera documentation. 3 If the PictBridge connection is successful, the following appears on the display: PictBridge Camera detected. Press to change settings. 4 If no selections were specified on your digital camera beforehand, you can use the printer to control printing photos. Press Select to choose default print settings. Understanding the PictBridge menu The PictBridge default settings menu lets you select printer settings if you did not specify the settings beforehand on your digital camera. For more information on making camera selections, see the documentation that came with your camera. 1 Connect a PictBridge-enabled digital camera to the printer. a Insert one end of the USB cable into the camera. Note: Use only the USB cable that came with the digital camera. b Insert the other end of the cable into the PictBridge port on the front of the printer. Note: The PictBridge port is marked with the PictBridge symbol. 84
-
 1
1 -
2
-
3
-
4
-
5
-
6
-
7
-
8
-
9
-
10
-
11
-
12
-
13
-
14
-
15
-
16
-
17
-
18
-
19
-
20
-
21
-
22
-
23
-
24
-
25
-
26
-
27
-
28
-
29
-
30
-
31
-
32
-
33
-
34
-
35
-
36
-
37
-
38
-
39
-
40
-
41
-
42
-
43
-
44
-
45
-
46
-
47
-
48
-
49
-
50
-
51
-
52
-
53
-
54
-
55
-
56
-
57
-
58
-
59
-
60
-
61
-
62
-
63
-
64
-
65
-
66
-
67
-
68
-
69
-
70
-
71
-
72
-
73
-
74
-
75
-
76
-
77
-
78
-
 79
79 -
 80
80 -
 81
81 -
 82
82 -
 83
83 -
 84
84 -
 85
85 -
 86
86 -
 87
87 -
 88
88 -
 89
89 -
90
-
91
-
92
-
93
-
94
-
95
-
96
-
97
-
98
-
99
-
100
-
101
-
102
-
103
-
104
-
105
-
106
-
107
-
108
-
109
-
110
-
111
-
112
-
113
-
114
-
115
-
116
-
117
-
118
-
119
-
120
-
121
-
122
-
123
-
124
-
125
-
126
-
127
-
128
-
129
-
130
-
131
-
132
-
133
-
134
-
135
-
136
-
137
-
138
-
139
-
140
-
141
-
142
-
143
-
144
-
145
-
146
-
147
-
148
-
149
-
150
-
151
-
152
-
153
-
154
-
155
-
156
-
157
-
158
-
159
-
160
-
161
-
162
-
163
-
164
-
165
-
166
-
167
-
168
-
169
-
170
-
171
 |
 |
