Lexmark 13L0180 Lexmark 4227 User's Guide - Page 12
cartridge into the slots in the side frames.
 |
UPC - 734646004817
View all Lexmark 13L0180 manuals
Add to My Manuals
Save this manual to your list of manuals |
Page 12 highlights
Getting Started 6 Insert the ribbon guide over the metal pins on each side of the printhead. Pins 7 Manually move the printhead to the center position. 8 Align and insert the left and right side tabs of the ribbon cartridge into the slots in the side frames. Press down firmly on the ribbon cartridge to snap it into place. 6 Chapter 1: Getting Started
-
 1
1 -
2
-
3
-
4
-
5
-
6
-
 7
7 -
 8
8 -
 9
9 -
 10
10 -
 11
11 -
 12
12 -
 13
13 -
 14
14 -
 15
15 -
 16
16 -
 17
17 -
18
-
19
-
20
-
21
-
22
-
23
-
24
-
25
-
26
-
27
-
28
-
29
-
30
-
31
-
32
-
33
-
34
-
35
-
36
-
37
-
38
-
39
-
40
-
41
-
42
-
43
-
44
-
45
-
46
-
47
-
48
-
49
-
50
-
51
-
52
-
53
-
54
-
55
-
56
-
57
-
58
-
59
-
60
-
61
-
62
-
63
-
64
-
65
-
66
-
67
-
68
-
69
-
70
-
71
-
72
-
73
-
74
-
75
-
76
-
77
-
78
-
79
-
80
-
81
-
82
-
83
-
84
-
85
-
86
-
87
-
88
-
89
-
90
-
91
-
92
-
93
-
94
-
95
-
96
-
97
-
98
-
99
-
100
-
101
-
102
-
103
-
104
-
105
-
106
-
107
-
108
-
109
-
110
-
111
-
112
-
113
-
114
-
115
-
116
-
117
-
118
-
119
-
120
-
121
-
122
-
123
-
124
-
125
-
126
-
127
-
128
-
129
-
130
-
131
-
132
-
133
-
134
-
135
-
136
-
137
-
138
-
139
-
140
-
141
-
142
-
143
-
144
-
145
-
146
-
147
-
148
-
149
-
150
-
151
-
152
-
153
-
154
-
155
-
156
-
157
-
158
-
159
-
160
 |
 |

Chapter 1: Getting Started
6
Getting Started
6
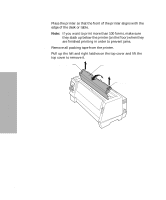
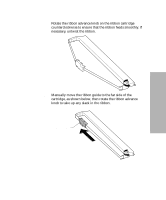
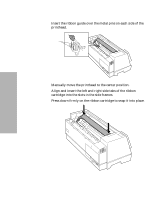
Insert the ribbon guide over the metal pins on each side of the
printhead.
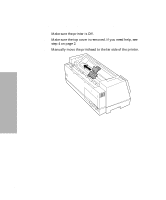
7
Manually move the printhead to the center position.
8
Align and insert the left and right side tabs of the ribbon
cartridge into the slots in the side frames.
Press down firmly on the ribbon cartridge to snap it into place.
Pins