Lexmark 13L0180 Lexmark 4227 User's Guide - Page 83
Set Top of Form, Micro, LineFeed, Store, Ready, Unload, Auto Tear-Off, Press Menu.
 |
UPC - 734646004817
View all Lexmark 13L0180 manuals
Add to My Manuals
Save this manual to your list of manuals |
Page 83 highlights
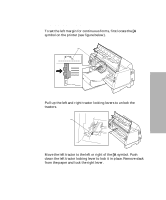
Selecting and Loading Paper 6 Press Menu. Set Top of Form appears on the display. 7 Press any paper movement key (Micro ↓, Micro ↑, or LineFeed) to move the paper to the position you want. The following illustration shows the printer without the ribbon cartridge installed. When the cartridge is not installed, you can easily see the position of the two horizontal white lines on either end of the metal platen bar. Use these lines as your reference point when lining up your TOF. The bottom of a printed character will be even with the white lines. White lines Note: When the ribbon cartridge is installed and the top edge of the paper is even with the top edge of the ribbon, the TOF is set to one line, or 1/6 inch. 8 Press Store to save the position you want. The Ready light comes on solid. Whenever you change the TOF setting, tear off excess continuous forms, then unload and reload the paper by pressing Load/ Unload. This ensures the printer goes to the current TOF setting. Note: When Auto Tear-Off is set to On, the paper advances to the current tear off position. If the tear off position is not correct, see "Auto Tear-Off (Set to On)" on page 79. 77 Chapter 4: Selecting and Loading Paper
-
 1
1 -
2
-
3
-
4
-
5
-
6
-
7
-
8
-
9
-
10
-
11
-
12
-
13
-
14
-
15
-
16
-
17
-
18
-
19
-
20
-
21
-
22
-
23
-
24
-
25
-
26
-
27
-
28
-
29
-
30
-
31
-
32
-
33
-
34
-
35
-
36
-
37
-
38
-
39
-
40
-
41
-
42
-
43
-
44
-
45
-
46
-
47
-
48
-
49
-
50
-
51
-
52
-
53
-
54
-
55
-
56
-
57
-
58
-
59
-
60
-
61
-
62
-
63
-
64
-
65
-
66
-
67
-
68
-
69
-
70
-
71
-
72
-
73
-
74
-
75
-
76
-
77
-
 78
78 -
 79
79 -
 80
80 -
 81
81 -
 82
82 -
 83
83 -
 84
84 -
 85
85 -
 86
86 -
 87
87 -
 88
88 -
89
-
90
-
91
-
92
-
93
-
94
-
95
-
96
-
97
-
98
-
99
-
100
-
101
-
102
-
103
-
104
-
105
-
106
-
107
-
108
-
109
-
110
-
111
-
112
-
113
-
114
-
115
-
116
-
117
-
118
-
119
-
120
-
121
-
122
-
123
-
124
-
125
-
126
-
127
-
128
-
129
-
130
-
131
-
132
-
133
-
134
-
135
-
136
-
137
-
138
-
139
-
140
-
141
-
142
-
143
-
144
-
145
-
146
-
147
-
148
-
149
-
150
-
151
-
152
-
153
-
154
-
155
-
156
-
157
-
158
-
159
-
160
 |
 |
