Lexmark T642 Menus and Messages
Lexmark T642 - Monochrome Laser Printer Manual
 |
UPC - 734646722001
View all Lexmark T642 manuals
Add to My Manuals
Save this manual to your list of manuals |
Lexmark T642 manual content summary:
- Lexmark T642 | Menus and Messages - Page 1
Menus and Messages March 2005 Lexmark and Lexmark with diamond design are trademarks of Lexmark International, Inc., registered in the United States and/or other countries. © 2005 Lexmark International, Inc. All rights reserved. 740 West New Circle Road Lexington, Kentucky 40550 www.lexmark.com - Lexmark T642 | Menus and Messages - Page 2
740 West New Circle Road, Lexington, Kentucky 40550, U.S.A. In the United Kingdom and Eire, send to Lexmark International Ltd., Marketing and Services Department, Westhorpe House, Westhorpe, Marlow Bucks SL7 3RQ. Lexmark may use or distribute any of the information you supply in any way it believes - Lexmark T642 | Menus and Messages - Page 3
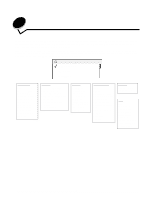
Contents Contents Chapter 1: Using printer menus 4 Understanding the printer operator panel ...5 Menu Groups ...7 Paper Menu ...7 Reports ...14 Settings ...16 Security ...29 Network/Ports ...30 Help ...39 Chapter 2: Understanding printer messages 41 3 - Lexmark T642 | Menus and Messages - Page 4
any time, but they only affect printer function when you have the optional equipment or the specified printer language. Menu Paper Menu Reports Settings Expiration Help Print All L Print Quality Printing Guide Media Guide Print Defects Menu Map Information Guide Connection Guide Moving Guide 4 - Lexmark T642 | Menus and Messages - Page 5
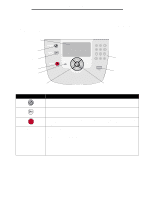
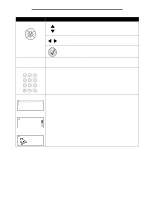
last screen viewed. Note: Changes made on a screen will not be applied if you press the Back button. To open the menu index. Note: The printer must be in the Ready state to access the menu index. A message indicating the menus are unavailable will appear if the - Lexmark T642 | Menus and Messages - Page 6
and print PDF files. Note: A USB port is located on the back of the printer to connect a PC or other peripheral. The numeric pad consists of numbers, a pound and graphics describing the current state of the printer and indicating possible printer problems you must resolve. The top line of the - Lexmark T642 | Menus and Messages - Page 7
Using printer menus Menu Groups Note: An asterisk (*) next to a value indicates the Menu selection Default Source Purpose Identifies the default paper source. Values Tray MP Feeder Env Feeder Manual Paper Manual Env If you loaded the same size and type of paper in two paper sources (and the - Lexmark T642 | Menus and Messages - Page 8
by selecting type and size. Automatically link paper sources. Any sources containing the same type and size of paper are automatically linked by the printer if you have set the Paper Size and the Paper Type to the correct values. Identifies the size of paper installed in the multipurpose feeder - Lexmark T642 | Menus and Messages - Page 9
MP This menu selection is used to configure the multipurpose feeder as another paper tray or manual feeder. If you link the multipurpose feeder with another tray, you can have the printer pull paper from the multipurpose feeder before taking paper from another tray. Menu selection Configure MP - Lexmark T642 | Menus and Messages - Page 10
set the media texture for each of the defined media types. This allows the printer to optimize the print quality for the specified media. Menu selection Plain Texture Transparency Rough Smooth Normal* Rough Shown if Card Stock is supported in the specified input source. Shown if the custom type is - Lexmark T642 | Menus and Messages - Page 11
input source. Shown if the custom type is supported in the specified input source. Paper Loading This menu selection is used to set the loading orientation for each paper type. This lets you load an input source with preprinted media, and then notify the printer that the media is loaded for duplex - Lexmark T642 | Menus and Messages - Page 12
width of the Universal Paper Size. By specifying the height and width for Universal Paper Size, the printer will use the Universal setting exactly like other paper sizes, including support for duplex and n-up. Menu selection Units of Measure Portrait Width Portrait Height Feed Direction Purpose - Lexmark T642 | Menus and Messages - Page 13
Standard Bin* Bin Configure Bins Determines which output bin(s) the printer uses for a particular job. Mailbox* Link Mail Overflow Link though they were one large bin. When one linked bin is full, the printer starts filling the next linked bin, and continues with each additional linked bin. - Lexmark T642 | Menus and Messages - Page 14
Menu Settings Page This menu selection prints a menu settings page. Menu selection Menu Settings Page Purpose Values Prints information relating to the default printer settings and verifies that printer options are installed correctly. After selecting this item, the page will print and the - Lexmark T642 | Menus and Messages - Page 15
item in the Network Menu. Values After selecting this item, the page will print, and the printer will return to Ready. Print Fonts This menu selection prints a list of the fonts stored in the printer. Menu selection Print Fonts Purpose Values Prints a sample of all the fonts available for the - Lexmark T642 | Menus and Messages - Page 16
is not set to 100%. After selecting this item, the page will print, and the printer will return to Ready. Settings Setup Menu Use this menu selection to configure a variety of printer features. Menu selection Display Language Purpose Determines the language of the text displayed on the operator - Lexmark T642 | Menus and Messages - Page 17
does not appear unless Energy Conserve is set to Off. See the User's Guide for more information. Specifies the amount of time after a print job before the printer goes into Power Saver mode. (Your printer may not support the entire range of values.) The factory default Power Saver setting depends on - Lexmark T642 | Menus and Messages - Page 18
Disabled-Disables Print Timeout. 1-255-Specifies the amount of time the printer waits for an end-of-job message before canceling the remainder of the Note: When the timer expires, any partially formatted page still in the printer is printed, and other input ports are examined to see if data exists. - Lexmark T642 | Menus and Messages - Page 19
permanent storage rather than the temporary storage that RAM provides. The resources remain in the flash memory or on the hard disk even when the printer is turned off. RAM* Flash Disk Specifies to store or not store Off* statistical information about your most recent print jobs on the hard disk - Lexmark T642 | Menus and Messages - Page 20
Sets duplexing as the default Off* for all print jobs. Note: You must have an On optional duplex unit installed. Note: Select Duplex from the printer driver to duplex only specific jobs. Defines the way duplexed pages would be bound, and how the printing on the back of the sheet (even-numbered - Lexmark T642 | Menus and Messages - Page 21
For example, if you set Copies to 2, and send three pages to print, the printer prints page 1, page 1, page 2, page 2, page 3, page 3. Prints entire job example, if you set Copies to 2, and send three pages to print, the printer prints page 1, page 2, page 3, page 1, page 2, page 3. Does not insert - Lexmark T642 | Menus and Messages - Page 22
Sets stapling as the default for Off* all print jobs. Note: Only displayed when an On optional finisher is installed. Note: Select stapling from the printer driver if you want to staple only specific jobs. Offsets the output of each print job or each copy of a print job, making it easier to - Lexmark T642 | Menus and Messages - Page 23
is the default setting. Utilities Menu Use this menu selection to change printer settings, remove jobs, set up printer hardware, and troubleshoot printer problems. Menu selection Factory Defaults Purpose Returns printer settings to the factory default values. Values Do Not Restore* Restore Now - Lexmark T642 | Menus and Messages - Page 24
turn off the printer while the hard disk is formatting. No Job Acct Stat Hex Trace Prints a listing of all job statistics stored on the hard disk, or clears all statistics on the disk. Print Clear Helps isolate the source of a Activate print job problem. Print Alignment Coverage Estimator - Lexmark T642 | Menus and Messages - Page 25
Displays all fonts resident in printer RAM when the printer ships from the factory. Displays all fonts downloaded to printer RAM. Displays all fonts special symbols used when printing with a selected font. Symbol sets support the different requirements for languages or specific applications, such as - Lexmark T642 | Menus and Messages - Page 26
text and graphics parallel to the short edge of the paper. Landscape prints text and graphics parallel to the long edge of the paper. The printer sets the amount of space between each line (vertical line spacing) based on the Lines per Page, Paper Size, and Orientation menu items. Select the - Lexmark T642 | Menus and Messages - Page 27
Tray Renumber Purpose Values Configures the printer to work with printer drivers or applications that use different source 199 Assign Man Env: Off* None 0-199 View Factory Def Restore Defaults Off-Printer uses factory default paper source assignments. None-Paper source ignores the Select Paper - Lexmark T642 | Menus and Messages - Page 28
menus HTML Menu This menu selection is used to change the printer HTML settings. Menu selection Font Name Font Size Scale Orientation Margin Backgrounds Purpose Values Sets the default font for HTML documents. Note: Times will be - Lexmark T642 | Menus and Messages - Page 29
it is deleted. Values Off* 2 3 4 5 6 7 8 9 10 Off* 1 hour 4 hours 24 hours 1 week • This menu selection only appears if a hard disk option is installed. • The printer counts the number of times in a row an invalid pin for a user name is entered. • Once the limit is reached, the jobs for that user - Lexmark T642 | Menus and Messages - Page 30
Using printer menus Network/Ports TCP/IP This menu section is use to view and change the Transmission Control Protocol/Internet Protocol settings. Note: This menu is - Lexmark T642 | Menus and Messages - Page 31
automatically calculates the Network Buffer size (recommended setting). User specifies the Network Buffer size. The maximum size depends on the amount of memory in the printer, the size of the other link buffers, and whether Resource Save is set to On or Off. To maximize the range for the Network - Lexmark T642 | Menus and Messages - Page 32
communication, following the conventions defined in the Network Printing Alliance (NPA) Protocol. Note: Changing this menu item automatically resets the printer. Off On Auto* Printer examines the data on the USB port and selects PCL emulation if the data indicates that is the required - Lexmark T642 | Menus and Messages - Page 33
disk are printed before normal processing of incoming jobs resumes. Printer automatically calculates the USB Buffer size (recommended setting). User Buffer size. The maximum size depends on the amount of memory in the printer, the size of the other link buffers, and whether Resource Save is - Lexmark T642 | Menus and Messages - Page 34
automatically calculates the Parallel Buffer size (recommended setting). User specifies the Parallel Buffer size. The maximum size depends on the amount of memory in the printer, the size of the other link buffers, and whether Resource Save is set to On or Off. To maximize the range for the Parallel - Lexmark T642 | Menus and Messages - Page 35
negotiation. Enables bidirectional communication through the parallel interface. May resolve some parallel interface problems. Provides compatibility with most existing parallel interface implementations (recommended setting). Printer does not honor hardware initialization requests from the computer - Lexmark T642 | Menus and Messages - Page 36
automatically calculates the Serial Buffer size (recommended setting). User specifies the Serial Buffer size. The maximum size depends on the amount of memory in the printer, the size of the other link buffers, and whether Resource Save is set to On or Off. To maximize the range for the Serial - Lexmark T642 | Menus and Messages - Page 37
hardware and software handshaking values for the serial interface. Values DTR* DTR/DSR XON/XOFF XON/XOFF/DTR XONXOFF/DTRDSR Determines whether the Off* printer communicates availability to the computer. This menu item only applies to On the serial port if Serial Protocol is set to XON/XOFF - Lexmark T642 | Menus and Messages - Page 38
data. Only data received while the DSR signal is high is treated as valid. NetWare Use this menu selection to view or change the printer NetWare settings. Menu selection View Login Name View Print Mode View Network Number Activate Ethernet 802.2 Ethernet 802.3 Ethernet Type II Ethernet SNAP Packet - Lexmark T642 | Menus and Messages - Page 39
feature. Help This menu selection is used to print some or all of the resident Help menu pages. These pages contain information about printer connectivity, print quality, paper tips, and supplies. Note: If the operator panel is set to a language other than English, French, German, or Spanish - Lexmark T642 | Menus and Messages - Page 40
Print Defect sheet. Prints the Menu Map topic. Prints the Information Guide topic. Prints the Connection Guide topic. Prints the Moving Guide topic. Values After selecting this item, the "Help" menu pages will print, and the printer will return to Ready. After selecting this item, the "Help" menu - Lexmark T642 | Menus and Messages - Page 41
, turn the printer off, unplug the power cord from the wall outlet, and then remove the specified device, and call for service. • Press to clear the message and print without using the device. Clearing job accounting statistics Wait for the message to clear. Close Door or Insert Cartridge • Close - Lexmark T642 | Menus and Messages - Page 42
NOT POWER OFF Formatting Flash DO NOT POWER OFF Hex Trace Insert Staple Cartridge Insert Tray Action • Press to delete all confidential jobs. • Press to clear. Enter the PIN you identified in the driver when you sent the confidential job to the printer. Enter the correct pin number to lock the - Lexmark T642 | Menus and Messages - Page 43
is displayed. Enter the correct PIN. • Load the specified paper in the manual feed tray or multipurpose feeder. • Press to ignore the manual feed request and print on paper already installed in one of the input sources. If the printer finds a tray that has paper of the correct type and size, it - Lexmark T642 | Menus and Messages - Page 44
recognized file types Wait for the message to clear. Note: The only supported file type is PDF. Overflow Bin Full Remove the stack of paper from printer. - If the error recurs, turn the printer off, unplug the power cord from the wall outlet, and remove the specified device, and call for service - Lexmark T642 | Menus and Messages - Page 45
Supported Resetting Active Bin Resetting the Printer printer, r, and then restart the printer. - If the error recurs, turn the printer off, unplug the power cord from the wall outlet, and remove the specified bin, and call for service See the finisher User Guide for instructions to print on other - Lexmark T642 | Menus and Messages - Page 46
32 Replace unsupported toner cartridge Remove the toner cartridge, and install a supported one. 34 Short Paper • Press to clear the message and continue printing. The printer does not automatically reprint the page that prompted the message. • Check tray length and width guides to ensure paper is - Lexmark T642 | Menus and Messages - Page 47
the current job. • Press to stop the defragment operation and continue printing. • Delete fonts, macros, and other data in printer memory. • Install additional printer memory. The printer deleted some held jobs in order to process current jobs. Press until Continue appears, then press to clear the - Lexmark T642 | Menus and Messages - Page 48
Disabled. 56 USB port disabled • Press to clear the message. The printer discards any data received through the USB port. • Make sure the USB Buffer . 56 Standard USB port disabled • Press to clear the message. The printer discards any data received through the USB port. • Make sure the USB - Lexmark T642 | Menus and Messages - Page 49
replacing. • Press to clear the message, and continue printing. • Replace the maintenance items and if necessary, reset the printer maintenance counter. • Replace the toner cartridge. • Press to clear the message and continue printing. 1 Clear the paper path. 2 After clearing the paper path - Lexmark T642 | Menus and Messages - Page 50
1 Turn the printer off. 2 Unplug the power cord from the wall outlet. 3 Check all cable connections. 4 Connect the power cord to a properly grounded outlet. 5 Turn the printer back on. If the service message recurs, call for service, and report the message number and description of the problem. 50 - Lexmark T642 | Menus and Messages - Page 51
Invalid refill, change cartridge 46 31 Defective Print Cartridge 46 32 Replace unsupported toner cartridge 46 32 Unsupported Print Cartridge 46 34 Short Paper 49 80 Scheduled maintenance 49 88 Toner is low 49 900-999 Service 50 A accounting statistics 24 Activate, AppleTalk 39 Activate, LexLink 39 - Lexmark T642 | Menus and Messages - Page 52
Check tray connection 41 Clearing job accounting statistics 41 Close Door or Insert Cartridge 41 Close finisher side door 41 Close Finisher Top Cover 41 Collation, enabling 21 orientation 29 image scaling 29 Information Guide, help 40 Insert Staple Cartridge 42 Insert Tray 42 Install bin 43 52 - Lexmark T642 | Menus and Messages - Page 53
memory to support Resource Save language, printer 19 LexLink 39 Load Manual 43 Load Manual 43 Load Manual 43 Load Manual Manual Envelope Size 9 Manual Envelope Type 9 Manual Paper Size 9 Manual Paper Type 9 Margin, HTML 28 Max Invalid PIN 29 Media Guide, - Lexmark T642 | Menus and Messages - Page 54
44 Printer Language 19 Printer locked, enter PIN to unlock 44 Printing 44 Printing Alignment Page 44 printing annotations 24 Printing from USB drive 44 Printing Guide, help 40 Profiles List 15 Programming Disk 44 Programming Flash 44 Programming System Code 44 Protocol, parallel 35 PS SmartSwitch - Lexmark T642 | Menus and Messages - Page 55
USB Buffer 33 USB Direct interface 33 USB drive removed 46 Utilities Menu 23 V View Address, AppleTalk 39 View Login Name, netware 38 View Name, AppleTalk 39 View Network Number, netware 38 View Nickname, LexLink 39 View Print Mode, netware 38 View supplies 46 W Waiting 46 Index 55
-
 1
1 -
 2
2 -
 3
3 -
 4
4 -
 5
5 -
 6
6 -
 7
7 -
8
-
9
-
10
-
11
-
12
-
13
-
14
-
15
-
16
-
17
-
18
-
19
-
20
-
21
-
22
-
23
-
24
-
25
-
26
-
27
-
28
-
29
-
30
-
31
-
32
-
33
-
34
-
35
-
36
-
37
-
38
-
39
-
40
-
41
-
42
-
43
-
44
-
45
-
46
-
47
-
48
-
49
-
50
-
51
-
52
-
53
-
54
-
55
 |
 |
www.lexmark.com
Menus and Messages
March 2005
Lexmark and Lexmark with diamond design are trademarks of Lexmark International, Inc.,
registered in the United States and/or other countries.
© 2005 Lexmark International, Inc.
All rights reserved.
740 West New Circle Road
Lexington, Kentucky 40550