Marantz SR5002 SR4002_Rear_Panel_Drawing - Page 34
Preference, Surround
 |
View all Marantz SR5002 manuals
Add to My Manuals
Save this manual to your list of manuals |
Page 34 highlights
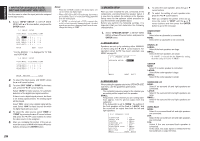
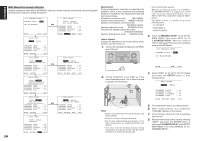
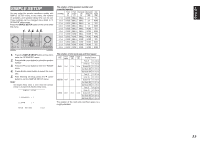
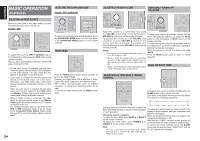
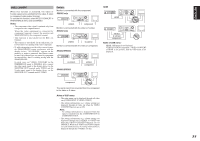
ENGLISH Notes: • If MRAC is started with both speaker settings A and B off, it will enter CANCEL mode without displaying an ERROR on the screen. When this happens, check the SPEAKER setting. • The measured speaker distance may differ from the actual distance from speakers. Nevertheless, the measured value is suitable for the speakers. • To make changes to individual speakers, select 2. SPEAKER SETUP on the SETUP MAIN MENU, then select MANUAL for 2-1 SPEAKER SETUP. • The included microphone is designed specifically for this receiver. Other microphones do not guarantee suitable measurement results. Use the included microphone to conduct measurements. • During measurement, press the ENTER or EXIT button to cancel measurement. • In some rooms, an error may occur during auto speaker setup or it may not be possible to set Speaker distance correctly because of room acoustics. In such case, set the speaker distance by MANUAL setup. • Please set any THX Certified speakers manually to "Small" and the crossover to "80 Hz" after Auto setup operation. • When only HDMI components are connected, OSD will not be displayed. Error Indications During Measurement If trouble occurs during measurement, an error message is displayed on the monitor screen and FL display. Those errors and their remedies are described below. The message appearing on the FL display is given in ( ). MIC SETUP ERROR (MIC SET ERROR) The microphone (MC-10) is not properly connected. → Check the microphone connection. AMBI NOISE ERROR (AMBI NOISE ER) Measurement cannot be done correctly because of excessive ambient noise. → Either temporarily turn off power to noisy devices such as air conditioning or move them out of the room. → Retry measurement when the room is quiet. SPEAKER SET ERROR (SPK SET ERROR) The speakers are not properly connected. → Recheck speaker layout and connections. 3 PREFERENCE 3 PREFERENCE STANDBY MODE TV-AUTO OSD INFO : ECONOMY : : ENABLE VIDEO CONVERT HDMI : ENABLE DC TRIGGER MAIN EXIT 1. Select "PREFERENCE" in the SETUP MAIN MENU with the 3 or 4 cursor buttons, and press the ENTER button. 2. To select a desired content, press the 3 or 4 cursor buttons. STANDBY MODE: When this function is set to "ECONOMY", you can reduce the power consumption when the unit is in the standby mode. Note: TV-AUTO and RS-232C are disabled in the "ECONOMY" setting (SR5002 only). TV AUTO: Select the TV AUTO ON/OFF function to enable or disable with the 1 or 2 cursor buttons. OSD Info: Select the OSD information function to enable or disable with the 1 or 2 cursor buttons. If you select "ENABLE", the unit will display the status of the feature (Volume up/down, input select, etc..) on the TV monitor. But if you do not desire this information, select "DISABLE". VIDEO CONVERT: Select the VIDEO CONVERT function to enable or disable with the 1 or 2 cursor buttons. (Video cable connection: Refer to page 20) 3-1 VIDEO CONVERT TV : ON DVD : ON VCR : ON DSS : ON AUX1 : ON MAIN RETURN EXIT After you complete this portion of the set up, move the cursor to "MAIN" with the 3 or 4 cursor buttons and press the ENTER button. HDMI AUDIO: This setting determines whether to playback audio input to the HDMI jacks through the unit or output it through the unit to a TV or projector. ENABLE: The audio input to the HDMI jacks can be played back by this unit. In such case, audio signals are not output to the TV or projector. THROUGH: The audio input to the HDMI jacks is not output from the speaker terminals of the unit. Audio data is output directly to the TV or projector. This setting is used to listen to audio on a multi channel TV, etc. DC TRIGGER: Select "DC TRIG SETUP" in the SETUP MAIN MENU with 3 or 4 cursor button, and press the ENTER button. 3-2 DC TIRGGER SETUP DC TRIG DISABLE TV : DVD : VCR : DSS : AUX1 : TAPE : CD/R : AUX2 : TUNER: 7.1CH: MAIN RETURN EXIT You can select MAIN ROOM, MULTI ROOM, REMOTE or DISABLE by pressing 1 or 2 cursor buttons. Notes: • REMOTE is available for the external control. The RC5001SR cannot operate this function. • To select desired input source , press 3 or 4 cursor button. • To set ON or OFF, press 1 or 2 cursor button. • After you complete this portion of the set up, move the cursor to "MAIN" with the 3 or 4 cursor buttons and press the ENTER button. 4 SURROUND 4 SURROUND SURR.MODE :AUTO HT-EQ :OFF LFE LEVEL : MAIN EXIT 1. Select "SURROUND" in the SETUP MAIN MENU with the 3 or 4 cursor buttons, and press the ENTER button. 2. To select a desired content , press the 3 or 4 cursor buttons. SURR.MODE: Select the desired surround mode with the 1 or 2 cursor buttons. HT-EQ: Select to active the HT-EQ with the 1 or 2 cursor buttons. The tonal balance of a film soundtrack will be excessively bright and harsh when played back over audio equipment in the home. This is because film soundtracks were designed to be played back in large movie theater environments. Activating the HT-EQ feature when watching a film made for movie theaters corrects this and restores the correct tonal balance. The HT-EQ feature is available except in the following modes. • 7.1 CH INPUT • PURE-DIRECT • SOURCE DIRECT • When VIRTUAL is set for the surround mode LFE LEVEL: Select the output level of the LFE signal included in the Dolby Digital signal or the DTS signal. Select 0 dB, -10 dB or OFF with the 1 or 2 cursor buttons. After you complete this portion of the set up, move the cursor to "MAIN" with the 3 or 4 cursor buttons and press the ENTER button. 31
-
 1
1 -
2
-
3
-
4
-
5
-
6
-
7
-
8
-
9
-
10
-
11
-
12
-
13
-
14
-
15
-
16
-
17
-
18
-
19
-
20
-
21
-
22
-
23
-
24
-
25
-
26
-
27
-
28
-
 29
29 -
 30
30 -
 31
31 -
 32
32 -
 33
33 -
 34
34 -
 35
35 -
 36
36 -
 37
37 -
 38
38 -
 39
39 -
40
-
41
-
42
-
43
-
44
-
45
-
46
-
47
-
48
-
49
-
50
-
51
-
52
-
53
-
54
-
55
-
56
-
57
-
58
-
59
-
60
 |
 |