Marantz SR5002 SR4002_Rear_Panel_Drawing - Page 45
Tuner - blinking standby
 |
View all Marantz SR5002 manuals
Add to My Manuals
Save this manual to your list of manuals |
Page 45 highlights
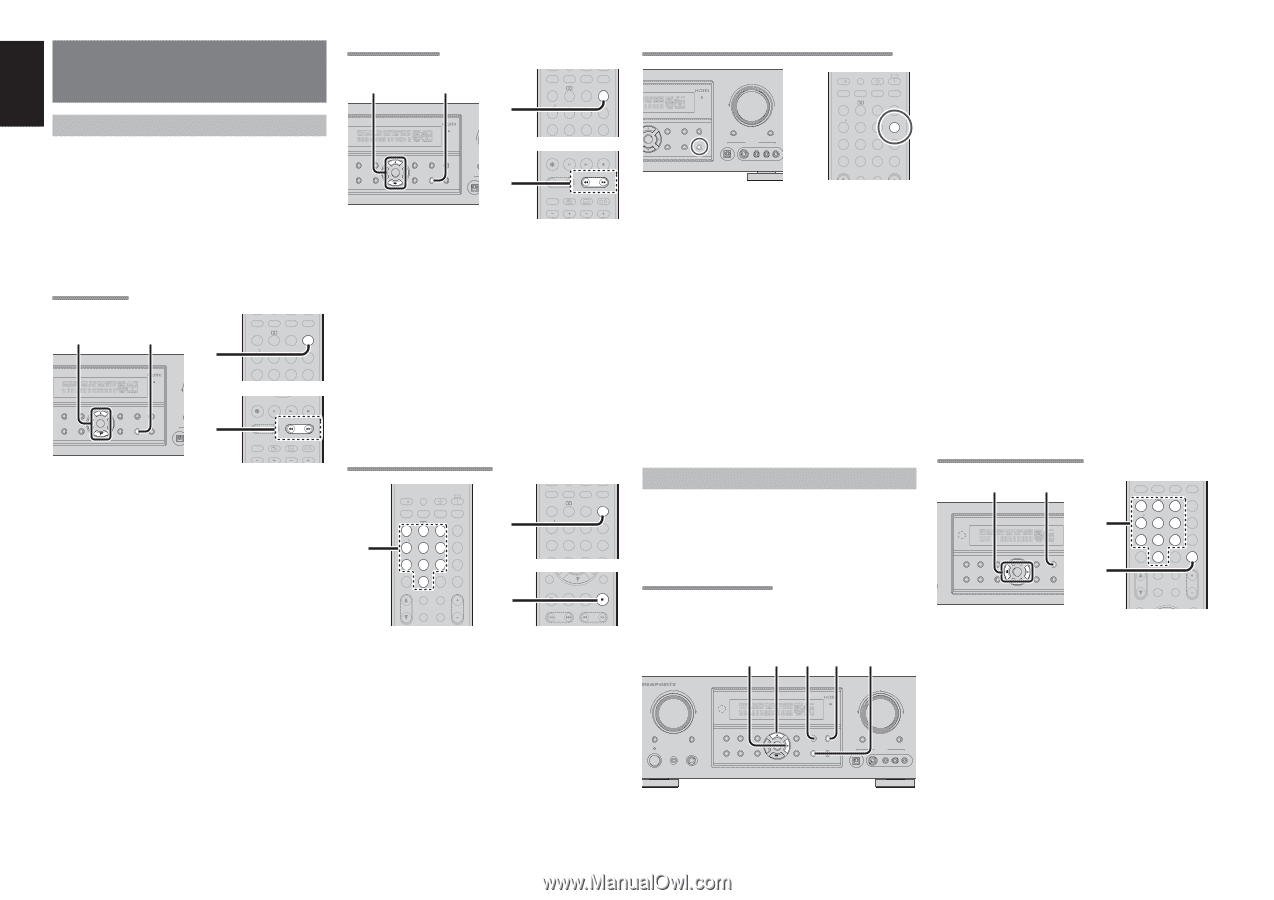
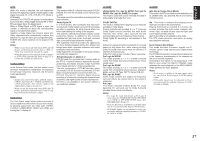
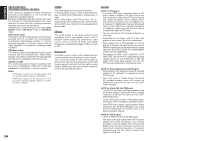
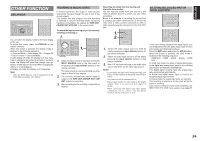
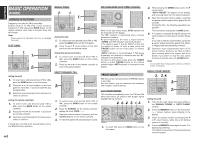
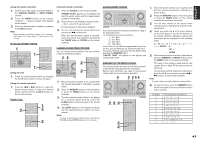
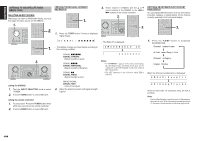
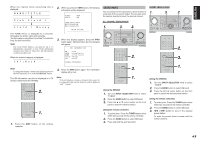
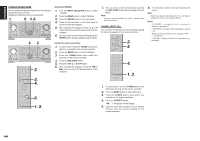
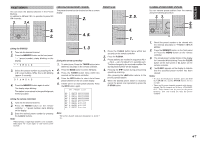
ENGLISH BASIC OPERATION (TUNER) LISTENING TO THE TUNER Frequency scan step for AM is selectable. Default setup is 10 kHz step, if your country's standard is 9 kHz step, press BAND button on the remote controller more than 6 seconds. Scan step will change. Note: Preset memory for the tuner will clear by changing this setup. AUTO TUNING 2. 1. 1. D PURE DIRECT SIMPLE SETUP HT-EQ MENU ENTER DISPLAY MEMORY CLEAR EXIT BAND T-MODE DOWN M DIGITAL 2. SLEEP DISPLAY P.DIRECT SURROUND AUTO 12 LIP SYNC/ dts INPUT 3 BAND CS EX/ES VIRTUAL T.MODE 456 M-CH ST 7 STEREO 8 NIGHT 9 P.SCAN REC T.DISP PTY F.DIRECT - PRESET + - TUNING + DISC+ ANGLE SUB TITLE AUDIO CH-SEL V-OFF ATT. (Using the unit) 1. To select tuner and desired band (FM or AM), press the BAND button on the front panel. 2. Press the 3 or 4 cursor buttons on the front panel for more than 1 second to start the auto tuning function. 3. Automatic searching begins then stops when a station is tuned in. (Using the remote controller) 1. To select tuner and desired band (FM or AM), press the BAND button on the remote controller. 2. Press the 5 or 6 for more than 1 second on the remote controller. 3. Automatic searching begins then stops when a station is tuned in. If tuning does not stop at the desired station, use to the "Manual tuning" operation. 42 MANUAL TUNING 2. 1. 1. DOWN SLEEP DISPLAY P.DIRECT SURROUND AUTO 12 LIP SYNC/ dts INPUT 3 BAND CS EX/ES VIRTUAL T.MODE 456 M-CH ST 7 STEREO 8 NIGHT 9 P.SCAN D PURE DIRECT SIMPLE SETUP HT-EQ MENU ENTER DISPLAY MEMORY CLEAR EXIT BAND T-MODE M DIGITAL 2. REC T.DISP PTY F.DIRECT - PRESET + - TUNING + DISC+ ANGLE SUB TITLE AUDIO CH-SEL V-OFF ATT. BASS TREBLE (Using the unit) 1. To select tuner and desired band (FM or AM), press the BAND button on the front panel. 2. Press the 3 or 4 cursor buttons on the front panel to select the desired station. (Using the remote controller ) 1. To select tuner and desired band (FM or AM), press the BAND button on the remote controller. 2. Press the 5 or 6 on the remote controller to tune in the desired station. DIRECT FREQUENCY CALL 3. SOURCE l/ SET SLEEP DISPLAY OFF ON P.DIRECT SURROUND AUTO 12 LIP SYNC/ dts INPUT 3 CS EX/ES VIRTUAL T.MODE 456 M-CH ST 7 STEREO 8 NIGHT 9 P.SCAN 7.1CH IN A/D HT-EQ CL 0 +10 MEMO CH/ CAT SPKR A/B MUTE VOLUME MULTI/ CAT M-SPKR 1. 2. SLEEP DISPLAY P.DIRECT SURROUND AUTO 12 LIP SYNC/ dts INPUT 3 BAND CS EX/ES VIRTUAL T.MODE 456 M-CH ST 7 STEREO 8 NIGHT 9 P.SCAN 7.1CH IN A/D HT-EQ /SET UP EXIT REC T.DISP PTY F.DIRECT - PRESET + - TUNING + 1. To select tuner and desired band (FM or AM), press the BAND button on the remote controller. 2. Press the F.DIRECT on the remote controller, display will show "FREQ - - - -". 3. Input your desired station's frequency with the numeric buttons on the remote controller. 4. The desired station will automatically be tuned. (FM) TUNING MODE (AUTO STEREO OR MONO) VOLUME ENTER DISPLAY MEMORY CLEAR EXIT BAND T-MODE DOWN UP MUTE ATT DIGITAL AUX 1 INPUT S-VIDEO VIDEO L AUDIO R SOURCE l/ SET SLEEP DISPLAY OFF ON P.DIRECT SURROUND AUTO 12 LIP SYNC/ dts INPUT 3 CS EX/ES VIRTUAL T.MODE 456 M-CH ST 7 STEREO 8 NIGHT 9 P.SCAN 7.1CH IN A/D HT-EQ CL 0 +10 MEMO CH/ CAT SPKR A/B MUTE VOLUME When in the auto stereo mode, AUTO indicator will be illuminated on the display. The "ST" indicator is illuminated when a stereo broadcast is tuned in. At open frequencies, the noise is muted and the "TUNED" and "ST" indicators are not illuminated. If the signal is weak, it may be difficult to tune into the station in stereo. In such a case, press the T-MODE button on the front panel or remote controller. "AUTO" indicator is not illuminated, if FM stereo broadcasts are received in monaural and the "ST" indicator is not illuminated. To return to auto stereo mode, press the T-MODE button or press T-MODE button on the remote controller again. AUTO indicator is illuminated on the display. PRESET MEMORY With this unit you can preset up to 50 FM/AM stations in any order. For each station, you can memorize the frequency and reception mode if desired. AUTO PRESET MEMORY This function automatically scans the FM and AM band and enters all stations with proper signal strength into the memory. 2. 4. 2. 5. 1. 3. AV SURROUND RECEIVER SR5002 INPUT SELECTOR VOLUME MULTI MULTI SPEAKER STANDBY POWER ON/STANDBY SETUP MIC PHONES SURROUND MODE PURE DIRECT SIMPLE SETUP AUTO HT-EQ MENU ENTER DISPLAY MEMORY CLEAR EXIT BAND T-MODE DOWN UP MUTE ATT DIGITAL AUX 1 INPUT S-VIDEO VIDEO L AUDIO R 1. To select FM, press the BAND button on the front panel. 2. While pressing the MEMO button, press the 2 cursor button. "AUTO PRESET" will appear on the display, and scanning starts from the lowest frequency. 3. Each time the tuner finds a station, scanning will pause and the station will be played for five seconds. During this time, the following operations are possible. The band can be changed by the BAND button. 4. If no button is pressed during this period, the current station is memorized in location Preset 02. If you wish to skip the current station, press the 3 cursor button during this period, this station is skipped and auto presetting continues. 5. Operation stops automatically when all 50 preset memory positions are filled or when auto scanning attains the highest end of all bands. If you desire to stop the auto preset memory at anytime, press the CLEAR button. Note: It is possible that existing preset memory positions will be overwritten. MANUAL PRESET MEMORY 3. 2. 4. CEIVER SR5002 3. SURROUND MODE PURE DIRECT SIMPLE SETUP AUTO HT-EQ MENU ENTER DISPLAY MEMORY EXIT BAND T 2. SLEEP DISPLAY P.DIRECT SURROUND AUTO 12 LIP SYNC/ dts INPUT 3 CS EX/ES VIRTUAL T.MODE 456 M-CH ST 7 STEREO 8 NIGHT 9 P.SCAN 7.1CH IN A/D HT-EQ CL 0 +10 MEMO CH/ CAT SPKR A/B MUTE VOLUME MULTI/ CAT M-SPKR INFO MENU (Using the unit) 1. Tune into the radio station you desire (Refer to the "MANUAL TUNING" or "AUTO TUNING" section). 2. Press the MEMORY button on the front panel. "- -" (preset number) starts blinking on the display. 3. Select the preset number by pressing the 1 or 2 cursor buttons, while this is still blinking (approx. 5 seconds) 4. Press the MEMORY button again to enter. The display stops blinking. The station is now stored in the specified preset memory location.
-
 1
1 -
2
-
3
-
4
-
5
-
6
-
7
-
8
-
9
-
10
-
11
-
12
-
13
-
14
-
15
-
16
-
17
-
18
-
19
-
20
-
21
-
22
-
23
-
24
-
25
-
26
-
27
-
28
-
29
-
30
-
31
-
32
-
33
-
34
-
35
-
36
-
37
-
38
-
39
-
 40
40 -
 41
41 -
 42
42 -
 43
43 -
 44
44 -
 45
45 -
 46
46 -
 47
47 -
 48
48 -
 49
49 -
 50
50 -
51
-
52
-
53
-
54
-
55
-
56
-
57
-
58
-
59
-
60
 |
 |